Manage Storj Storage — Sync and Backup Files with RcloneView
RcloneView gives you a full-featured GUI to sync, backup, and manage your Storj decentralized cloud storage without writing a single command.
Storj is a decentralized object storage platform that distributes encrypted file fragments across a global network of nodes. Teams managing sensitive data — medical records, financial archives, or creative assets — choose Storj for its built-in encryption and resilience. With RcloneView, you can connect your Storj buckets and manage them visually alongside all your other cloud accounts.

Manage & Sync All Clouds in One Place
RcloneView is a cross-platform GUI for rclone. Compare folders, transfer or sync files, and automate multi-cloud workflows with a clean, visual interface.
- One-click jobs: Copy · Sync · Compare
- Schedulers & history for reliable automation
- Works with Google Drive, OneDrive, Dropbox, S3, WebDAV, SFTP and more
Free core features. Plus automations available.
Connect Storj to RcloneView
RcloneView supports Storj through two connection methods: the native Storj backend and the S3-compatible endpoint. For most users, the S3-compatible path is simplest — you generate S3 credentials in the Storj console (Access Key ID, Secret Access Key, and the regional endpoint URL), then add a new remote in RcloneView by selecting Amazon S3 as the provider type and entering those credentials.
The native Storj backend requires an Access Grant token, which you can create in the Storj web UI. Add a new remote, choose Storj as the provider, and paste your Access Grant. Either approach takes under two minutes, and RcloneView stores your credentials securely using encrypted local storage.

Once connected, your Storj buckets appear in the file explorer alongside your other remotes. Browse folders, preview thumbnails, and manage files exactly as you would with any other cloud provider.
Sync and Backup Files to Storj
RcloneView's 4-step sync wizard makes it straightforward to configure recurring backups to Storj. Select a local folder or cloud remote as the source, pick your Storj bucket or subfolder as the destination, give the job a name, and choose sync or copy mode. For a photography studio archiving 2TB of RAW files, a nightly sync job keeps the Storj bucket current without manual intervention.
Enable the checksum option in the advanced settings to verify data integrity — Storj's erasure-coded storage is resilient, but verifying uploads with hash comparison gives an extra layer of confidence. Set the retry count to 3 (the default) to handle transient network interruptions gracefully.

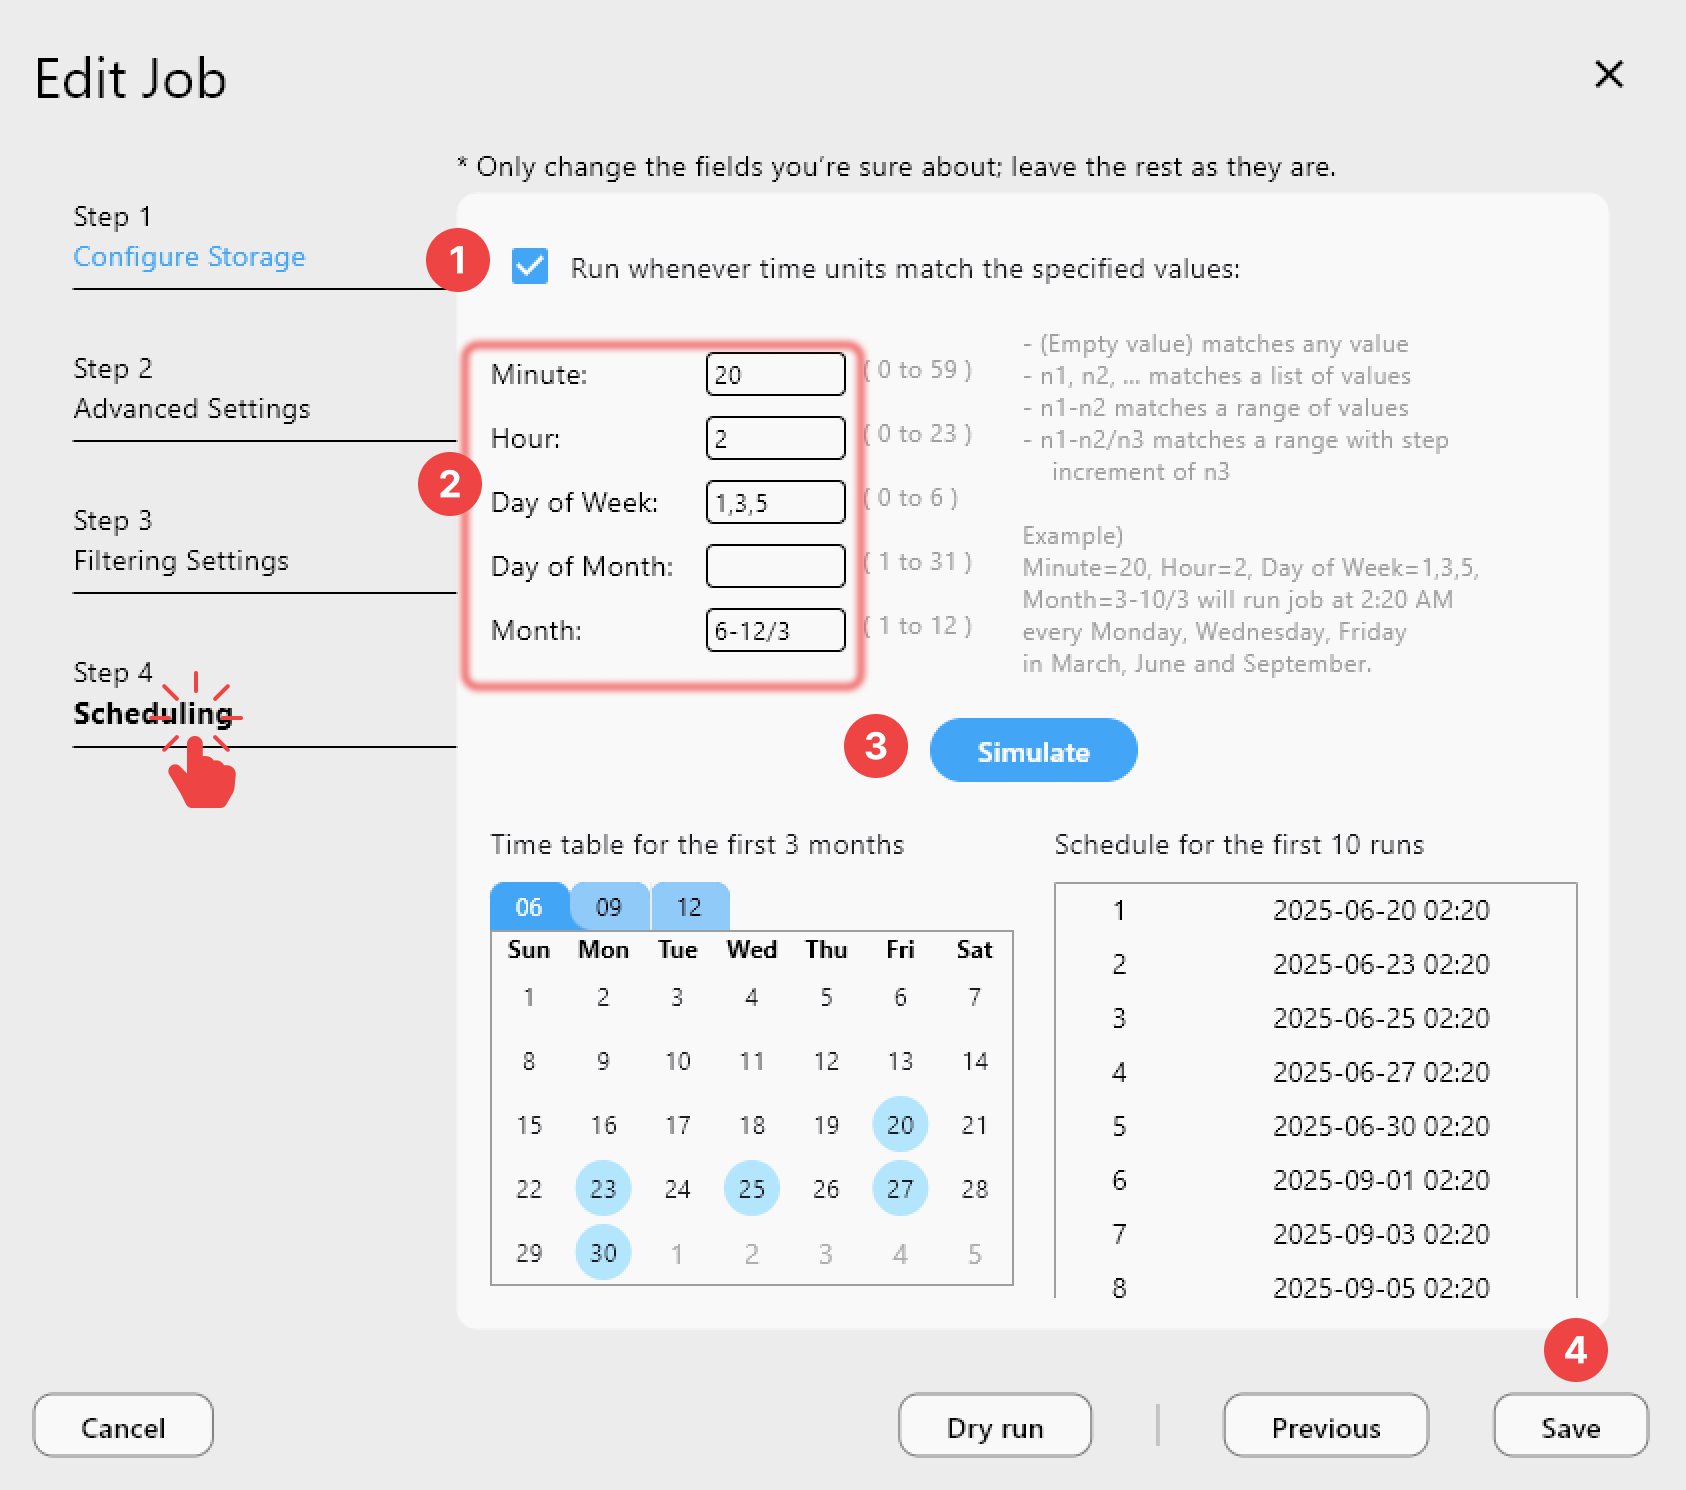
Schedule Automated Storj Backups (PLUS)
With a PLUS license, you can schedule Storj backup jobs using a crontab-style scheduler. Set a daily backup at 2 AM, weekly archival runs, or any custom cadence. RcloneView's Simulate schedule feature previews next execution times before you commit.
Job history tracks every run — start time, duration, bytes transferred, and completion status — so you have a clear audit trail of every file sent to Storj.
Transfer Between Storj and Other Clouds
Storj works well as a secondary off-site copy of data already on Google Drive or Dropbox. RcloneView's dual-panel explorer lets you drag files directly between remotes. For large-scale migrations, use a sync job with the dry run mode to preview what will be transferred before committing.

Getting Started
- Download RcloneView from rcloneview.com.
- Go to Remote tab > New Remote, select Storj or S3-compatible provider.
- Enter your Storj Access Grant or S3-compatible credentials and save.
- Open the file explorer to browse your Storj buckets and create sync jobs.
Storj's decentralized architecture makes it an excellent off-site backup target, and RcloneView makes managing it as easy as any mainstream cloud provider.
Related Guides:
- Manage Amazon S3 Storage — Sync and Backup Files with RcloneView
- Migrate Dropbox to Storj — Transfer Files with RcloneView
- Transfer Between Storj and Google Drive with RcloneView