Manage Synology C2 Storage — Sync and Backup Files with RcloneView
Synology C2 is Synology's purpose-built cloud storage — and with RcloneView you can manage it from a visual interface without writing a single command.
Synology C2 is the cloud storage service designed to extend the ecosystem of Synology NAS owners, offering S3-compatible object storage that integrates seamlessly with rclone-based tools. Whether you run a DiskStation at home, manage a small business file server, or need an additional off-site backup tier, RcloneView makes it straightforward to browse, sync, and automate transfers to and from Synology C2. Because Synology C2 exposes a standard S3-compatible API, you get the same reliable rclone performance you'd expect from any major object storage provider — wrapped in a clean desktop GUI.

Manage & Sync All Clouds in One Place
RcloneView is a cross-platform GUI for rclone. Compare folders, transfer or sync files, and automate multi-cloud workflows with a clean, visual interface.
- One-click jobs: Copy · Sync · Compare
- Schedulers & history for reliable automation
- Works with Google Drive, OneDrive, Dropbox, S3, WebDAV, SFTP and more
Free core features. Plus automations available.
Connecting Synology C2 as an S3-Compatible Remote
Synology C2 Object Storage uses a standard S3-compatible API, so you connect it inside RcloneView by selecting Amazon S3 as the remote type and pointing it at the Synology C2 endpoint. Open the Remote tab, click New Remote, and choose Amazon S3 as the provider. Enter your C2 Access Key ID, Secret Access Key, and the regional endpoint for your C2 account — available in the Synology C2 portal after creating your storage and generating an access key pair. Set the region field to match your C2 region and save.
Once the remote is created, it appears in your Explorer panel just like any other cloud storage. You can browse buckets and folders, inspect file sizes and modification dates, and navigate nested directory trees without leaving the GUI.

Browsing and Transferring Files
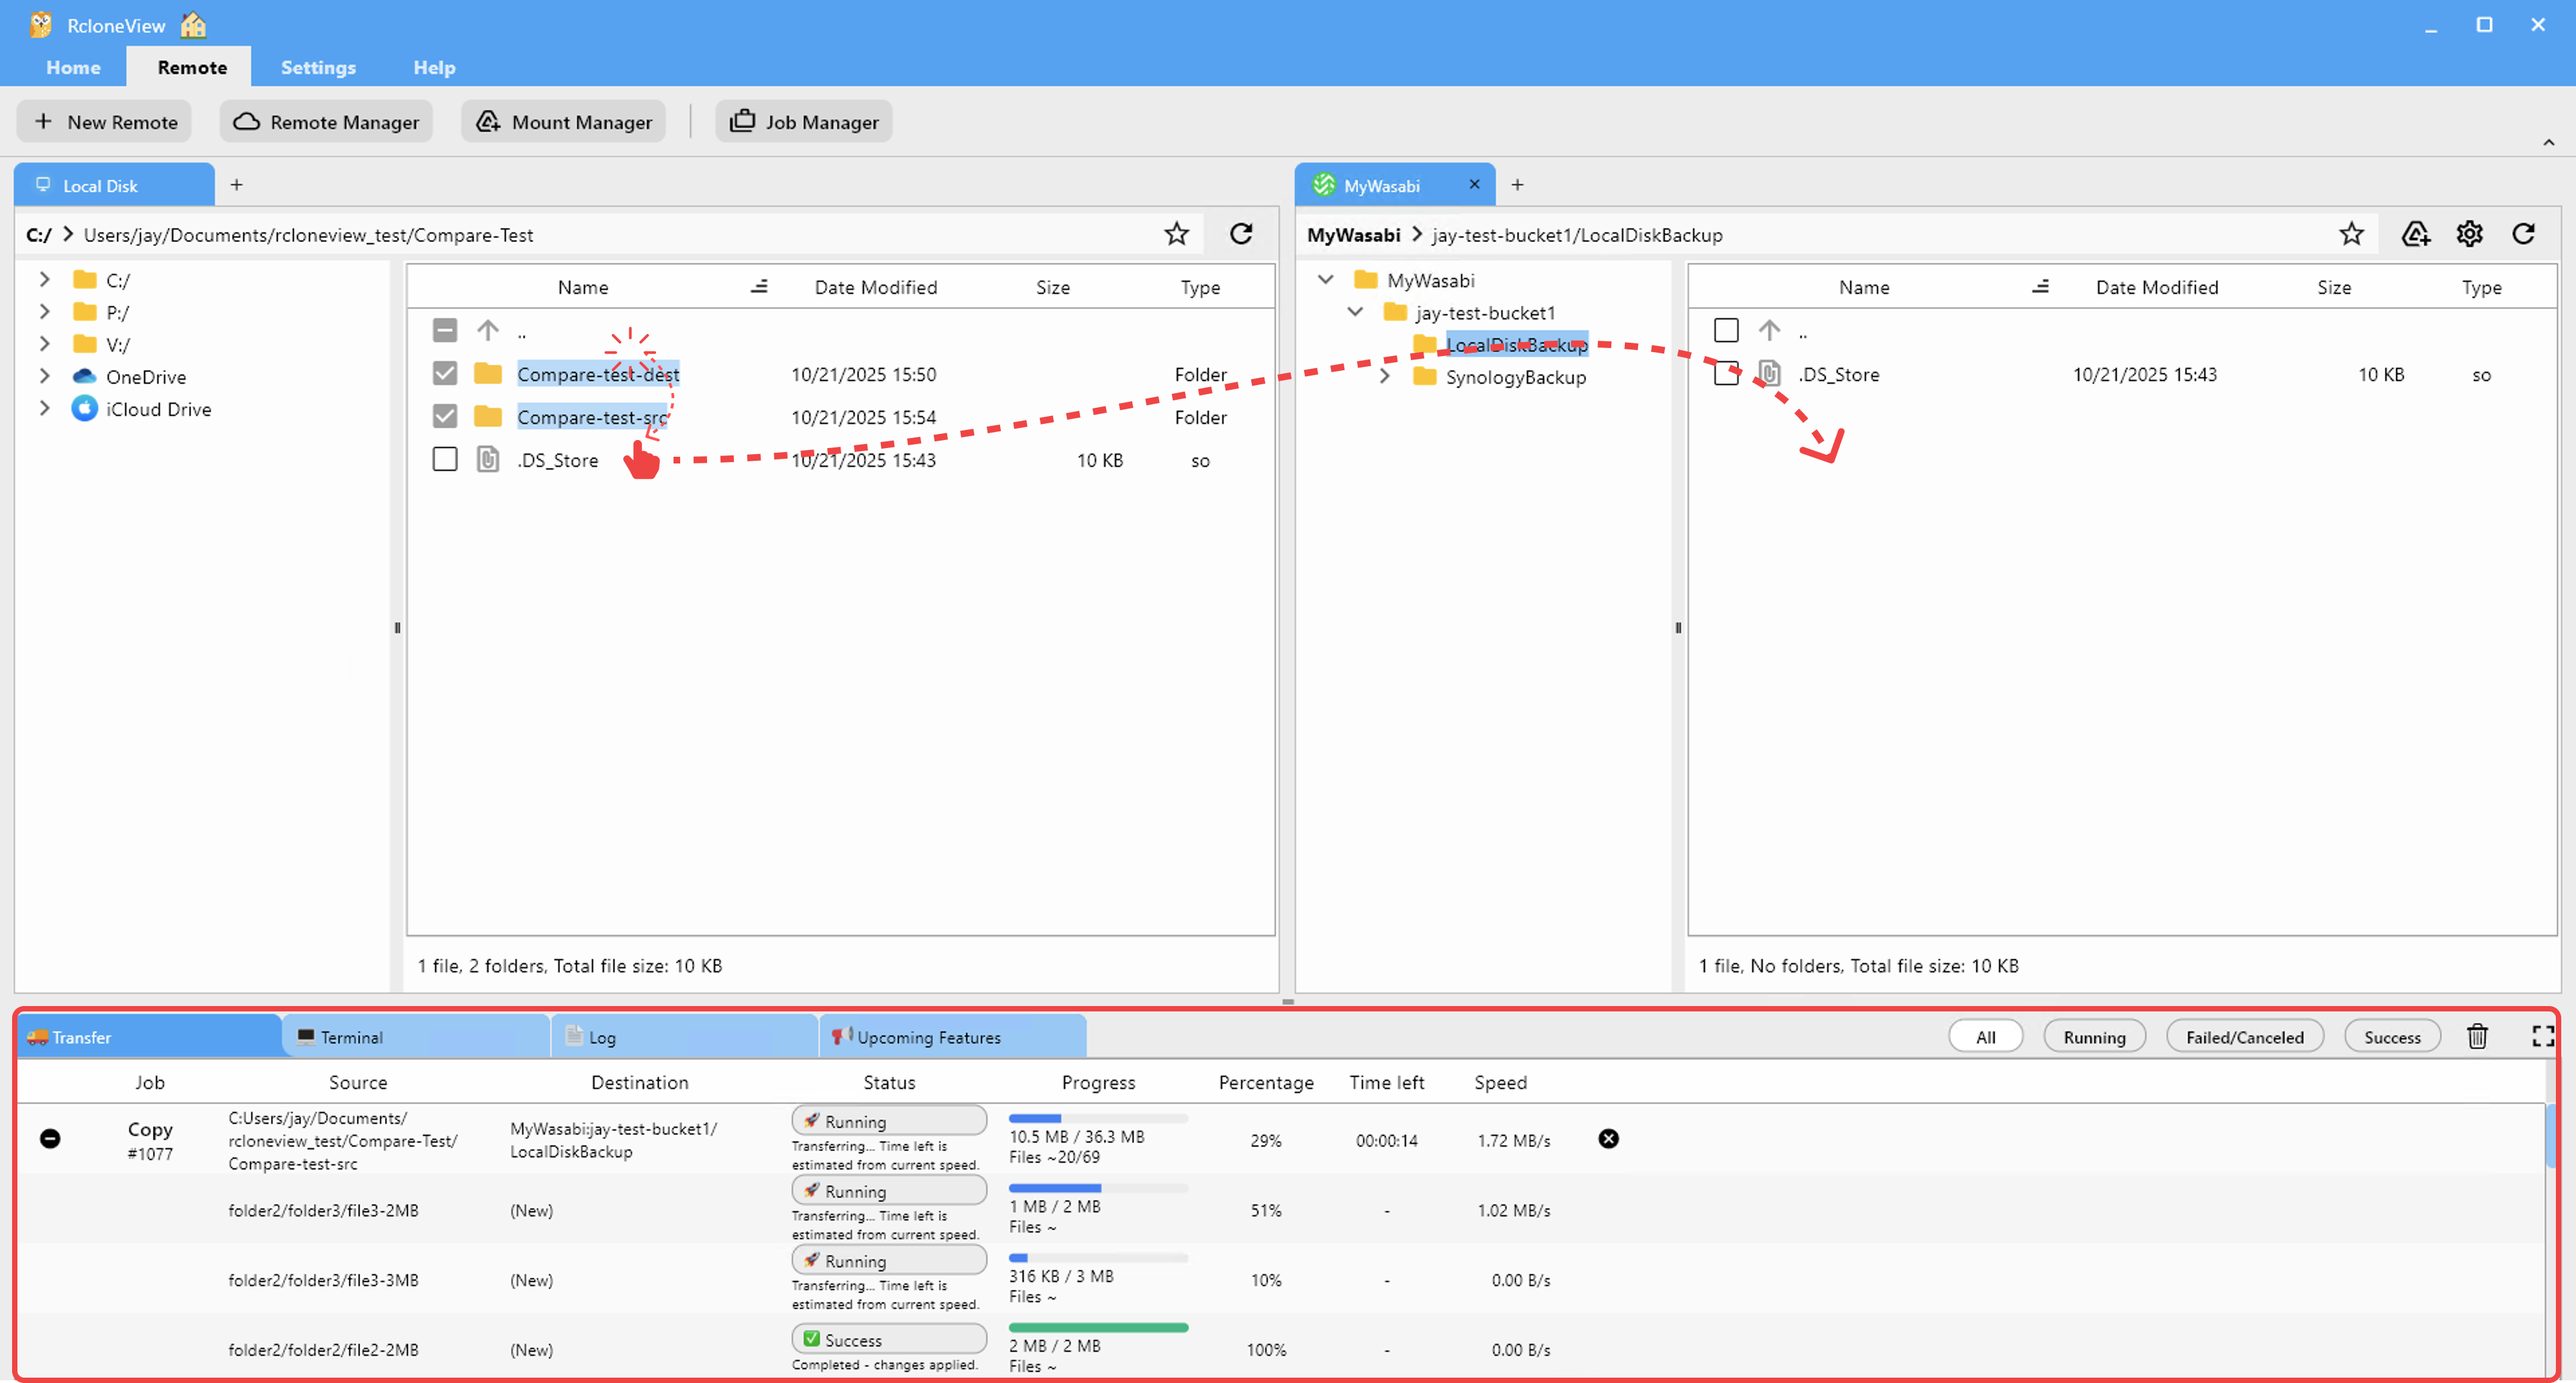
With your Synology C2 remote open in one Explorer panel and a local drive or another cloud in the adjacent panel, you can drag files between them to start an immediate transfer. RcloneView confirms the operation before touching anything, and the Transferring tab at the bottom of the screen shows live progress: file count, bytes transferred, and current throughput.
For large volumes — a photography studio backing up 2 TB of RAW files, for example — RcloneView's multi-threaded engine moves multiple files in parallel. You can configure concurrent transfer streams in the job's Advanced Settings to maximize throughput without saturating your network connection.
Creating Sync Jobs for Ongoing Backup
Beyond one-off transfers, RcloneView's Job Manager lets you define Sync jobs that keep a source folder mirrored to a Synology C2 bucket on demand or on a schedule. Choose Sync as the job type, select your source — a local folder, a Synology NAS remote, or another cloud — point the destination at your C2 bucket, and configure filtering preferences: file age limits, size caps, and extension exclusions are all configurable without editing any config file.
Before the first live sync, run the built-in Dry Run. It shows exactly which files will be copied or removed so there are no surprises when thousands of files are involved. Job History records every execution with timestamps, file counts, transfer sizes, and status codes for a full audit trail.

Scheduling Automated Backups (PLUS License)
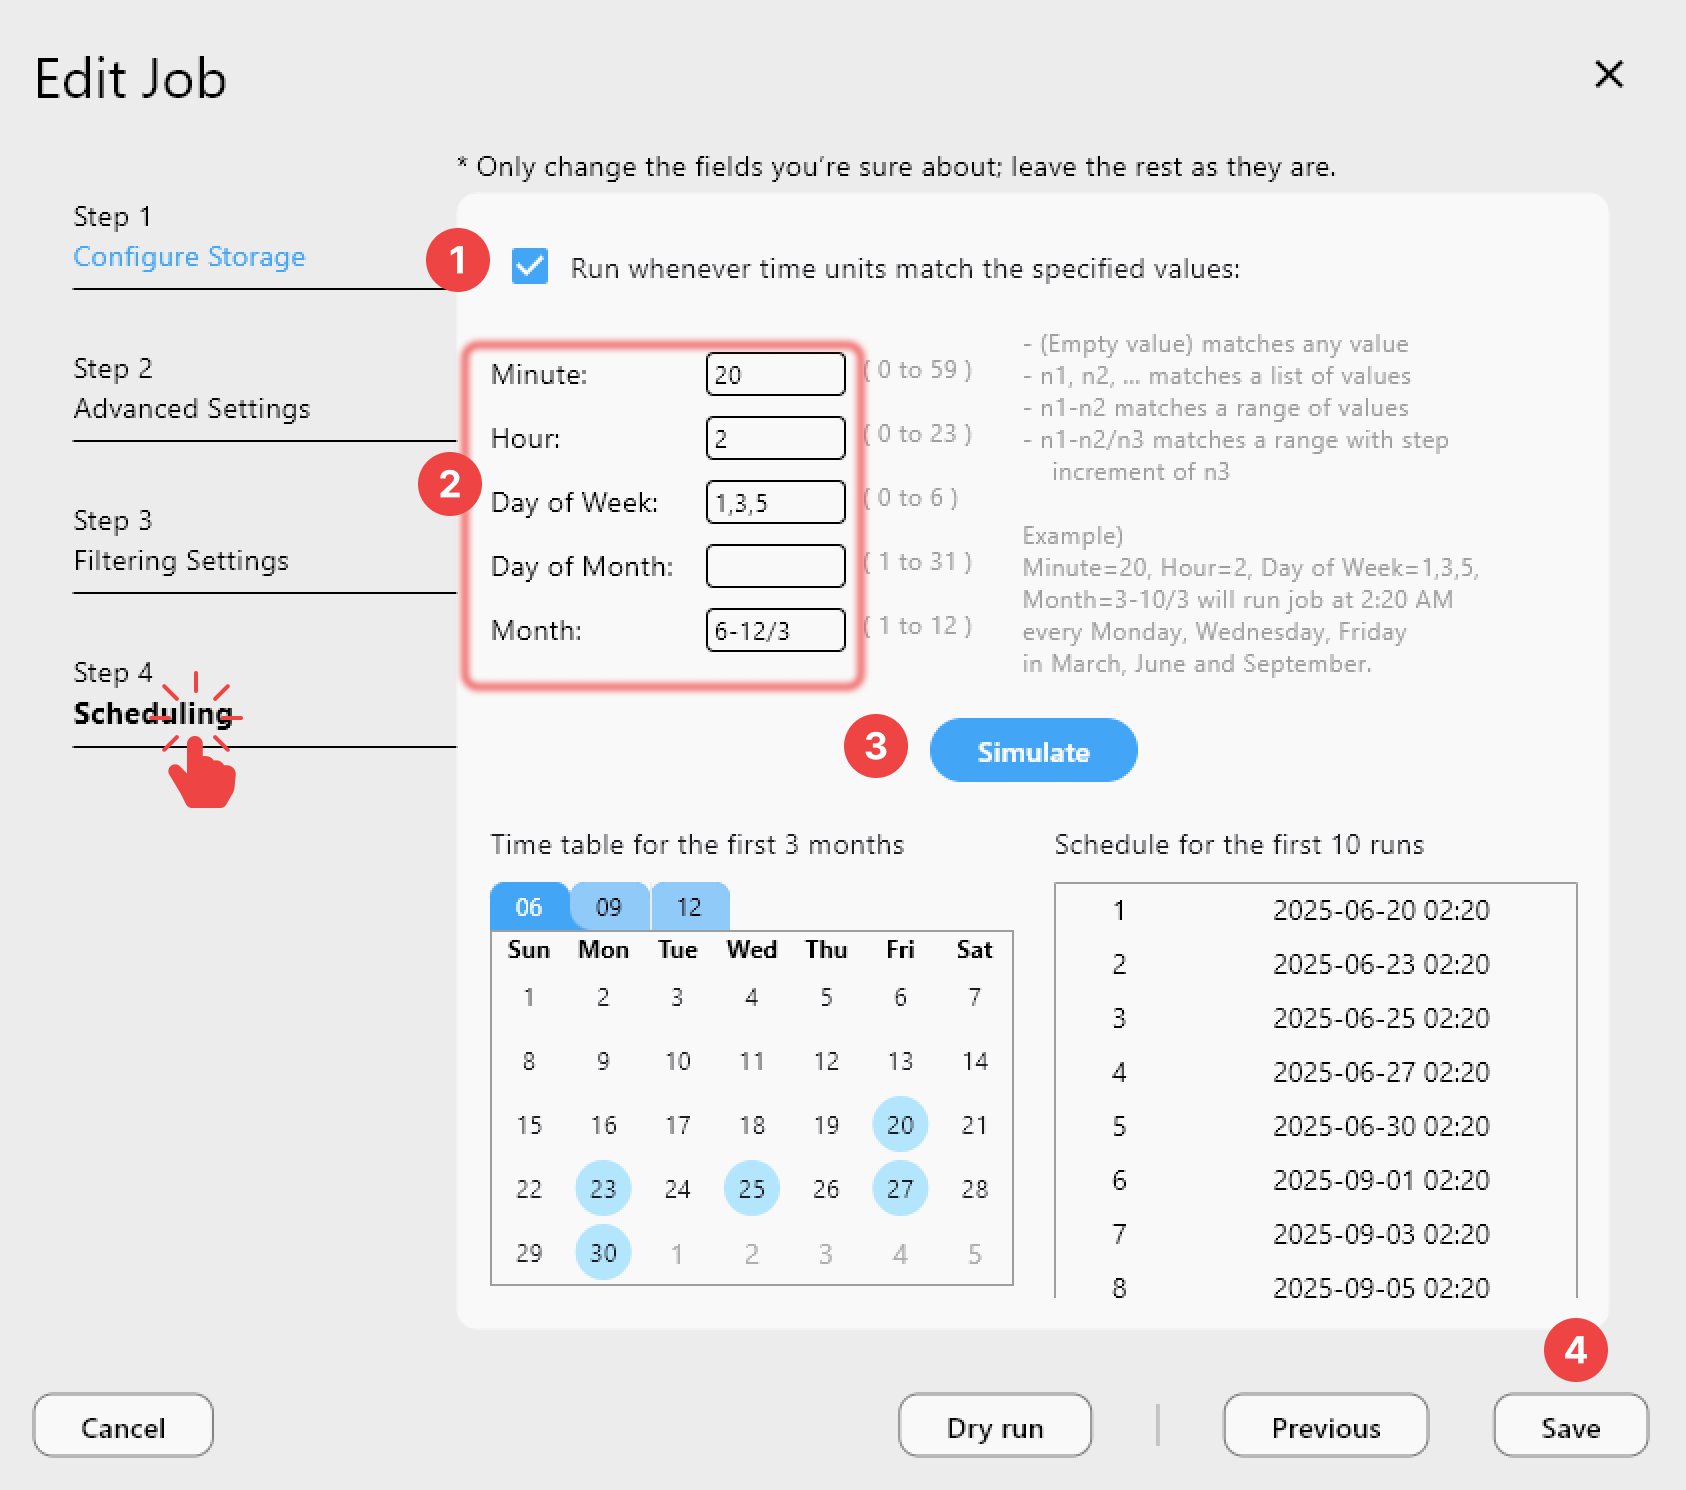
For hands-free data protection, RcloneView's PLUS license unlocks crontab-style scheduling. Set a Synology C2 sync job to run nightly, weekly, or at any custom interval by filling in the Minute, Hour, and Day-of-Week fields in the Schedule step of the job wizard. RcloneView executes the transfer at the configured time and logs the result in Job History — giving you a full audit trail to verify that backups ran and confirming exactly which files were transferred, even when you're away from the machine.
Getting Started
- Download RcloneView from rcloneview.com.
- In the Synology C2 portal, create a storage bucket and generate an access key pair.
- In RcloneView, open the Remote tab > New Remote, choose Amazon S3, and enter your C2 Access Key ID, Secret Access Key, and regional endpoint.
- Open the C2 bucket in an Explorer panel alongside your source, create a Sync job in the Job Manager, and run a Dry Run first.
- Enable scheduling (PLUS license) to automate nightly or weekly backups without manual intervention.
Synology C2 gives you a tightly integrated off-site backup tier — RcloneView turns it into a scheduled, monitored workflow you can set up in minutes.
Related Guides:
- Backup NAS to Multiple Clouds with RcloneView
- Manage Wasabi Cloud Sync and Backup with RcloneView
- Backup Synology Without Hyper Backup — RcloneView