High-Performance File Transfers Between AWS S3 and Cloudflare R2 via External Rclone on EC2
Modern teams often juggle multiple object-storage platforms and quickly discover that bandwidth, latency, and egress fees become critical roadblocks when large datasets travel through a local desktop. Running Rclone directly on a cloud instance—then controlling it through RcloneView—pushes the heavy traffic into the cloud’s high-speed backbone and keeps your laptop out of the data path.
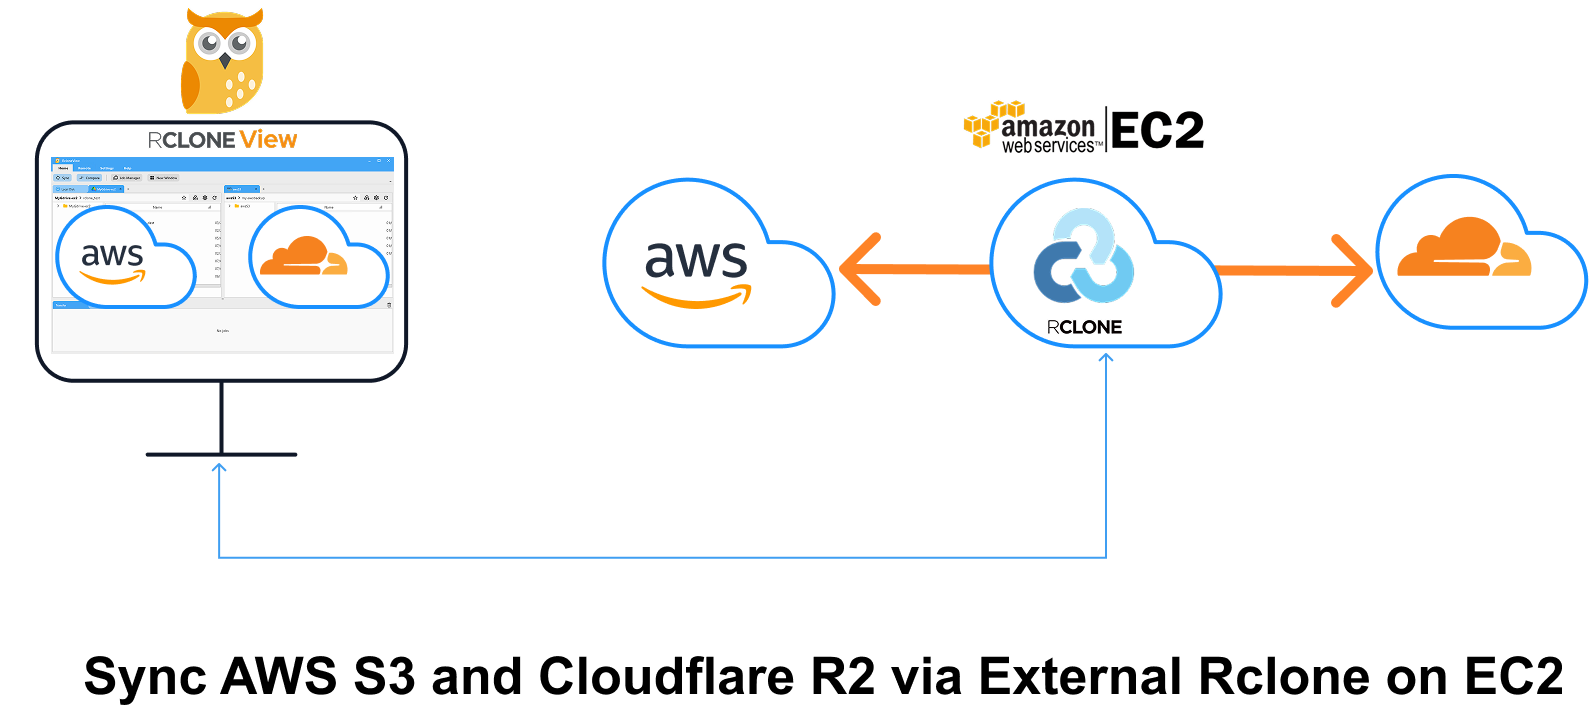
The walkthrough below adapts the layout of the “Sync AWS S3 and Google Drive via EC2” guide and extends it to the S3 ↔ R2 scenario. You will:
- Spin up Rclone as a remote-control daemon (rcd) on an AWS EC2 server.
- Open a separate RcloneView window and connect to that external Rclone.
- Add AWS S3 and Cloudflare R2 remotes inside the EC2-hosted Rclone.
- Transfer, sync, or schedule jobs—entirely cloud-to-cloud—without local bandwidth constraints.
Intra-region traffic within the same Availability Zone is free, but cross-AZ and Internet egress incur costs (typically $0.02/GB AZ-to-AZ; $0.09/GB to the Internet). See: AWS Pricing – Data Transfer
Why Use an External Rclone?
| Local Embedded Rclone | External Rclone on EC2 |
|---|---|
| Traffic path: S3 → local PC → R2 — double hop and throttled by home upload speeds. | Traffic path: S3 → EC2 → R2 — single hop in the cloud’s backbone, often 10-25 Gbit/s. |
| Home ISP caps or asymmetrical bandwidth slow large migrations. | Vastly higher throughput; no local caps. |
| Local CPU and RAM must hash every byte. | Off-loads CPU to a cloud VM; you can pick larger instance sizes on demand. |
| Possible NAT/firewall issues. | Public IP with open port 5572 (or tunnel via SSH). |
Part 1. Deploy Rclone on EC2 (External Rclone)
- Launch an Ubuntu EC2 instance (t3.medium or larger for multi-threaded uploads).
- Open TCP 5572 in the Security Group (or use an SSH tunnel).
- Install Rclone:
curl https://rclone.org/install.sh | sudo bash
- Run the rcd daemon with basic auth:
rclone rcd --rc-addr=0.0.0.0:5572 --rc-user=admin --rc-pass=admin --log-level INFO
The --rc-addr flag exposes HTTP endpoints for RcloneView to call.
- Health-check from your laptop:
curl -u admin:admin -X POST "http://<EC2-IP or DNS-NAME>:5572/rc/noop"
A JSON {} response confirms the daemon is listening.
👉 Learn more: How to Run Rclone on AWS EC2 Server
Part 2. Open a New RcloneView Window
To keep connections organized, RcloneView allows each window to operate with its own Rclone engine.
- Launch RcloneView
- Click the
New Windowbutton from theHomemenu. - A new application window will open. This instance is independent of the main window and will maintain its own connection context.
📌 _You’ll connect this window to your External Rclone (EC2) in the next step..
👉 Learn more: Using Multiple Rclone Connections with New Window.
Part 3. Connect to the EC2-Hosted Rclone
In the newly opened window, follow these steps to connect to your EC2-hosted External Rclone:
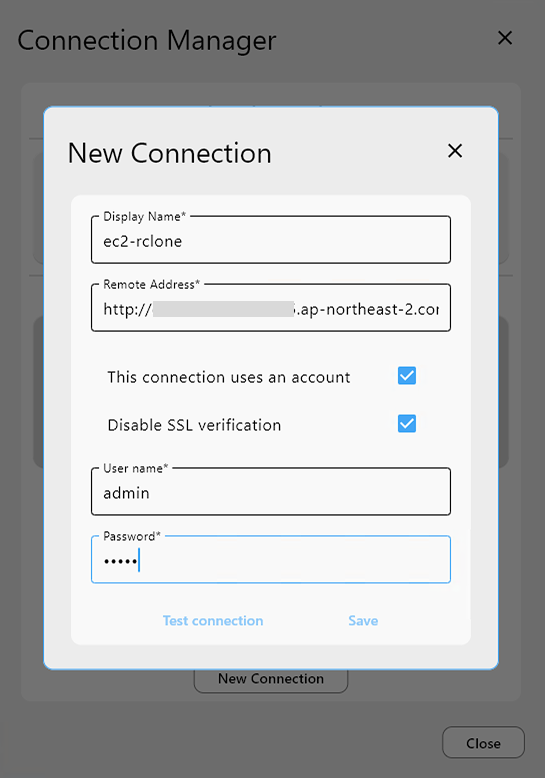
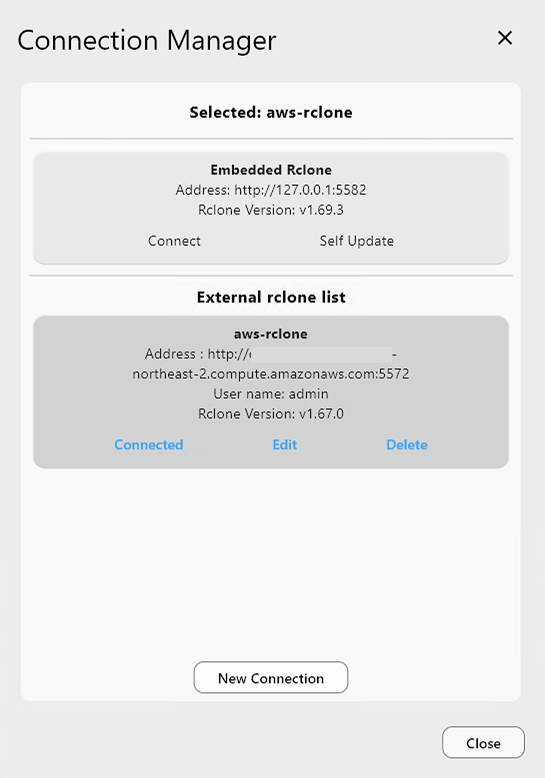
- In the new window, open Settings → Connection Manager.
- Click New Connection and fill the form:
| Field | Value |
|---|---|
| Display Name | ec2-rclone |
| Remote Address | http://<EC2-IP or DNS-NAME>:5572 |
| Username | admin |
| Password | admin |
- Click
Test Connectionto verify the setup.
You should see a successful connection response. - If the test passes, click
Save, then **Connect. - You are now connected to your External Rclone instance running on EC2, and the connection status should appear at the top of the window.
Part 4. Add AWS S3 & Cloudflare R2 Remotes (via External Rclone)
➕ Add AWS S3 Remote
- Go to the
Remotetab, and click+ New Remote. - In the
Providertab, choose Amazon S3. - In the
Optionstab:- Set
providertoAWS - Enter your Access Key ID and Secret Access Key
- Region and endpoint can be left default unless customized
- Set
- Click Save to complete the setup.
👉 Learn more:
➕ Add Cloudflare R2 Remote
- Again, click
+ New Remotein theRemotetab. - In the
Providertab, select S3 (yes, again—R2 uses the S3 protocol). - In the
Optionstab:- Set
providertoCloudflare - Enter your Cloudflare R2 Access Key and Secret Key
- Set
endpointtohttps://<accountid>.r2.cloudflarestorage.com
- Set
- Click Save to complete the R2 remote setup.
👉 Learn more:
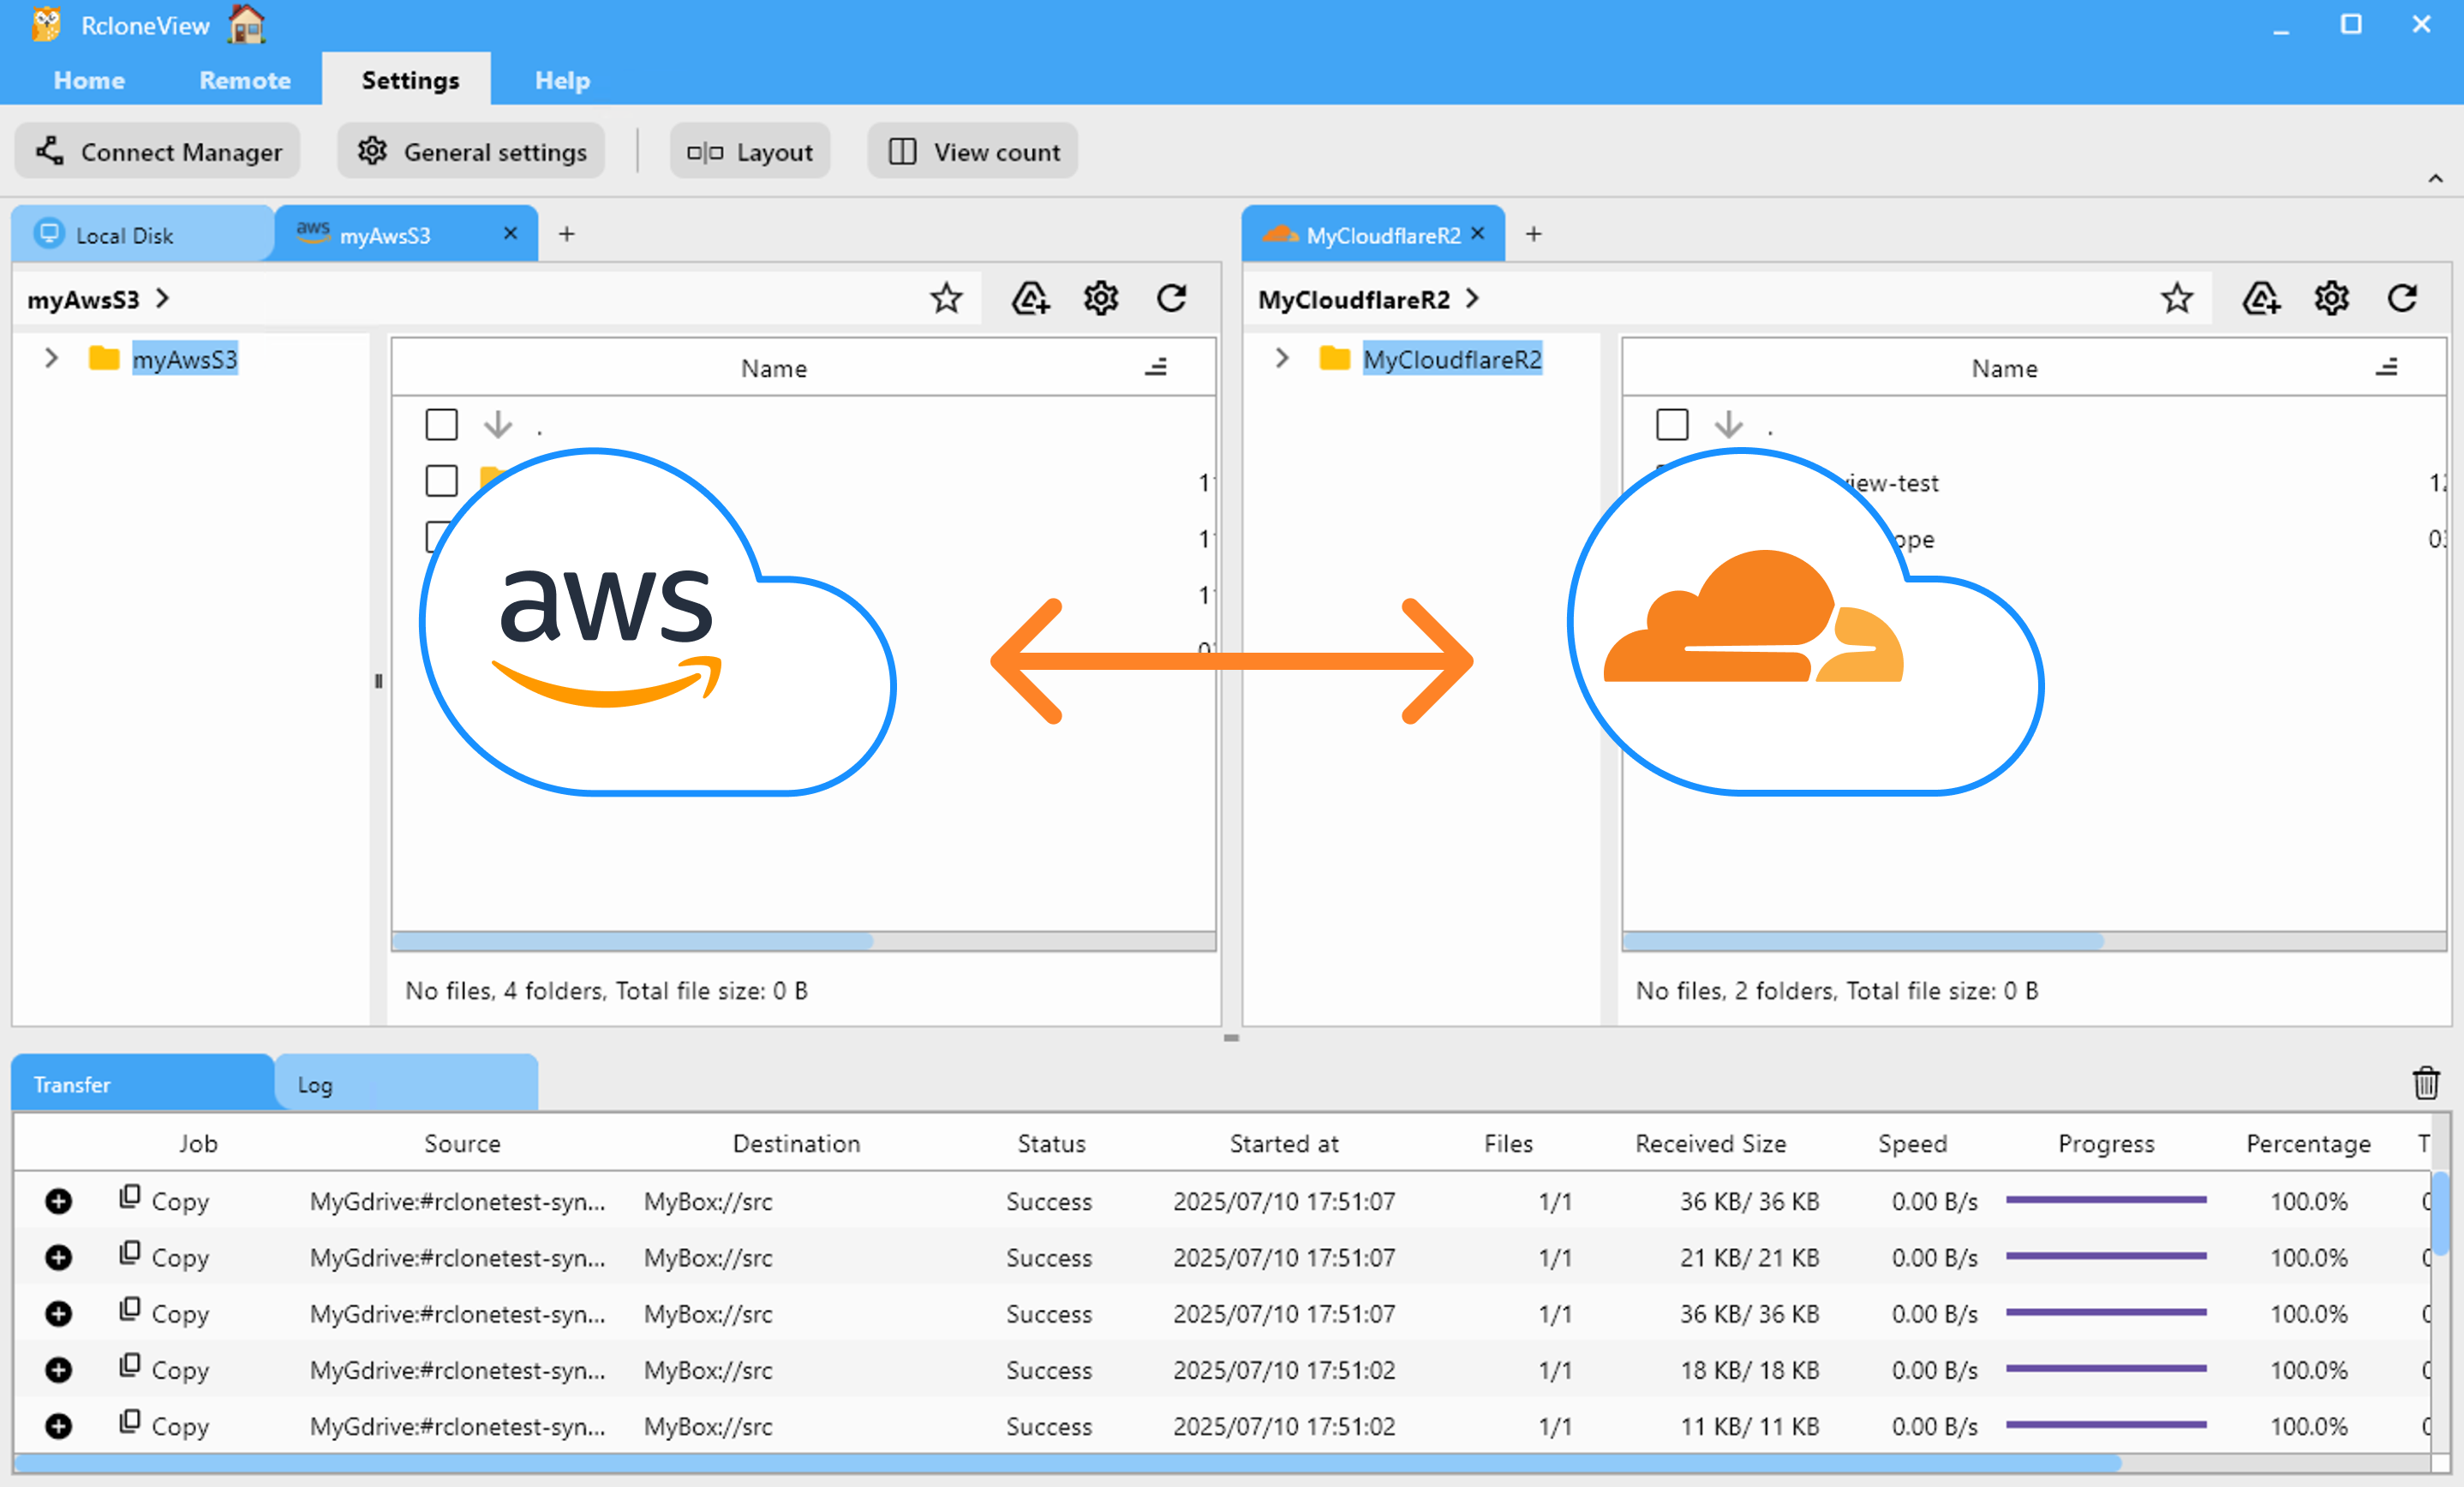
Part 5. Sync Files Between AWS S3 and Cloudflare R2
🔁 Method A: Use Sync or Job
- In the Explorer pane, select the Cloudflare R2 folder and the AWS S3 folder you want to synchronize.
- Click the
Syncbutton in thehomemenu. - Choose sync options (one-way or two-way), preview actions, and confirm.
- RcloneView runs the sync and displays progress in the
transferlog tab.
- For repeated or scheduled transfers:
- Click
Save to Jobsin the Sync modal, or openJob Manager→Add Job. - Configure source, destination, and options.
- Save and run manually or set a schedule.
- Click
👉 Learn more:
⏰ Method B: Schedule a Recurring Sync Job
- In the Explorer pane, select the Cloudflare R2 and AWS S3 folders you want to keep in sync.
- Open
Job Managerfrom theHomeorRemotemenu, then clickAdd Job. - Confirm your source and destination.
- Use the schedule editor to set when the job should run. Preview your schedule before saving.
- Save and enable the scheduled job.
RcloneView will run the sync at your specified times. Check execution details and logs in Job History and receive notifications upon completion.
👉 Learn more: Job Scheduling and Execution
⚡ Performance Tuning Cheat-Sheet
| Parameter | Recommended Value | Impact Level | Rationale |
|---|---|---|---|
--s3-chunk-size | 50M | ***** | Larger parts reduce Class-A ops on R2 and improve speed1. |
--s3-upload-concurrency | 32–64 | *** | Increases multipart threads for R2. |
--transfers | 32–64 | * | Parallel object uploads boost throughput on 10 Gbit links1. |
--s3-disable-checksum | Add only when reconciling checksums externally | **** | Skips per-part hashing bottleneck—use with caution1. |
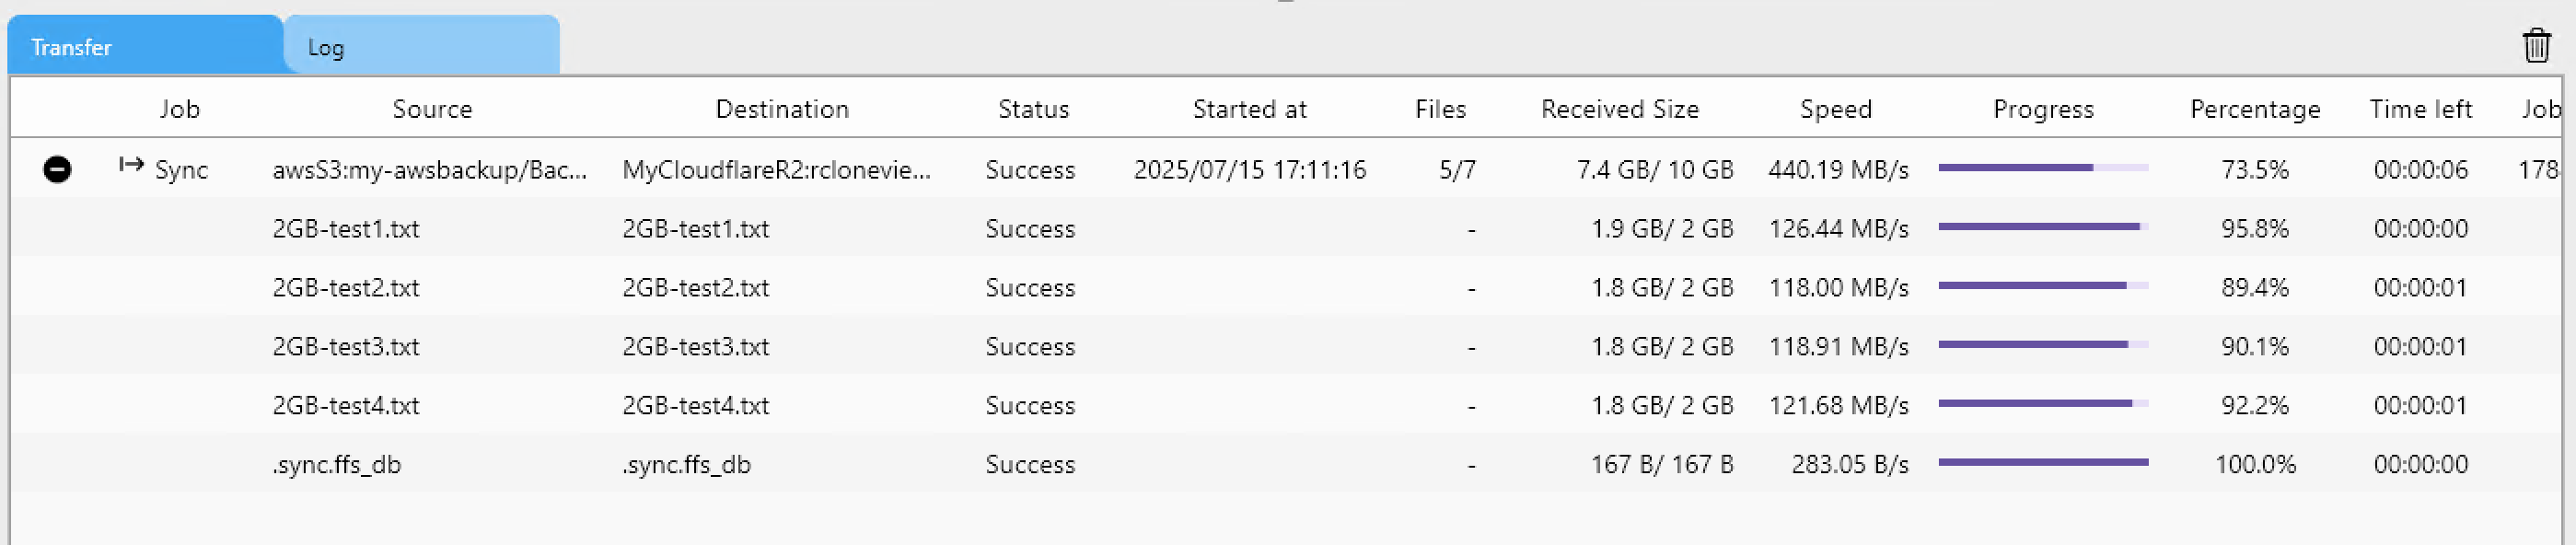
📈 Real‑World Tuning Results
To maximize performance during cloud-to-cloud transfers, we fine-tuned the Cloudflare R2 remote configuration as described below.
RcloneView is a GUI frontend for Rclone. The performance tuning tips and benchmarks shared here are based on experimental testing inspired by community posts ( How to Maximize Multipart Upload Speed to Cloudflare R2) and may vary depending on your specific cloud environment, region, network conditions, and use case.
These results are not guaranteed and should be used as a reference only.
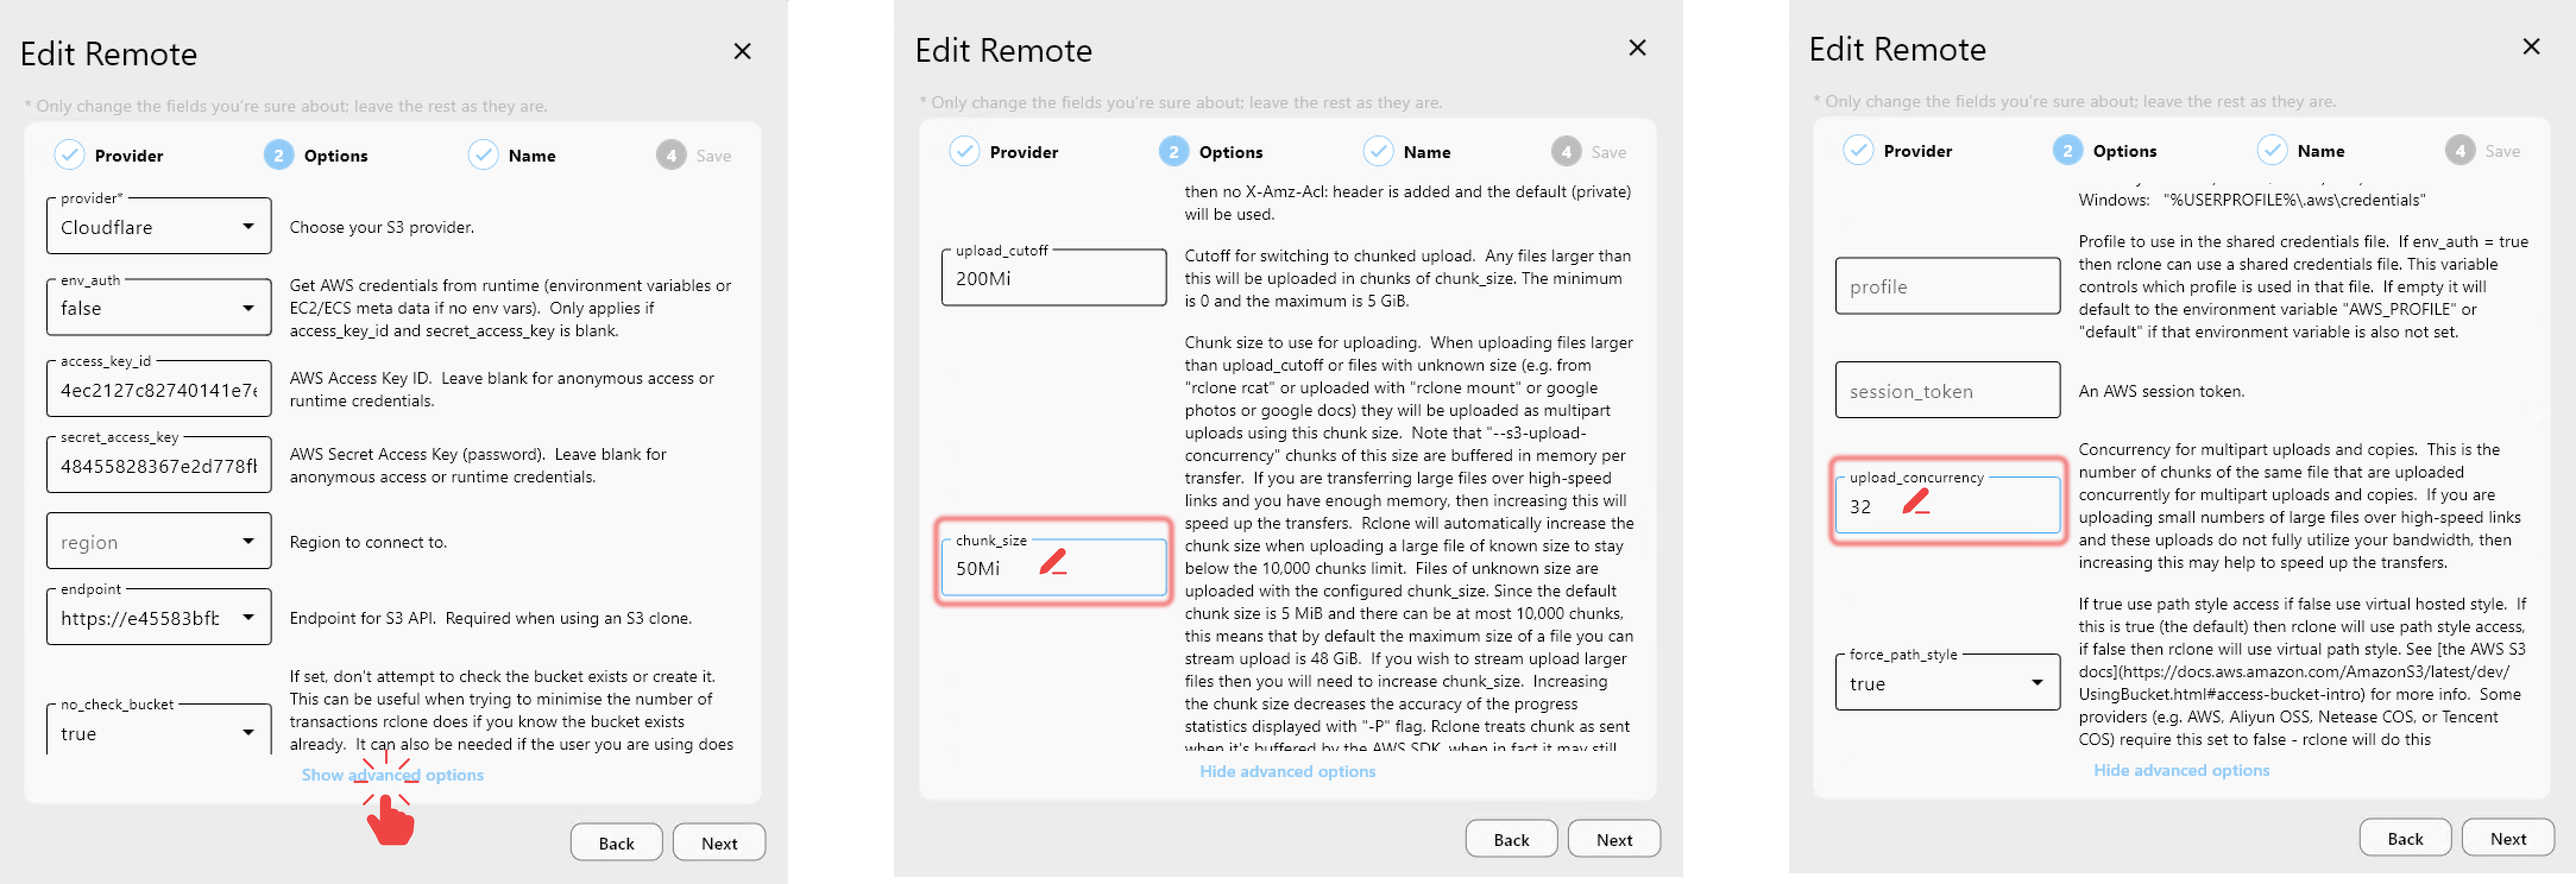
🔧 How to Update R2 Remote Settings
To change the configuration of the target R2 remote:
- In the Explorer pane, click the gear icon next to your Cloudflare R2 remote, or go to Remote Manager → Edit.
- In the
Optionstab, clickShow advanced options. - Set the following values:
chunk_size = 50Miupload_concurrency = 32
- Save your changes.
The disable_checksum option can also have a significant impact on transfer speed. However, for this test, we left it at the default value (false) to preserve integrity checks during file transfer.
📉 Baseline: Default Performance
When using default settings:
- chunk_size = 5Mi
- upload_concurrency = 4.
we observed transfer speeds of approximately 114 MB/s when moving large files from AWS S3 to Cloudflare R2 via EC2-hosted Rclone.

🚀 After Tuning: 4× Performance Boost
By updating the Cloudflare R2 remote with optimized settings:
- chunk_size = 50Mi
- upload_concurrency = 32
and keeping disable_checksum = false, we achieved speeds of around 440 MB/s—a 4× improvement over the default.
✅ Summary
Cloud-to-cloud transfers no longer need to crawl through your laptop. By off-loading the heavy lifting to an external Rclone daemon on EC2, you unlock near-line-rate migration speeds, dodge AWS egress surprises, and keep your workflow fully visual inside RcloneView. Start your next S3 ↔ R2 move with confidence—and wave goodbye to local bottlenecks.
🔗 Related Guides
- Storage Setup
- EC2 & Remote Rclone
- Window & Connection Management
- Synchronization and Job Control
- Cost Considerations
- Performance Optimization