Use Wasabi with RcloneView (S3-Compatible)
RcloneView is a desktop application that gives you a visual, two‑pane Explorer for rclone. It lets you copy, sync, and migrate files between Wasabi and other cloud or local storage, without using the command line.
With RcloneView you can:
- Browse your Wasabi buckets like local folders
- Drag & drop files between local disk ↔ Wasabi or Wasabi ↔ other clouds
- Run one‑time transfers or schedule recurring sync jobs
If you prefer to see it in action first, you can watch a short demo:
For more about RcloneView, visit the official site: https://rcloneview.com
1. Download and install RcloneView
RcloneView is available for Windows, macOS, and Linux.
- Go to the download page: https://rcloneview.com/src/download.
- Choose the installer for your OS (Windows, macOS, or Linux).
- Install and launch RcloneView.
2. Add Wasabi as a remote in RcloneView
RcloneView treats Wasabi as an S3‑compatible backend. You create a remote once and then reuse it for browsing, copy, sync, and scheduled jobs.
2.1 Prerequisites – Wasabi access keys and endpoint
To connect RcloneView to Wasabi, you need:
- Access Key / Secret Key
- Region / Endpoint URL (for example region
ap-northeast-2and endpoints3.ap-northeast-2.wasabisys.com)
Please follow Wasabi’s official documentation to create an access key and find your endpoint:
- Wasabi docs: https://docs.wasabi.com/docs
- Example: “Creating a New Access Key” or “Creating a Bucket” (search within the Wasabi docs portal).
Once you have your Access Key, Secret Key, and Endpoint, return to RcloneView.
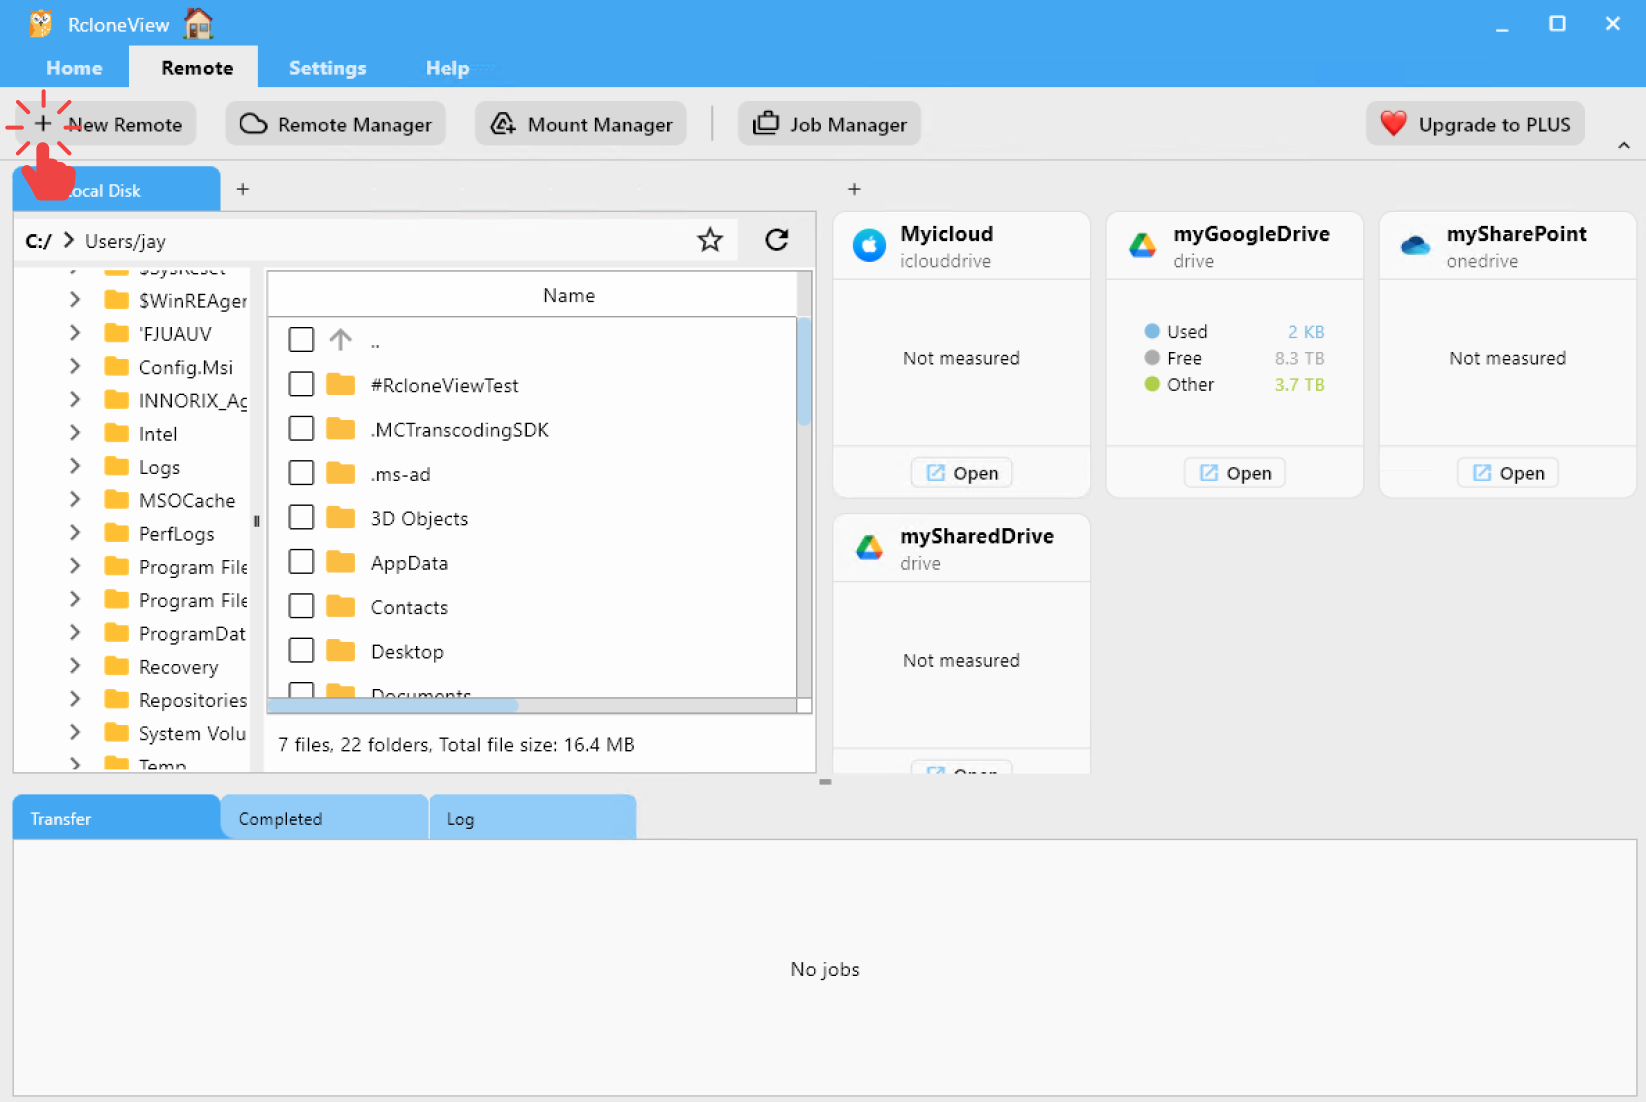
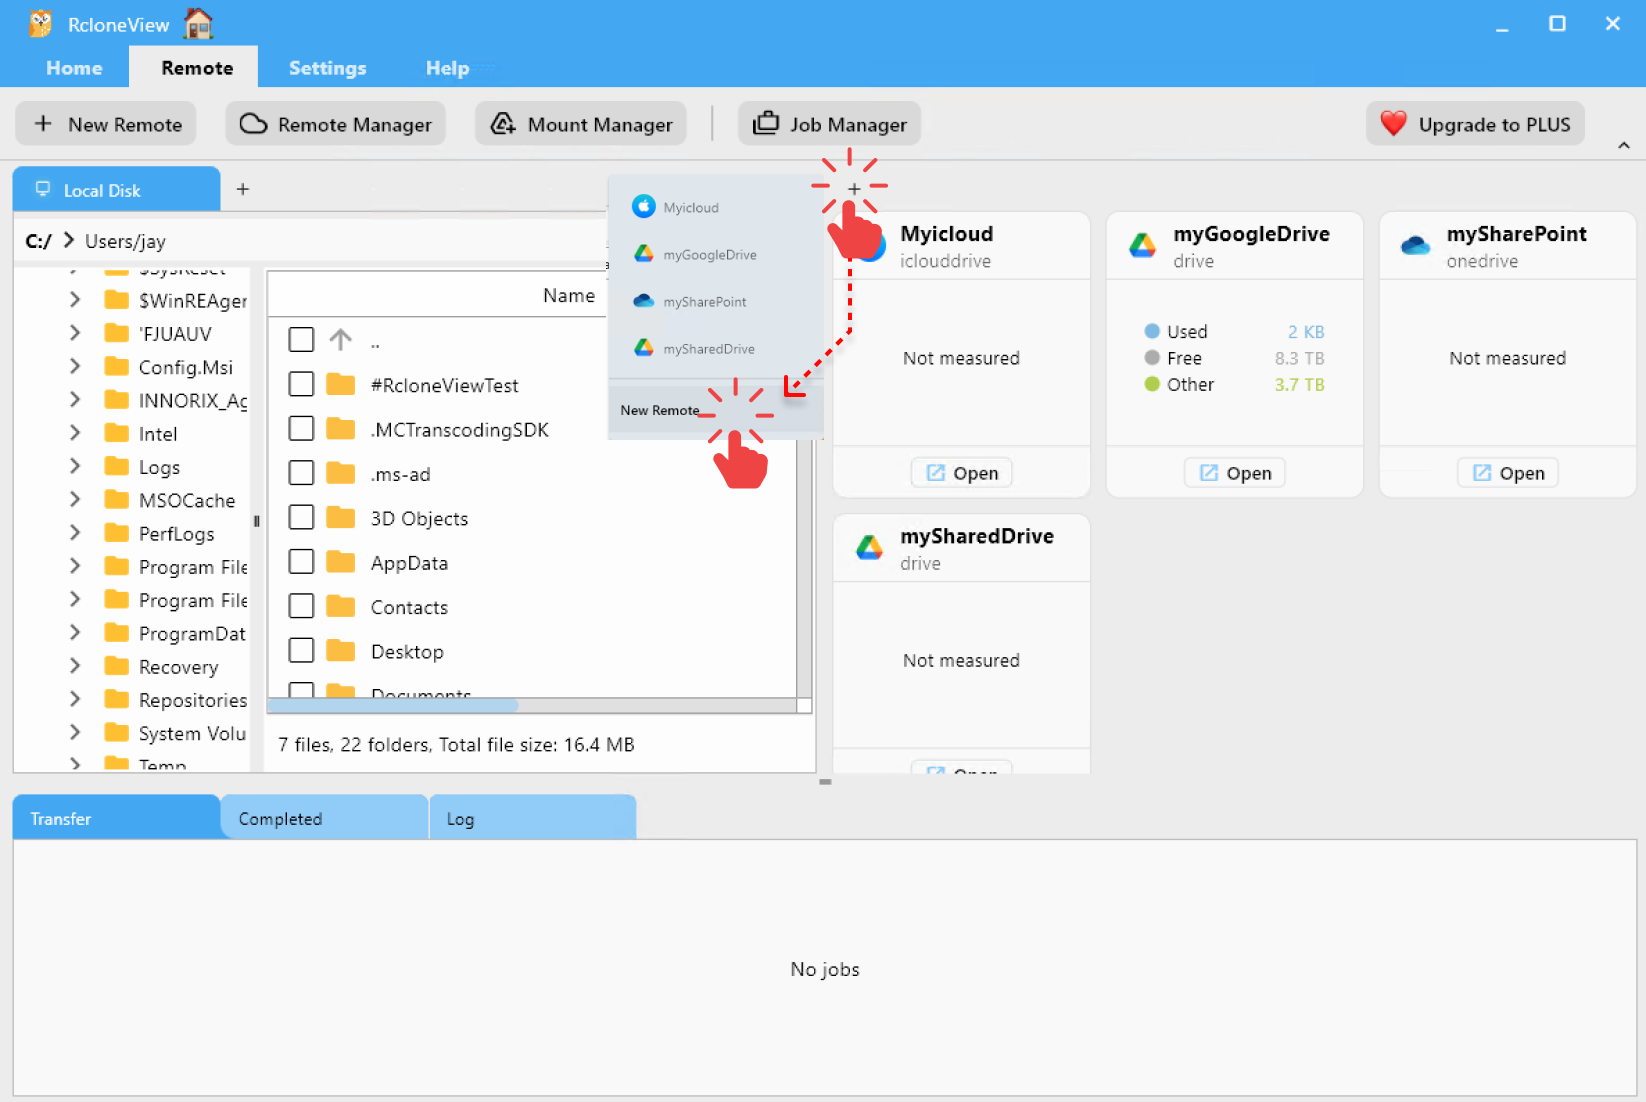
2.2 Open the “New Remote” wizard
- Launch RcloneView.
- From the top menu, click
Remote→+ New Remote.- Or click the
+tab in the Explorer pane and chooseNew Remote.
- Or click the
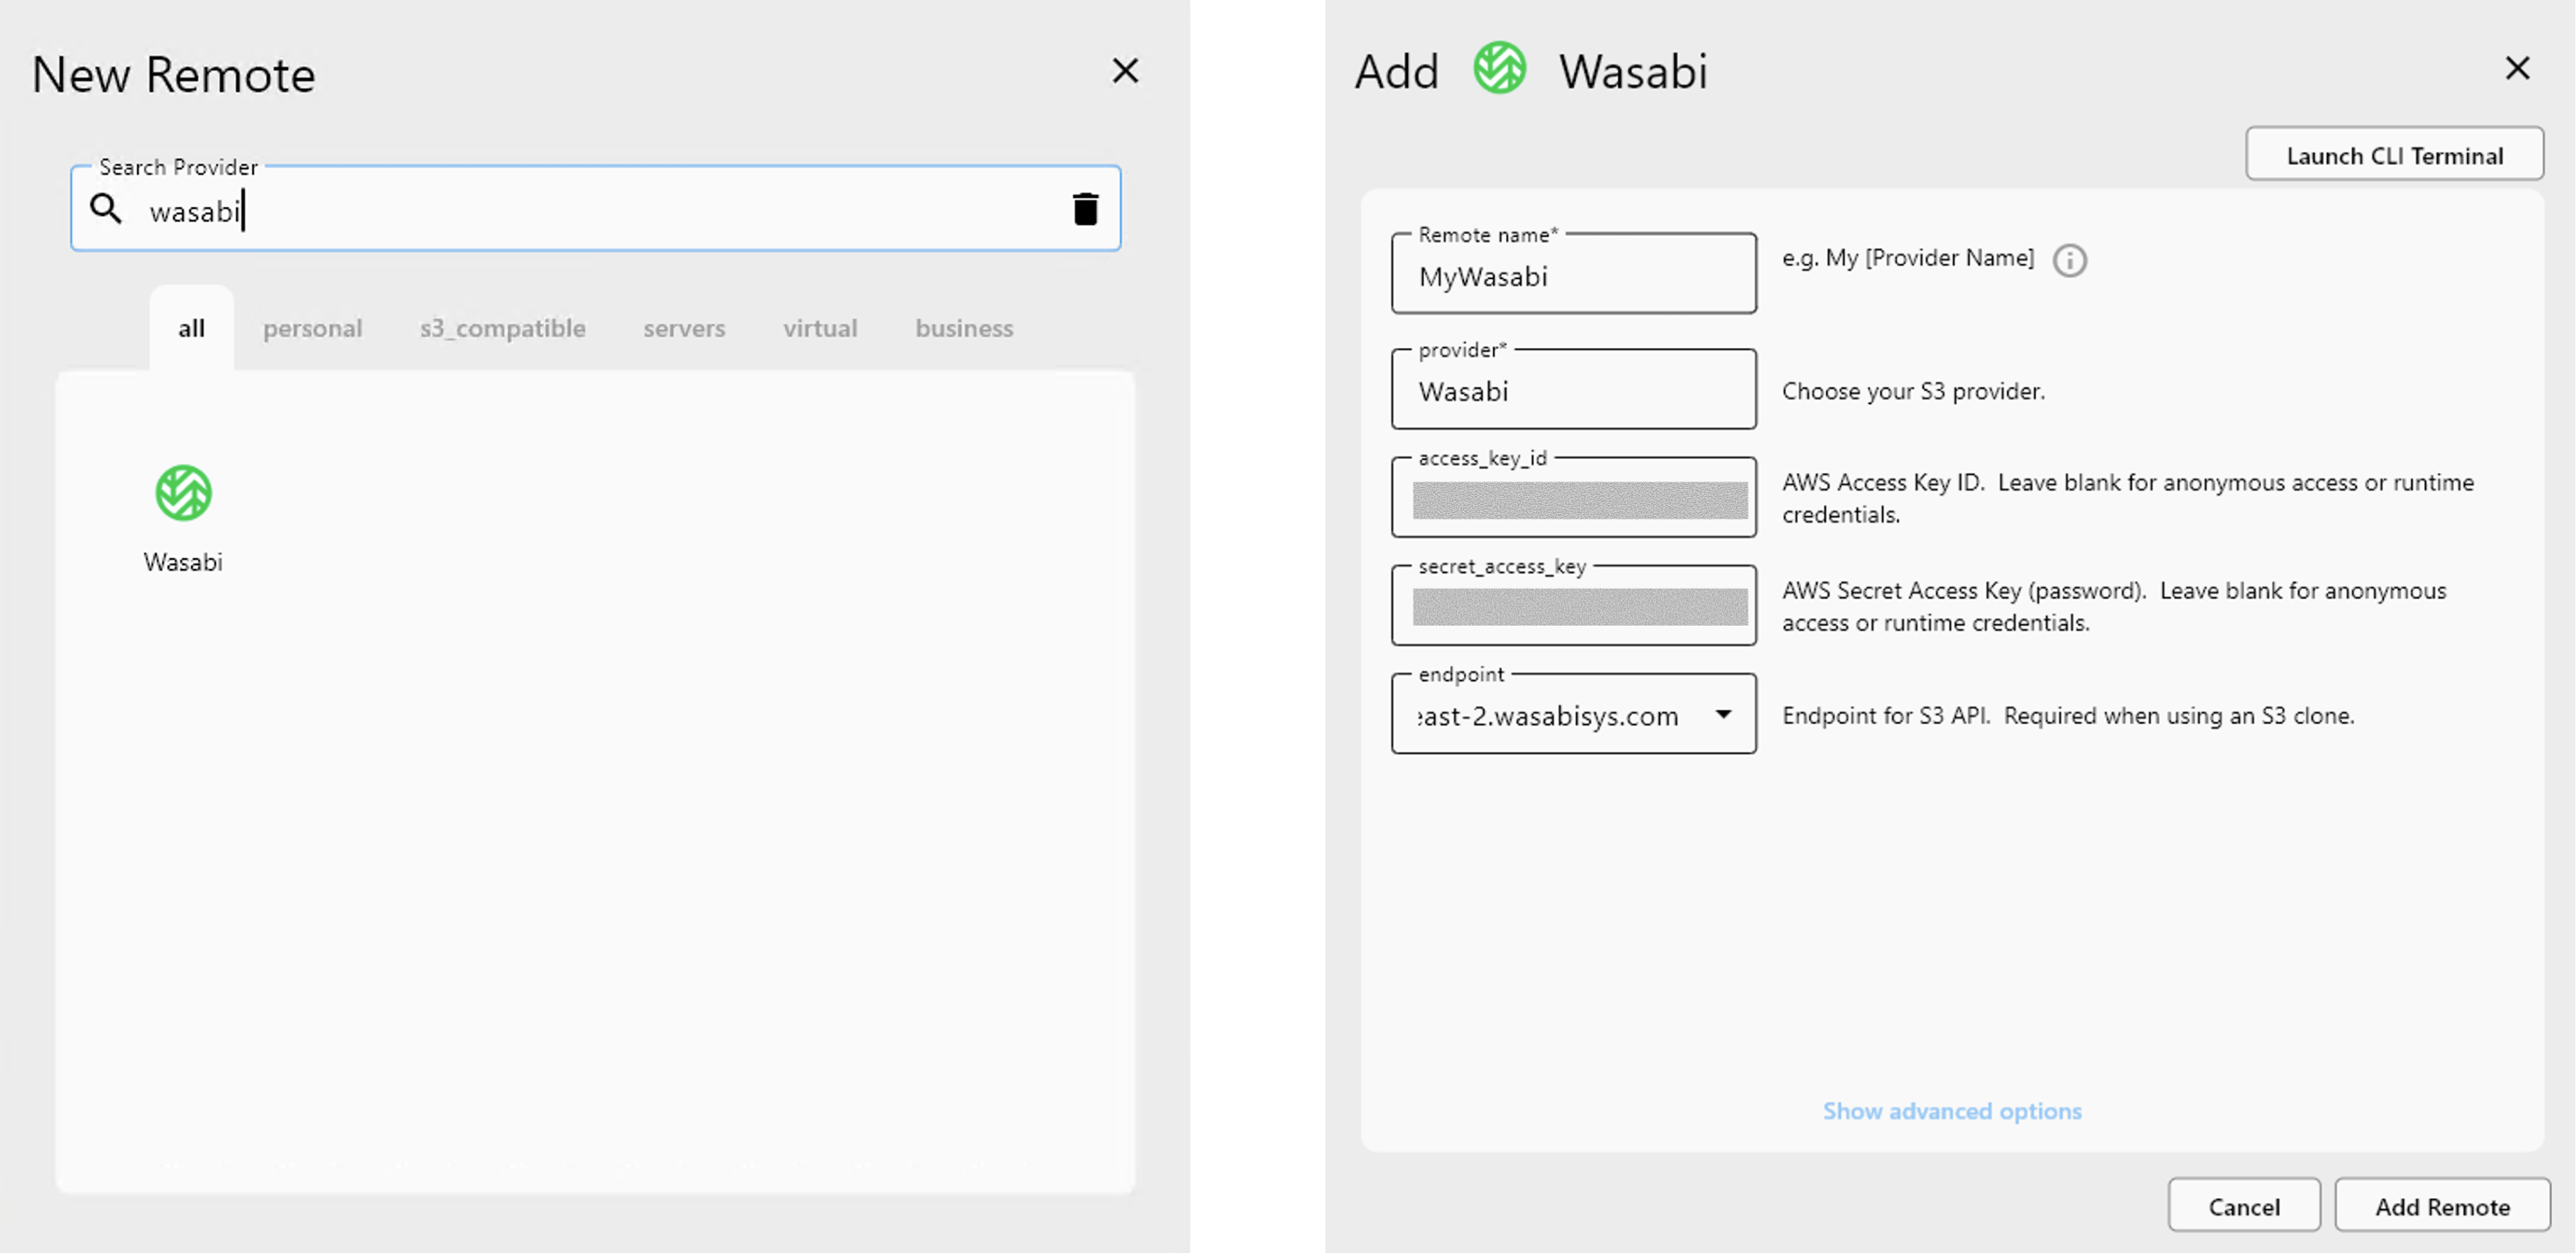
2.3 Configure Wasabi as an S3‑compatible provider
- In the New Remote dialog, search for
Wasabi. - Select the Wasabi provider tile.
- Configure the connection:
- Remote name: enter a clear name, such as
MyWasabi. - Access Key ID: paste your Wasabi access key.
- Secret Access Key: paste your Wasabi secret key.
- Endpoint: enter the Wasabi S3 endpoint (for example
s3.ap-northeast-2.wasabisys.com).
- Remote name: enter a clear name, such as
- Click Add Remote.
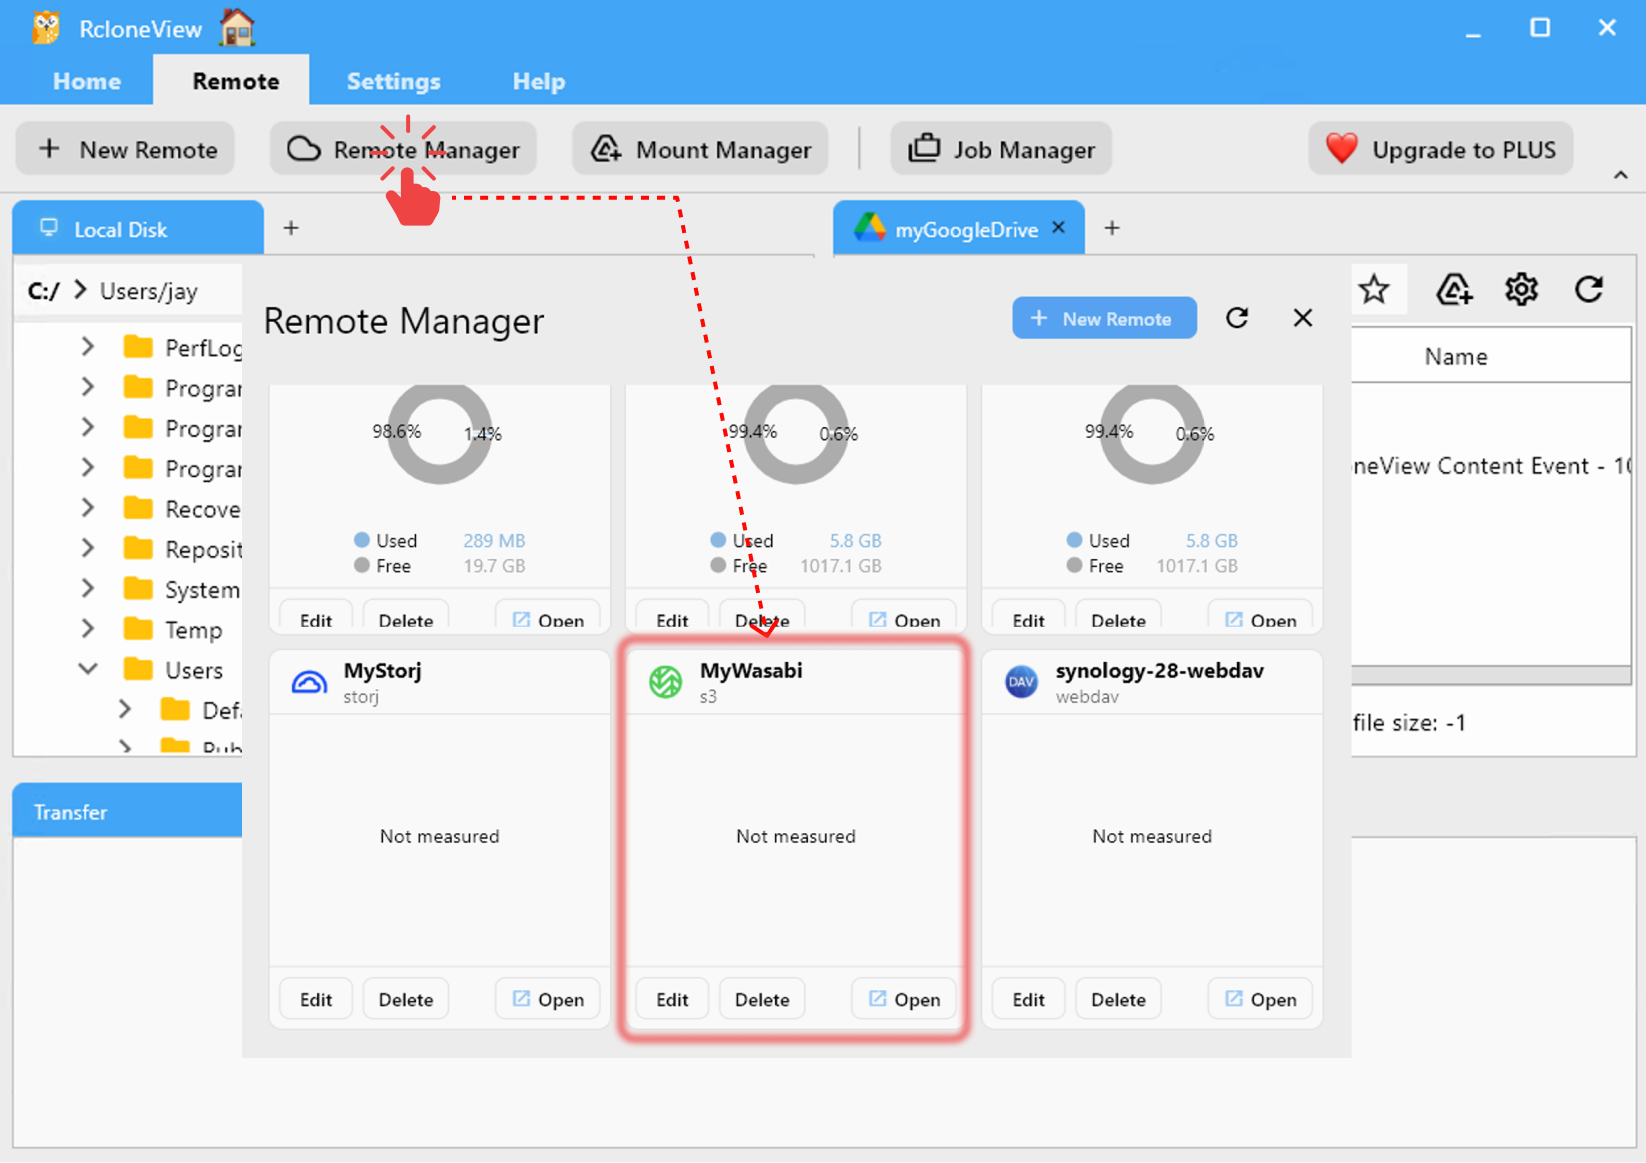
2.4 Verify the Wasabi remote
- Open
Remote → Remote Manager. - Confirm that your Wasabi remote (for example
MyWasabi) is listed and reachable.
For more details, see the general S3‑compatible guide:
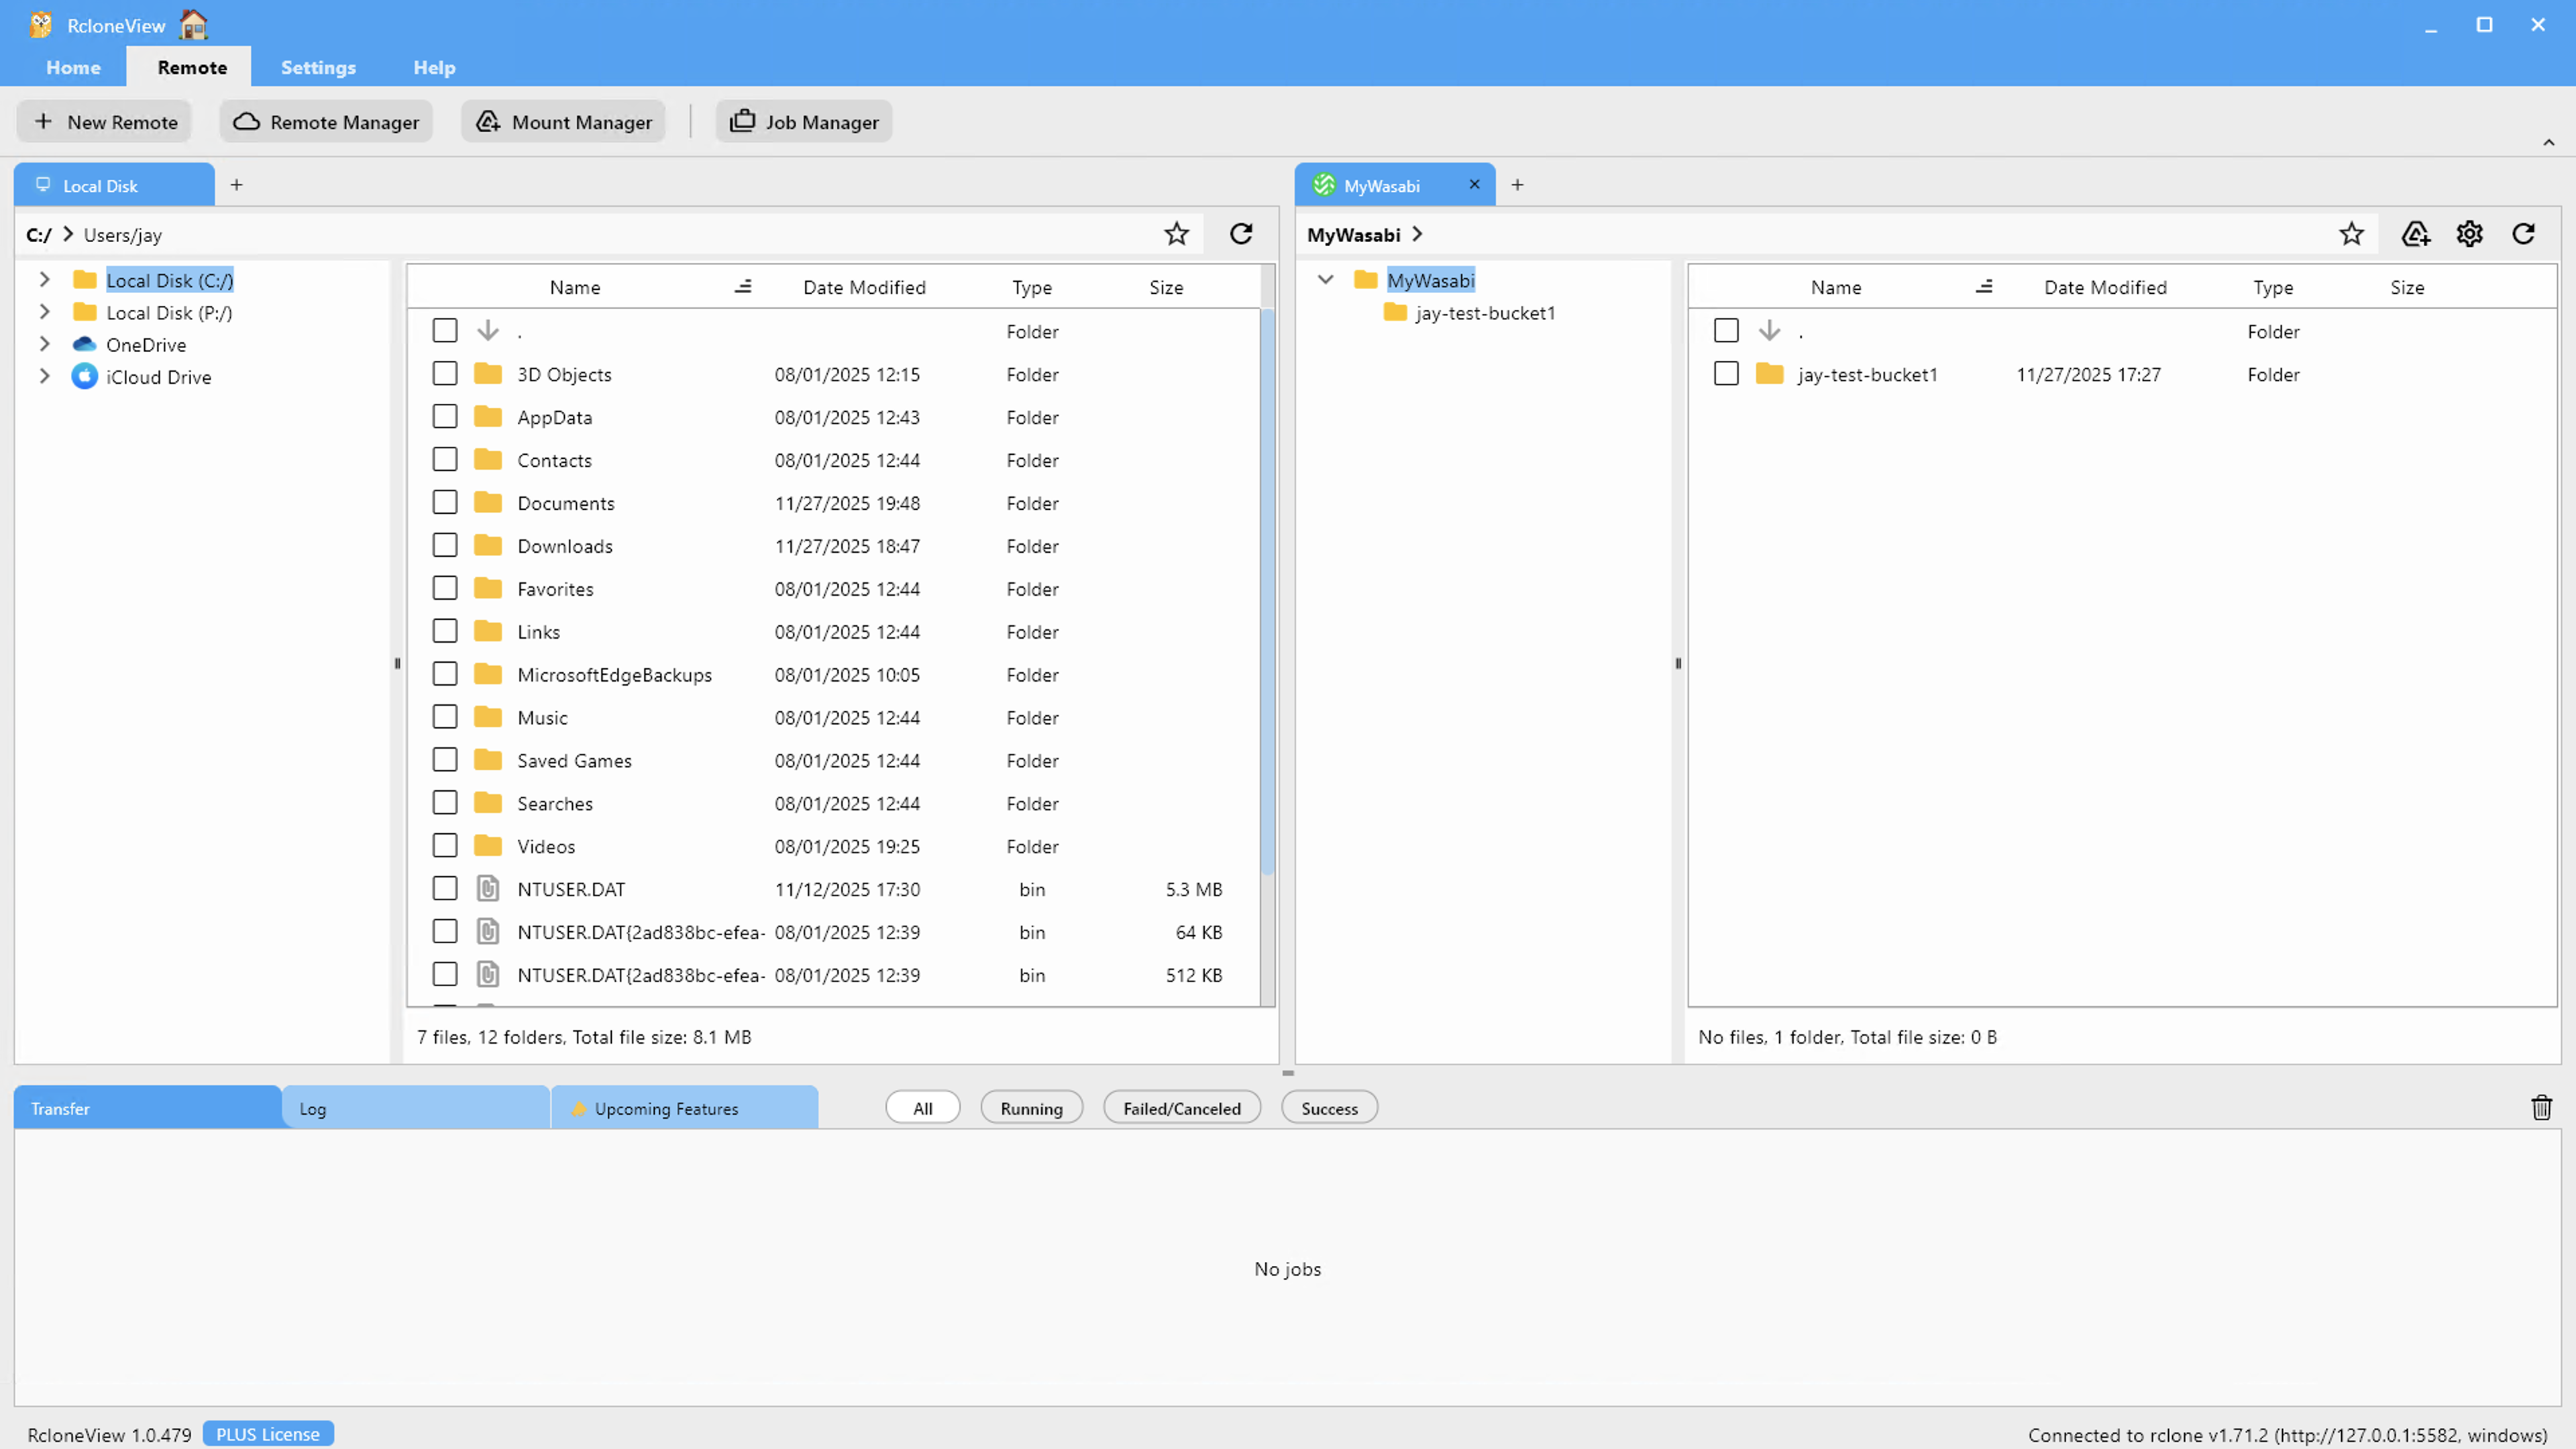
3. Browse folders in Wasabi
Once the remote is created, you can browse buckets and objects inside RcloneView’s Explorer.
- In the Explorer pane, click the
+tab. - In the “Open Remote” list, choose your Wasabi remote (e.g.,
MyWasabi). - RcloneView opens the remote in a tab where buckets appear like top‑level folders.
- Double‑click a bucket to explore its contents.
For more general navigation tips, refer to:
4. Manage files between Local Disk and Wasabi
This section shows practical ways to move data between your local computer and Wasabi using RcloneView.
You can open:
- Left pane: local disk (for example
C:\or a specific folder) - Right pane: your Wasabi remote bucket
Then use drag & drop, folder comparison, or sync jobs depending on your workflow.
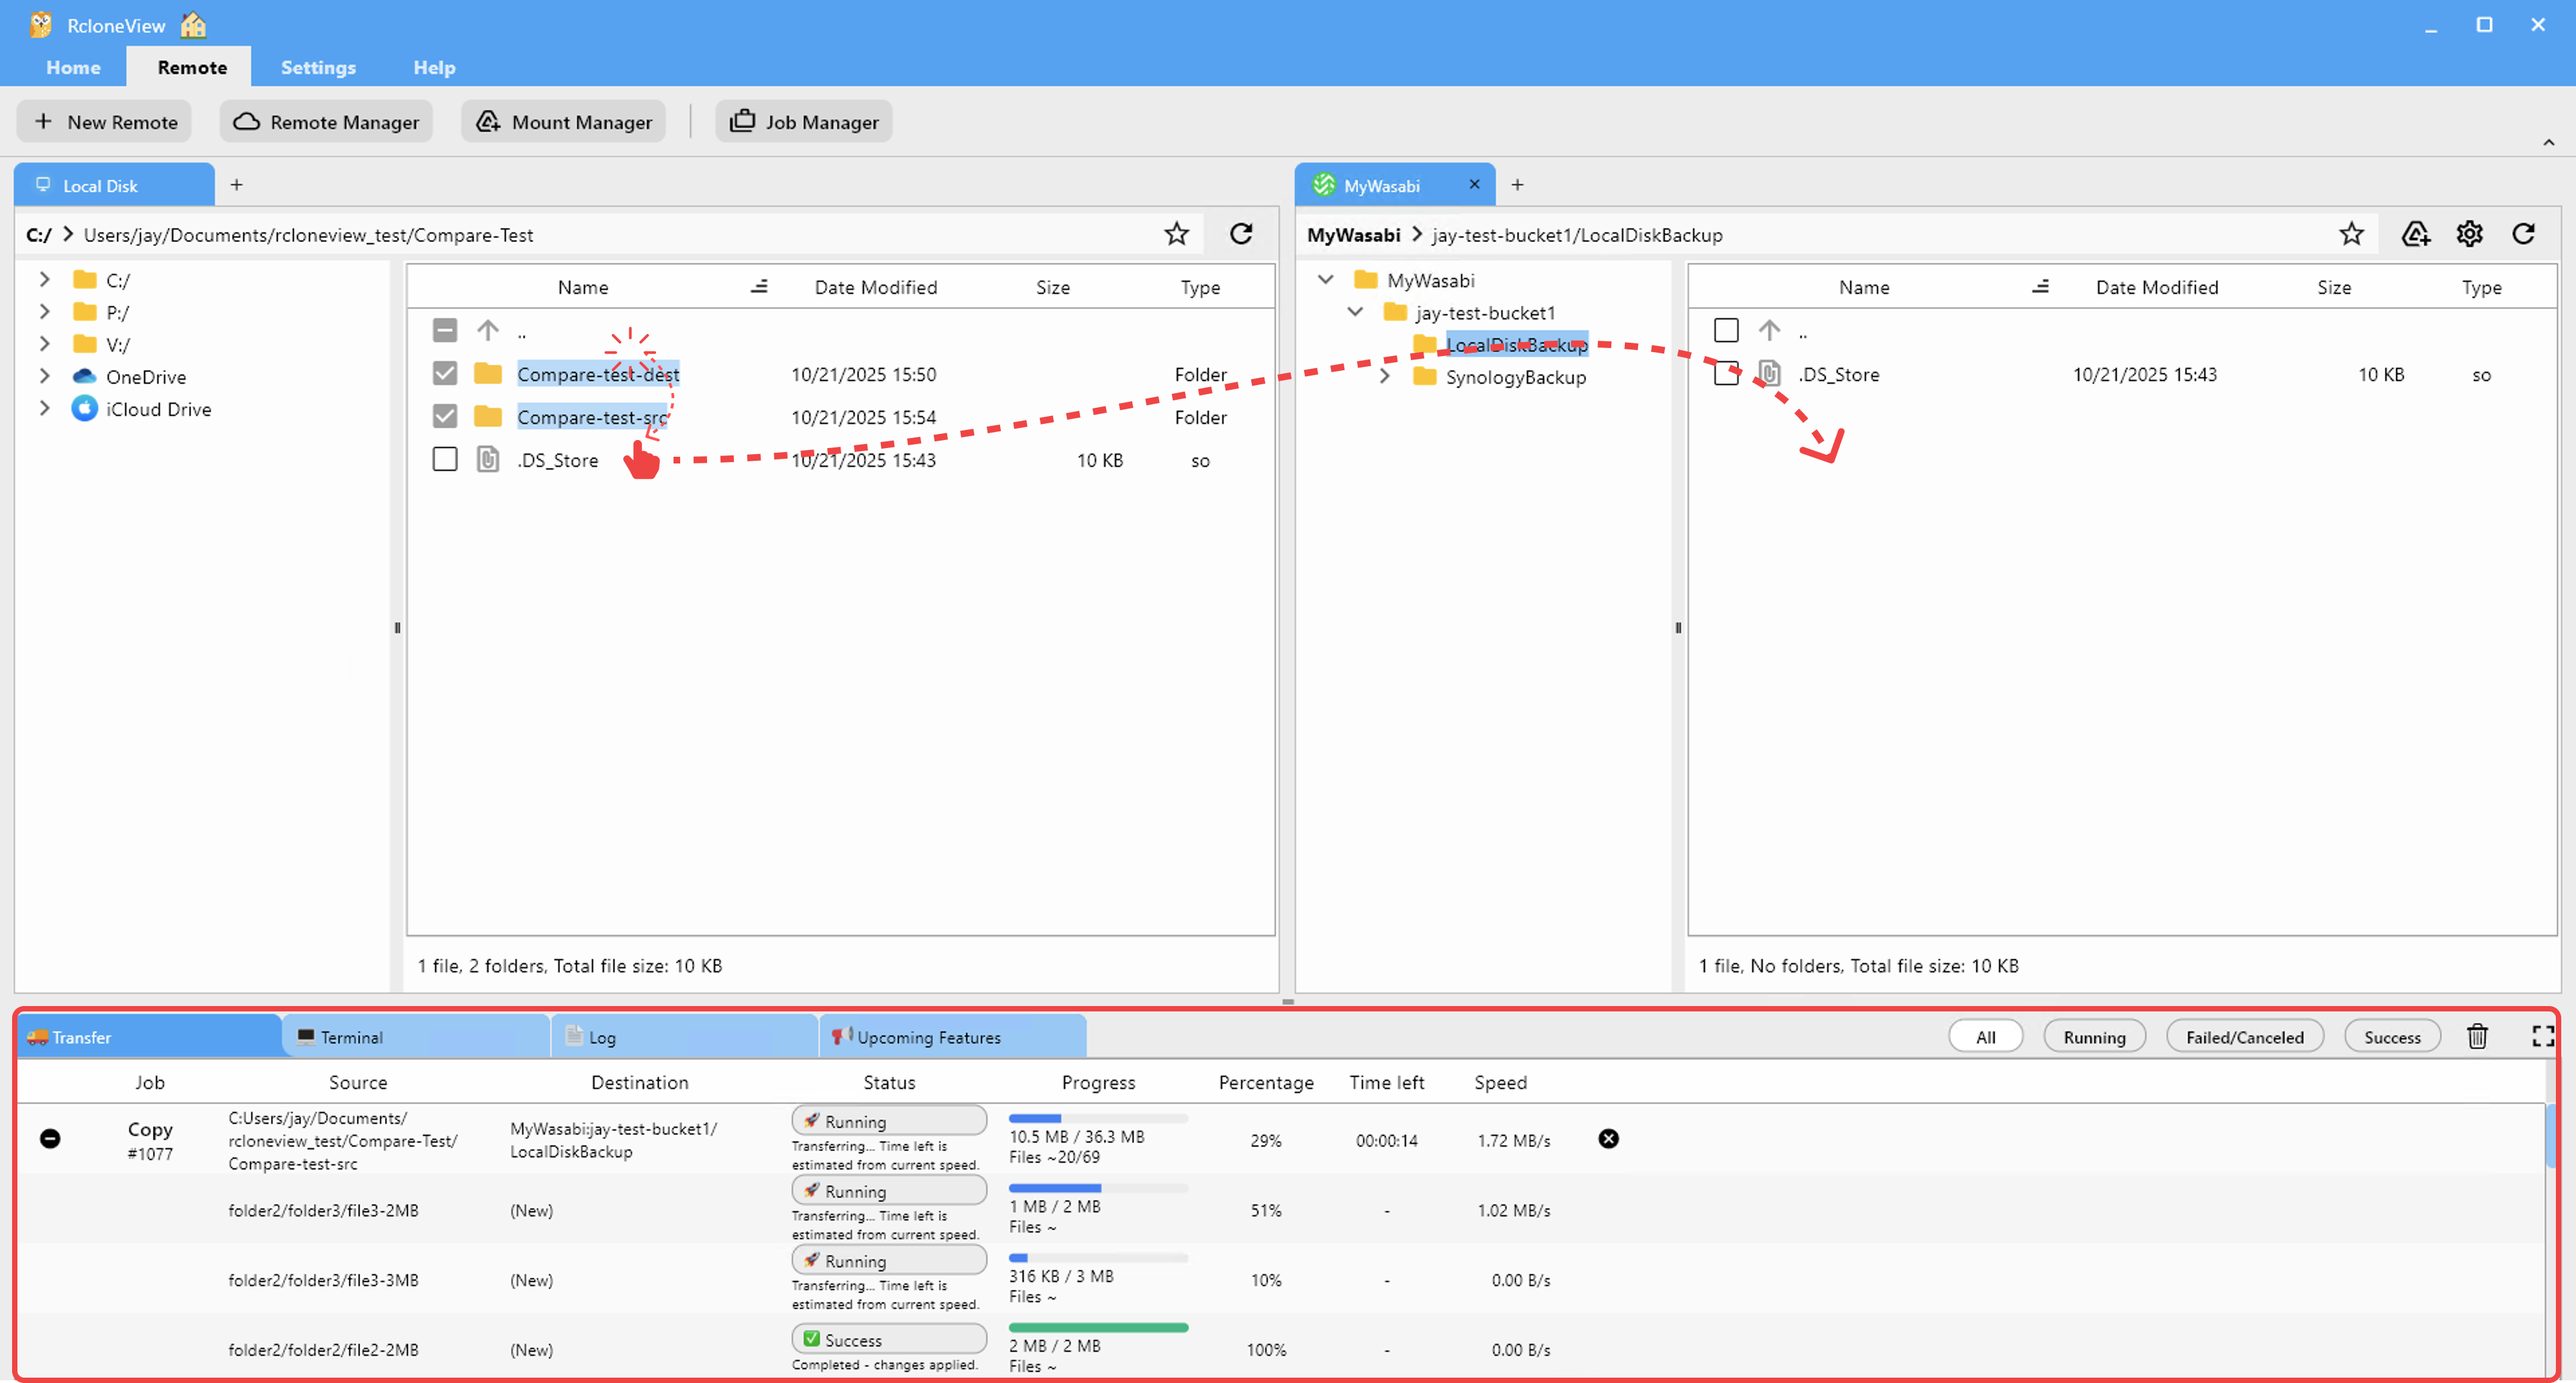
4.1 Drag & drop between Local and Wasabi
Drag & drop is the simplest way to copy files.
- In the left pane, open your local folder (e.g.,
D:\Media). - In the right pane, open your Wasabi bucket/folder.
- Select files or folders on the left.
- Drag them to the right pane and drop into the desired location.
- RcloneView starts a transfer job; progress appears in the Transfer tab.
For multi‑selection, right‑click actions, and more, see:
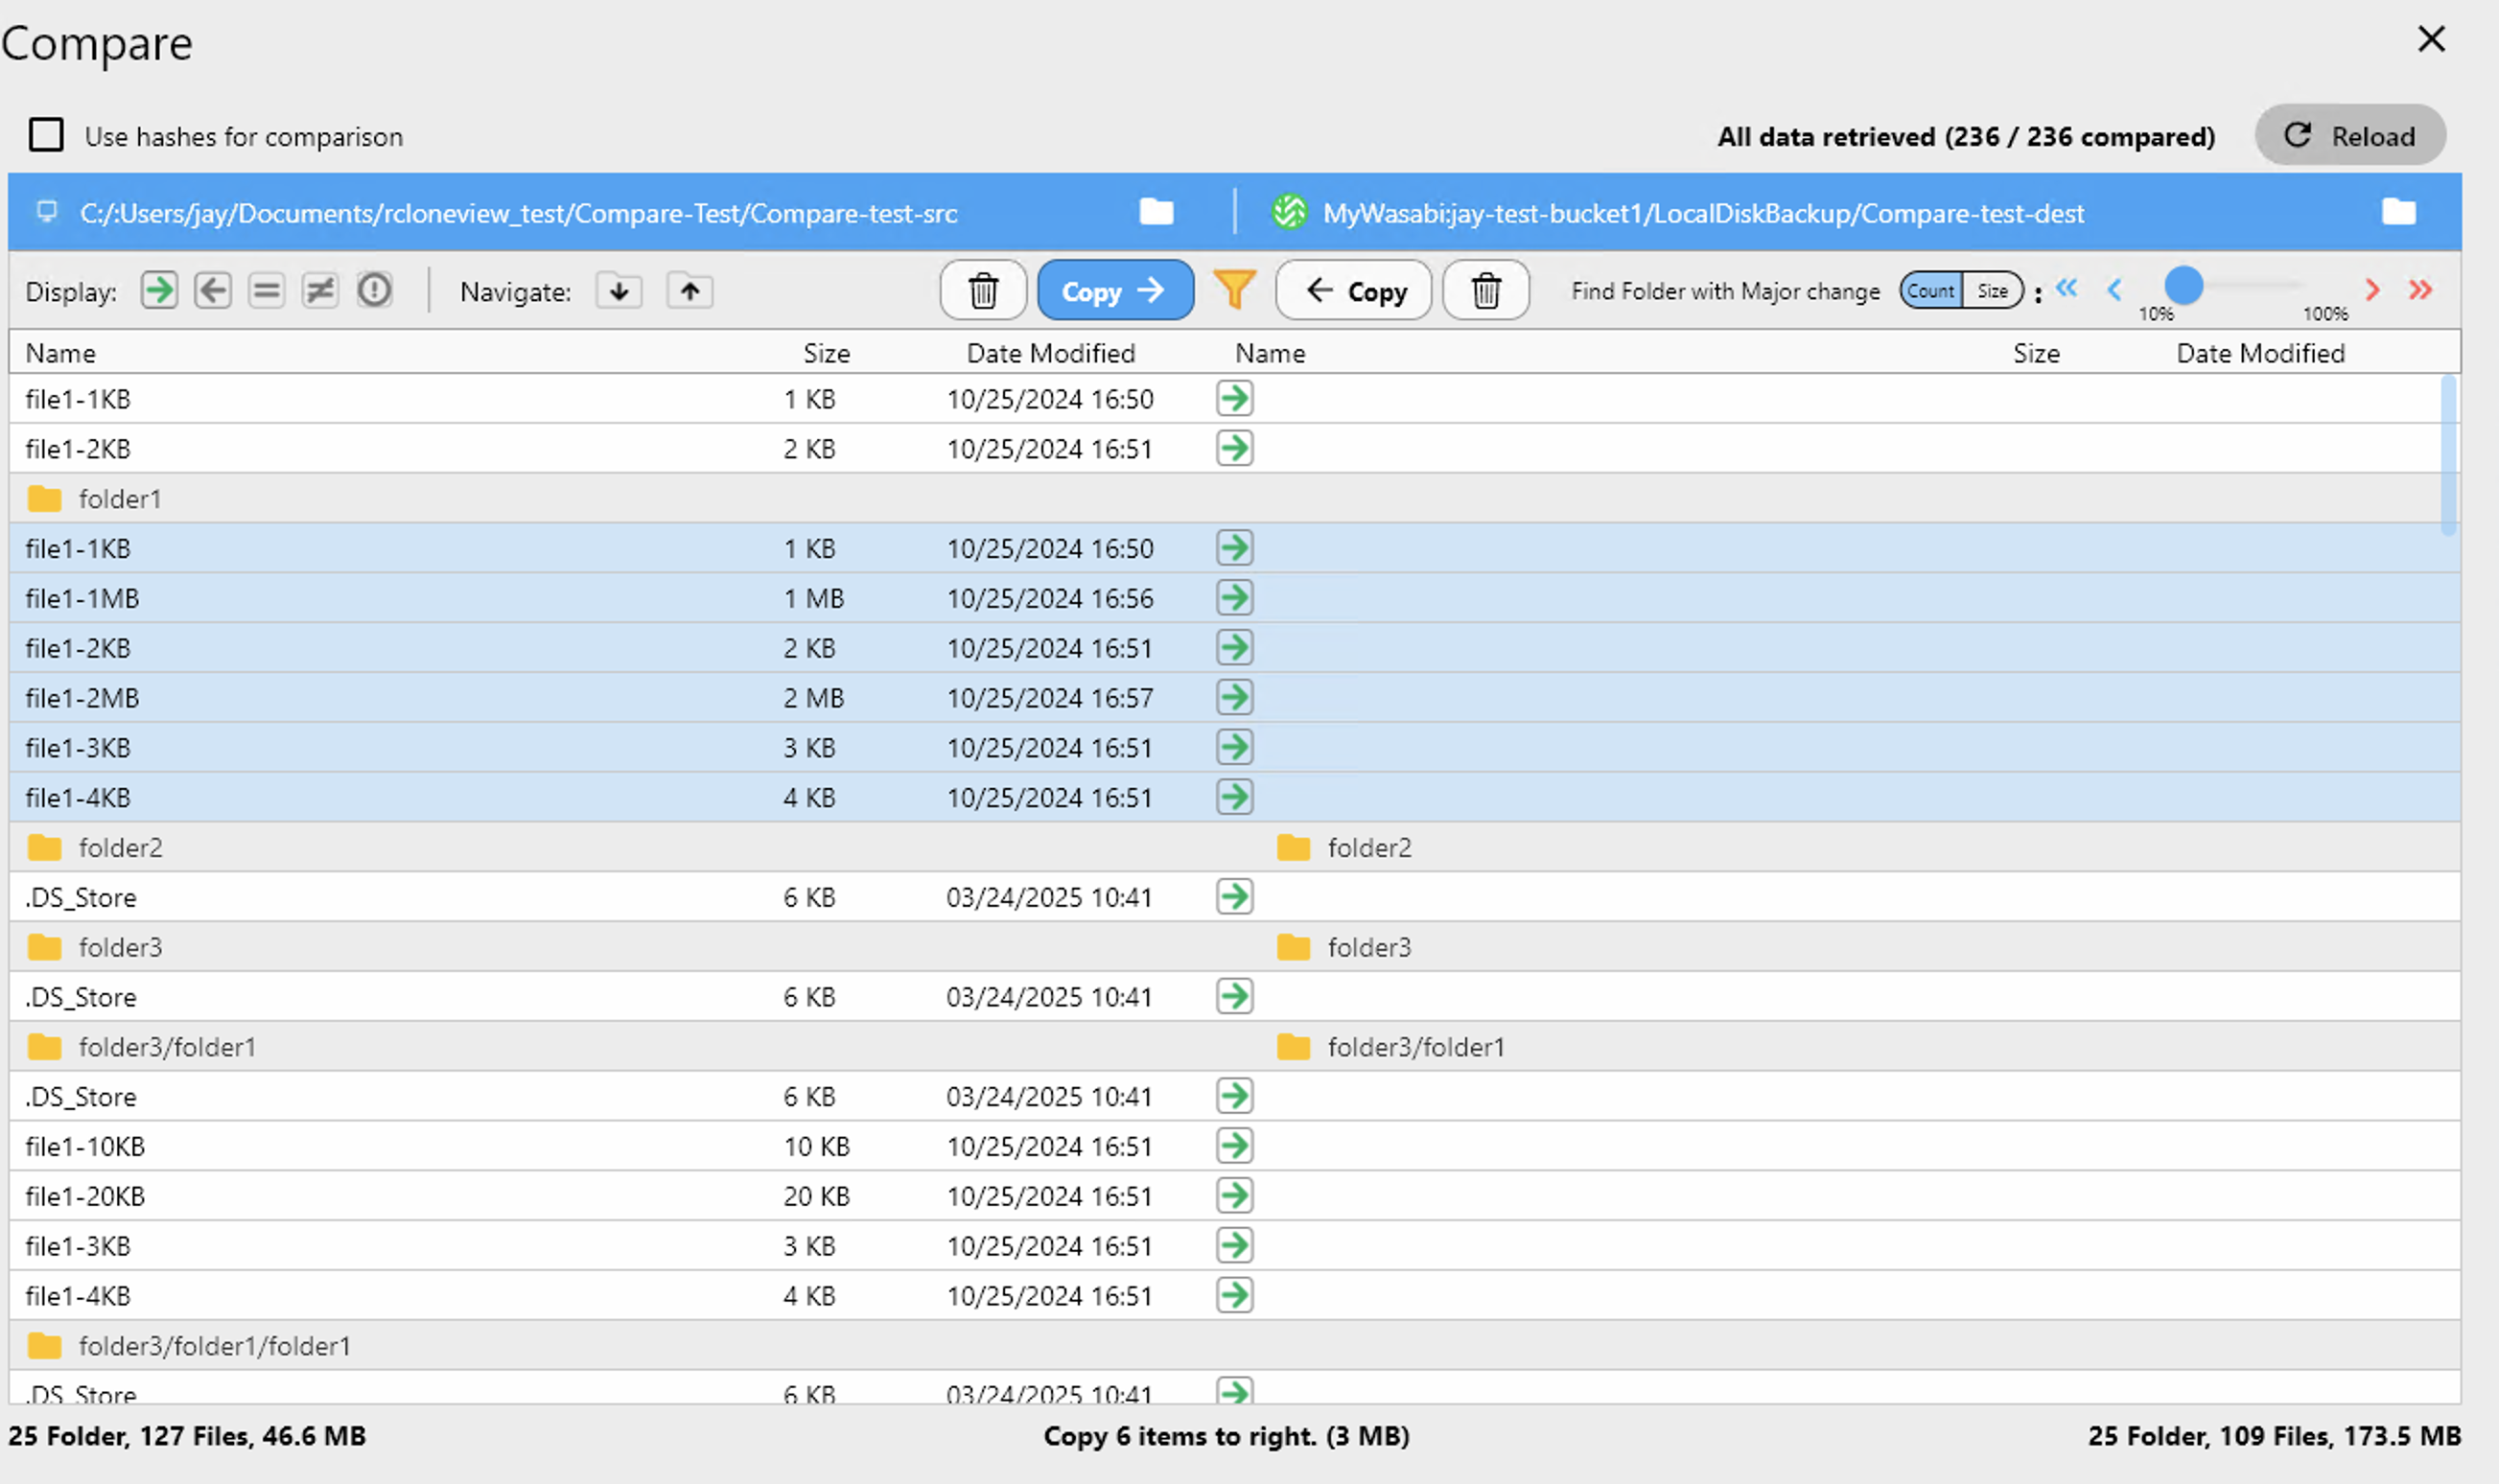
4.2 Compare folders and copy changed files
If you want to see differences before copying, use the Compare function.
Typical use case: compare a local backup folder with a Wasabi backup folder.
- In the left pane, open the source folder (e.g., local or another cloud).
- In the right pane, open the Wasabi destination folder.
- Click
Comparein the top Home menu. - RcloneView marks:
- Files only on the left (source only)
- Files only on the right (destination only)
- Changed files (size, timestamp, or checksum differs)
- Select the items you want to move and click Copy → (or ← Copy for the reverse direction).
Learn more:
4.3 Sync jobs between Local Disk and Wasabi
For repeatable backups or mirroring, use Sync. Sync makes the destination match the source.
There are three common patterns:
- Instant Sync (run once immediately)
- Saved Sync Job (re‑run when needed)
- Scheduled Sync Job (run automatically on a schedule)
⚠️ Sync updates the destination to match the source; files that only exist in the destination can be deleted. Review the sync settings carefully before running.
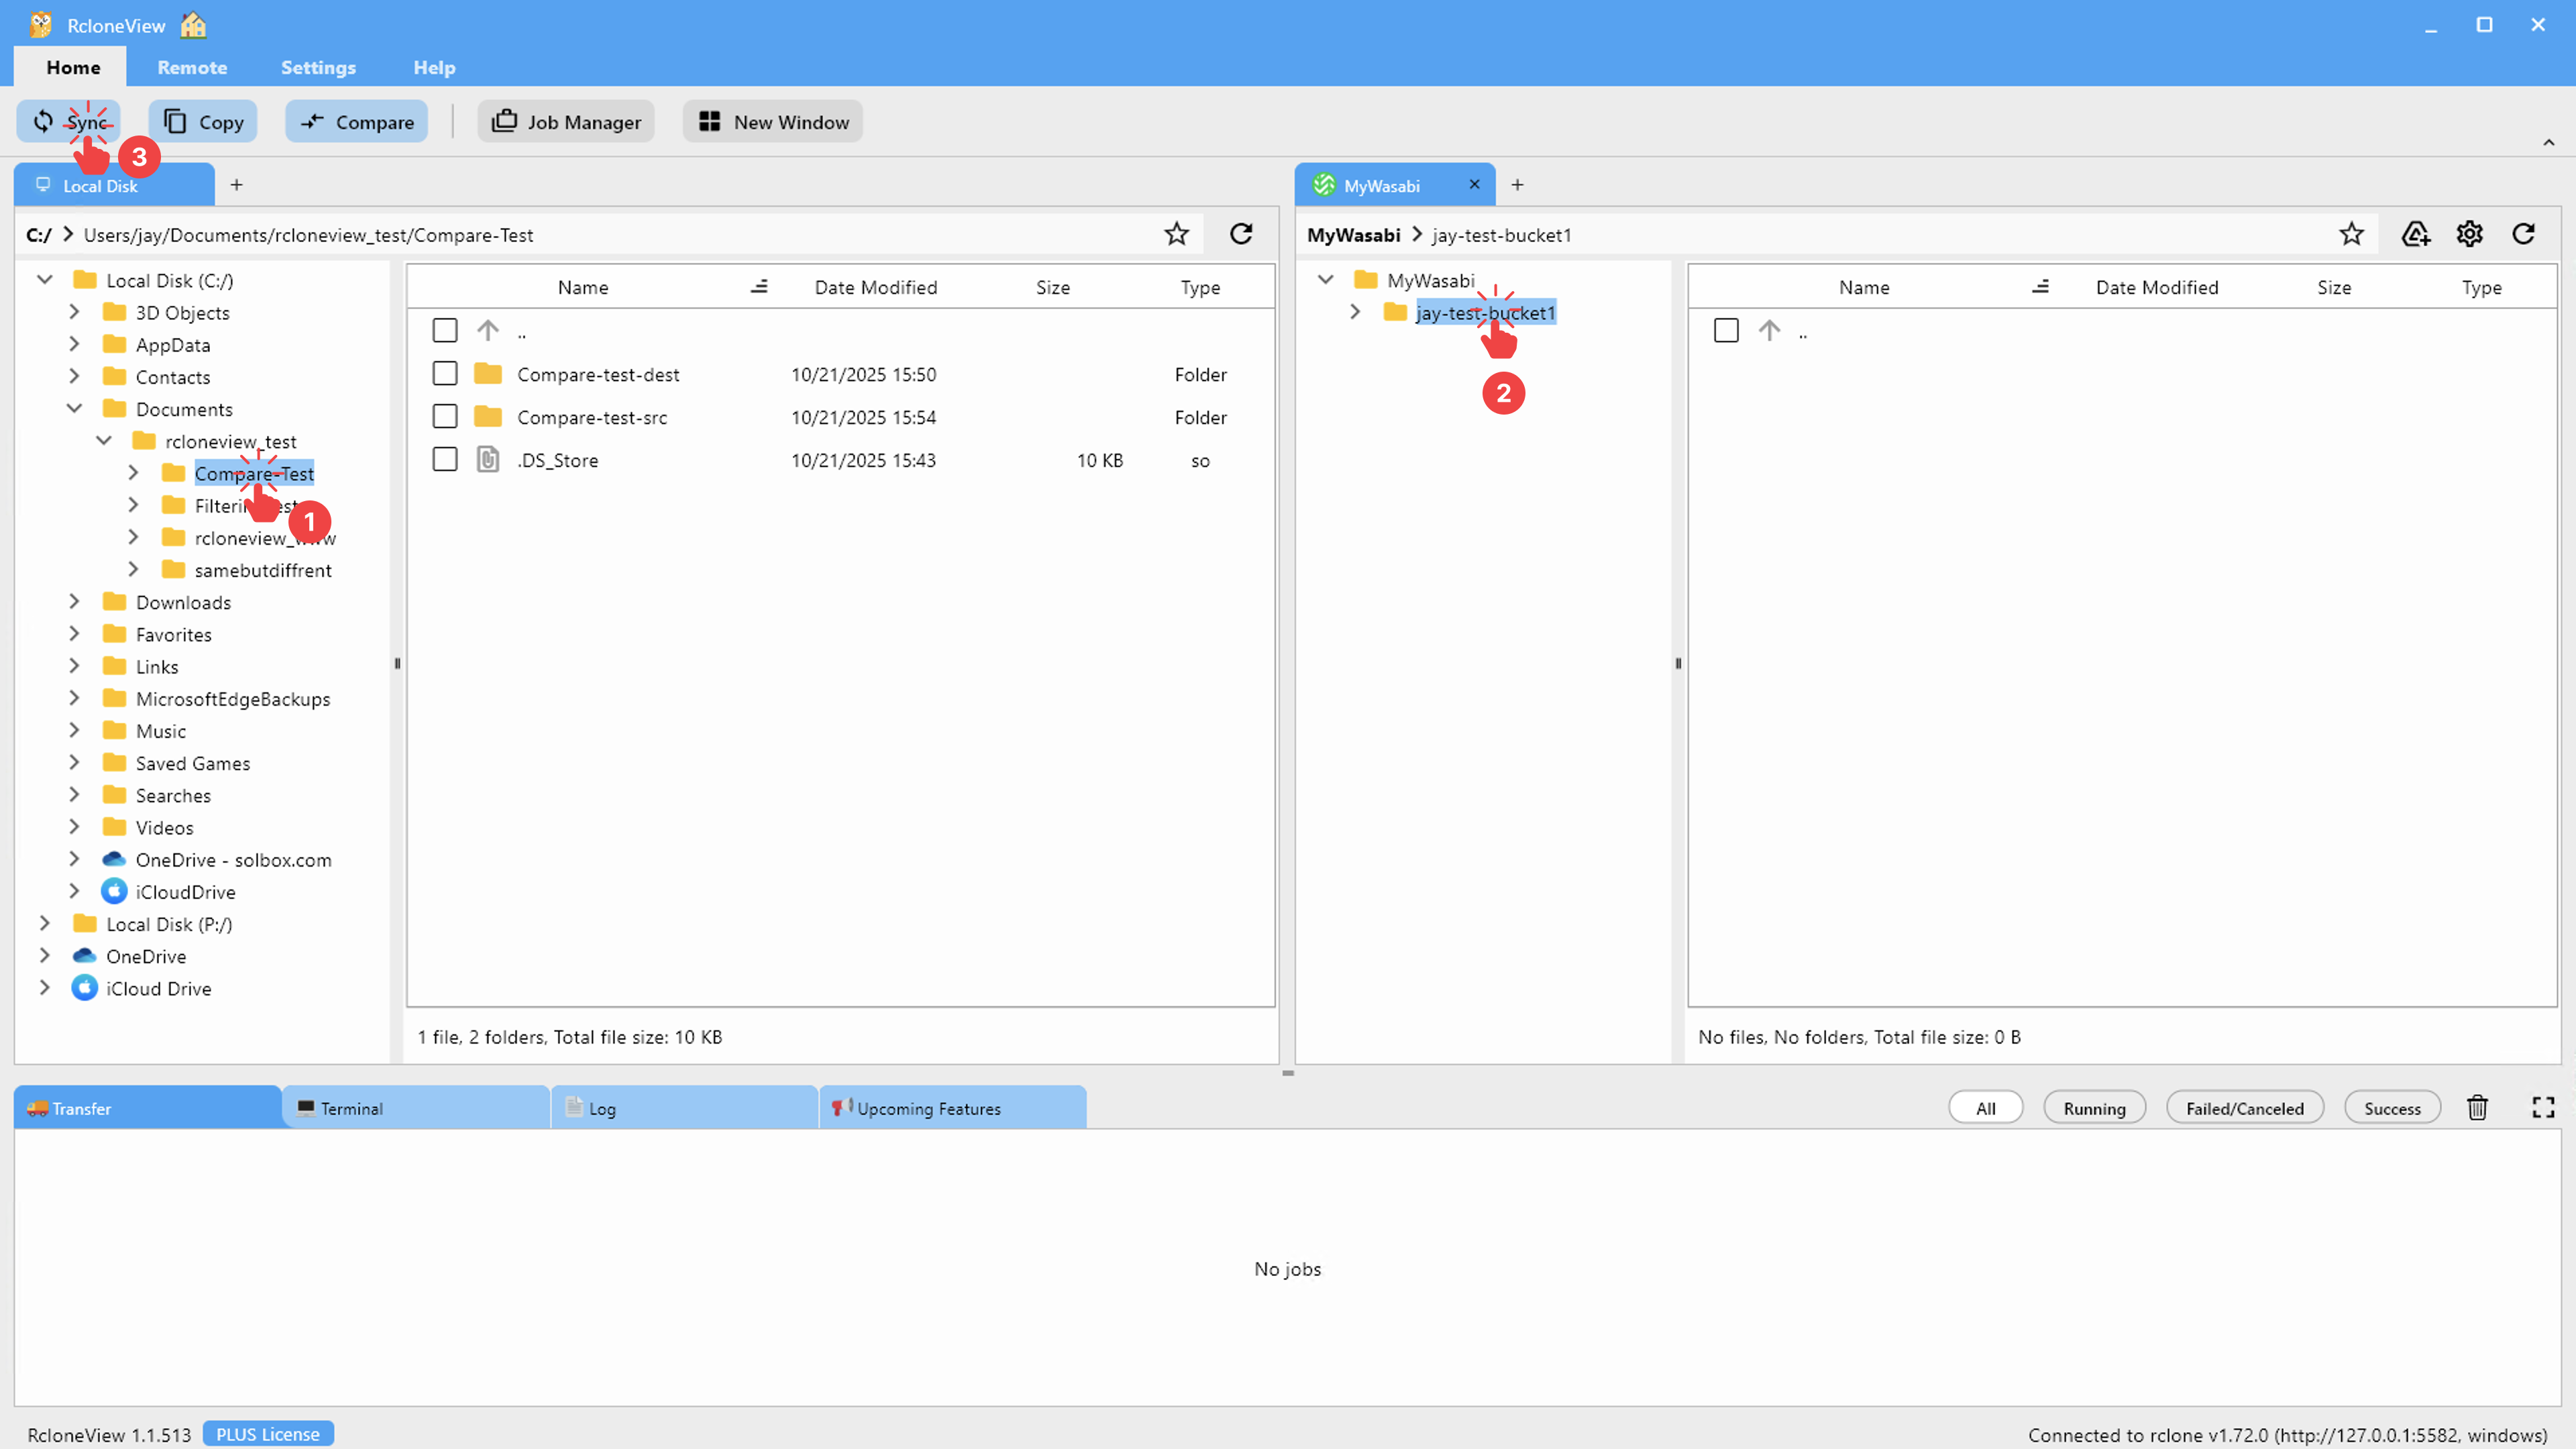
4.3.1 Instant Sync (one‑time)
- Open the source folder in the left pane (for example, a local folder).
- Open the destination Wasabi folder in the right pane.
- Click
Syncon the Home menu.
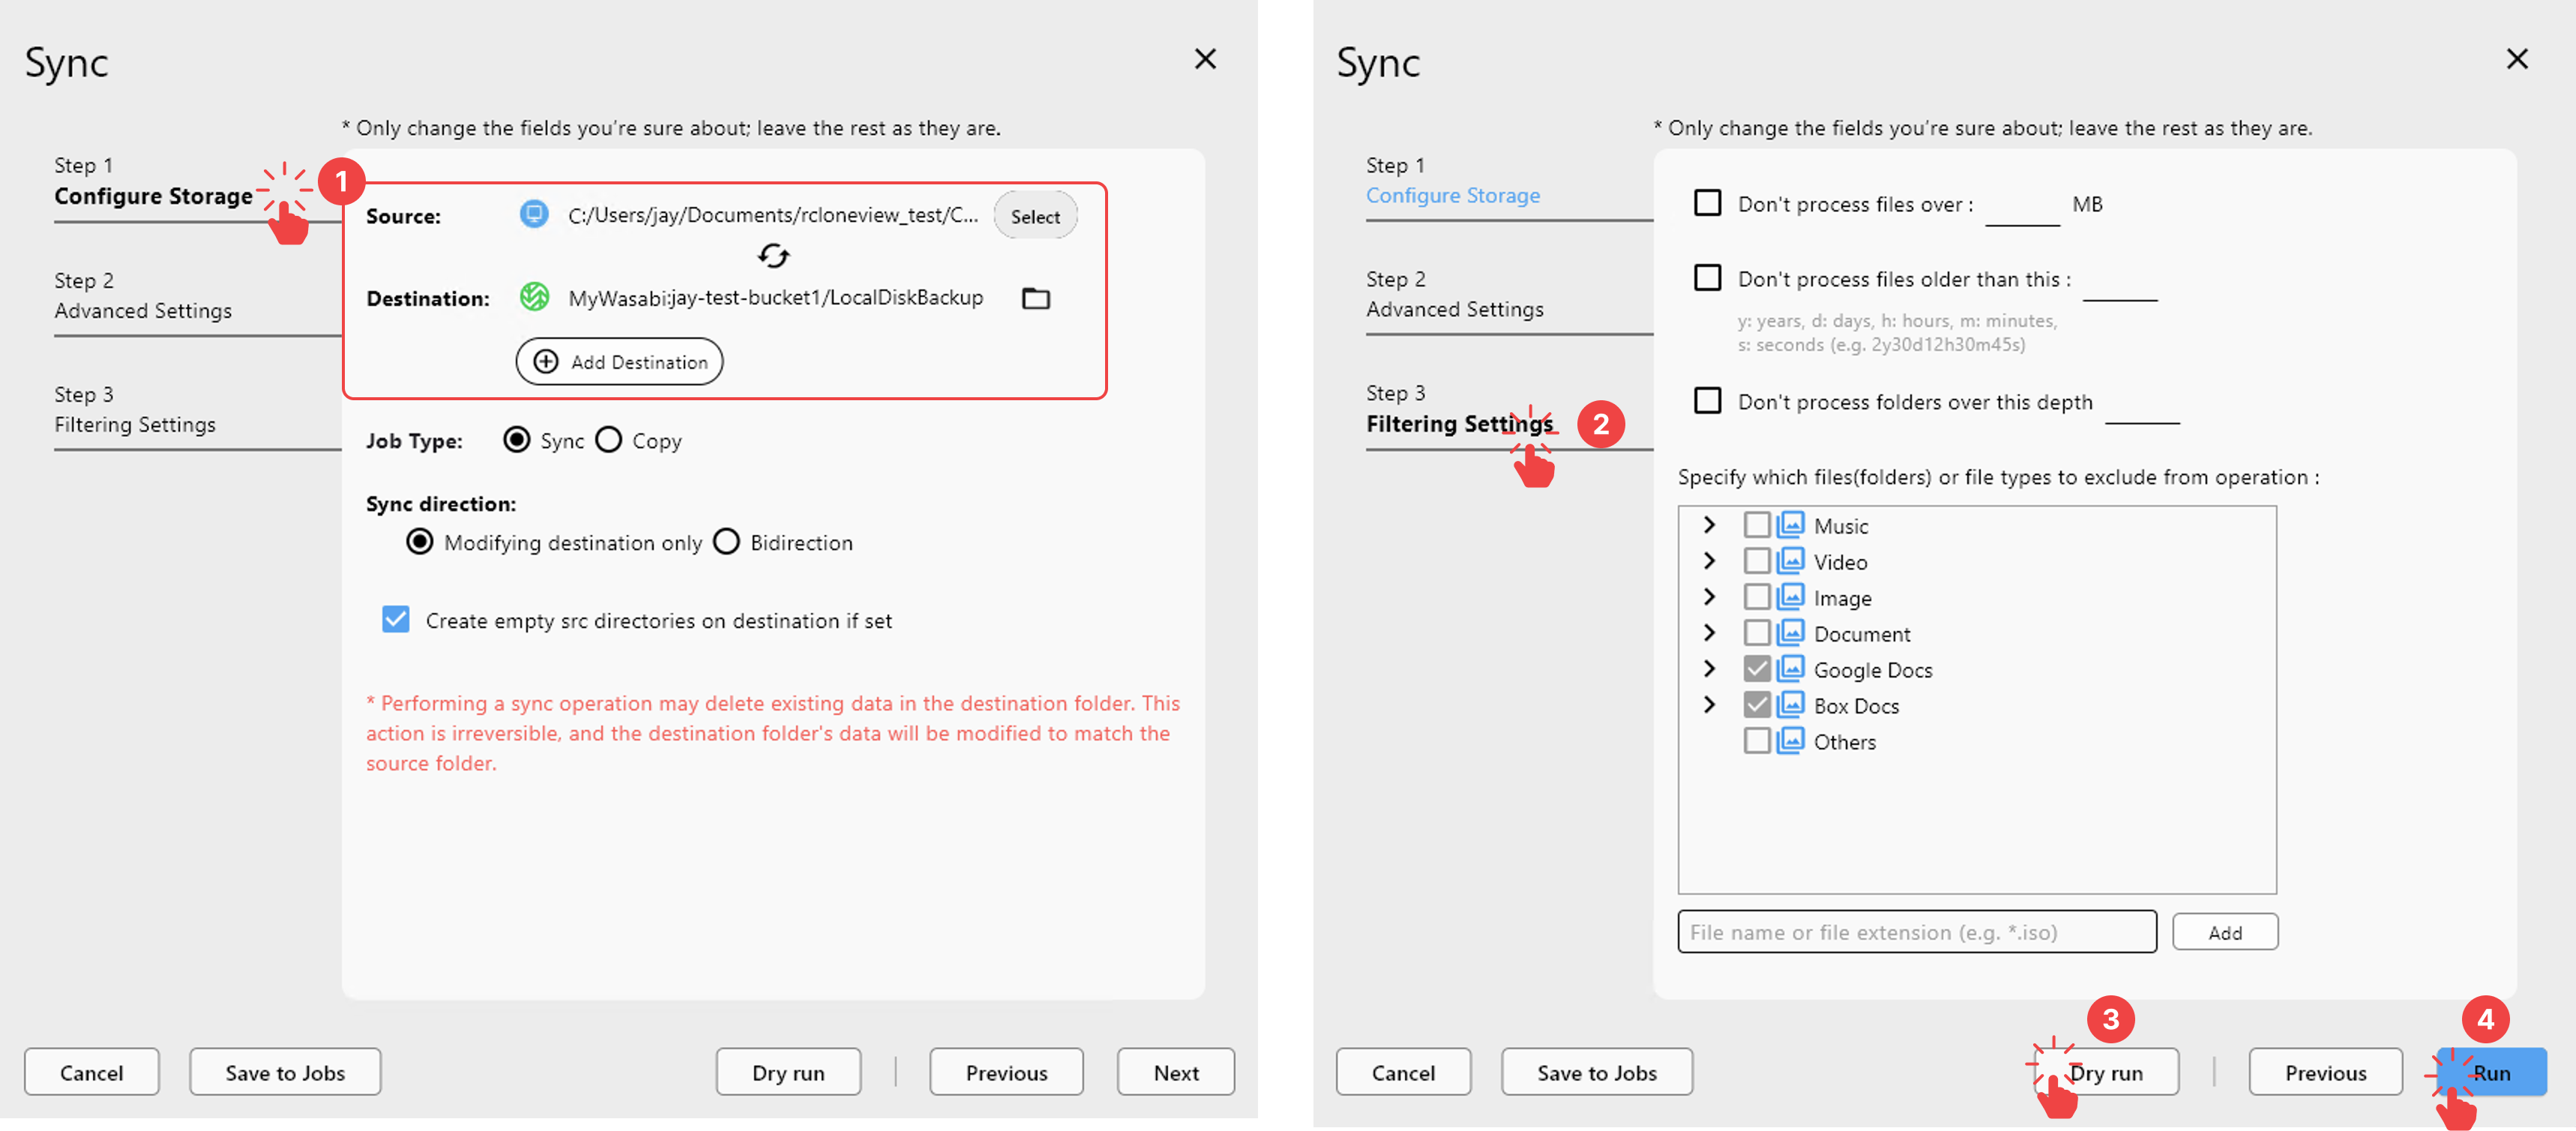
Then, in the Sync dialog:
- In Configure Storage, confirm the source and destination.
- Optionally adjust Advanced Settings or Filtering Settings.
- Run a Dry Run first if you want to preview changes.
- Click Run to start the sync.
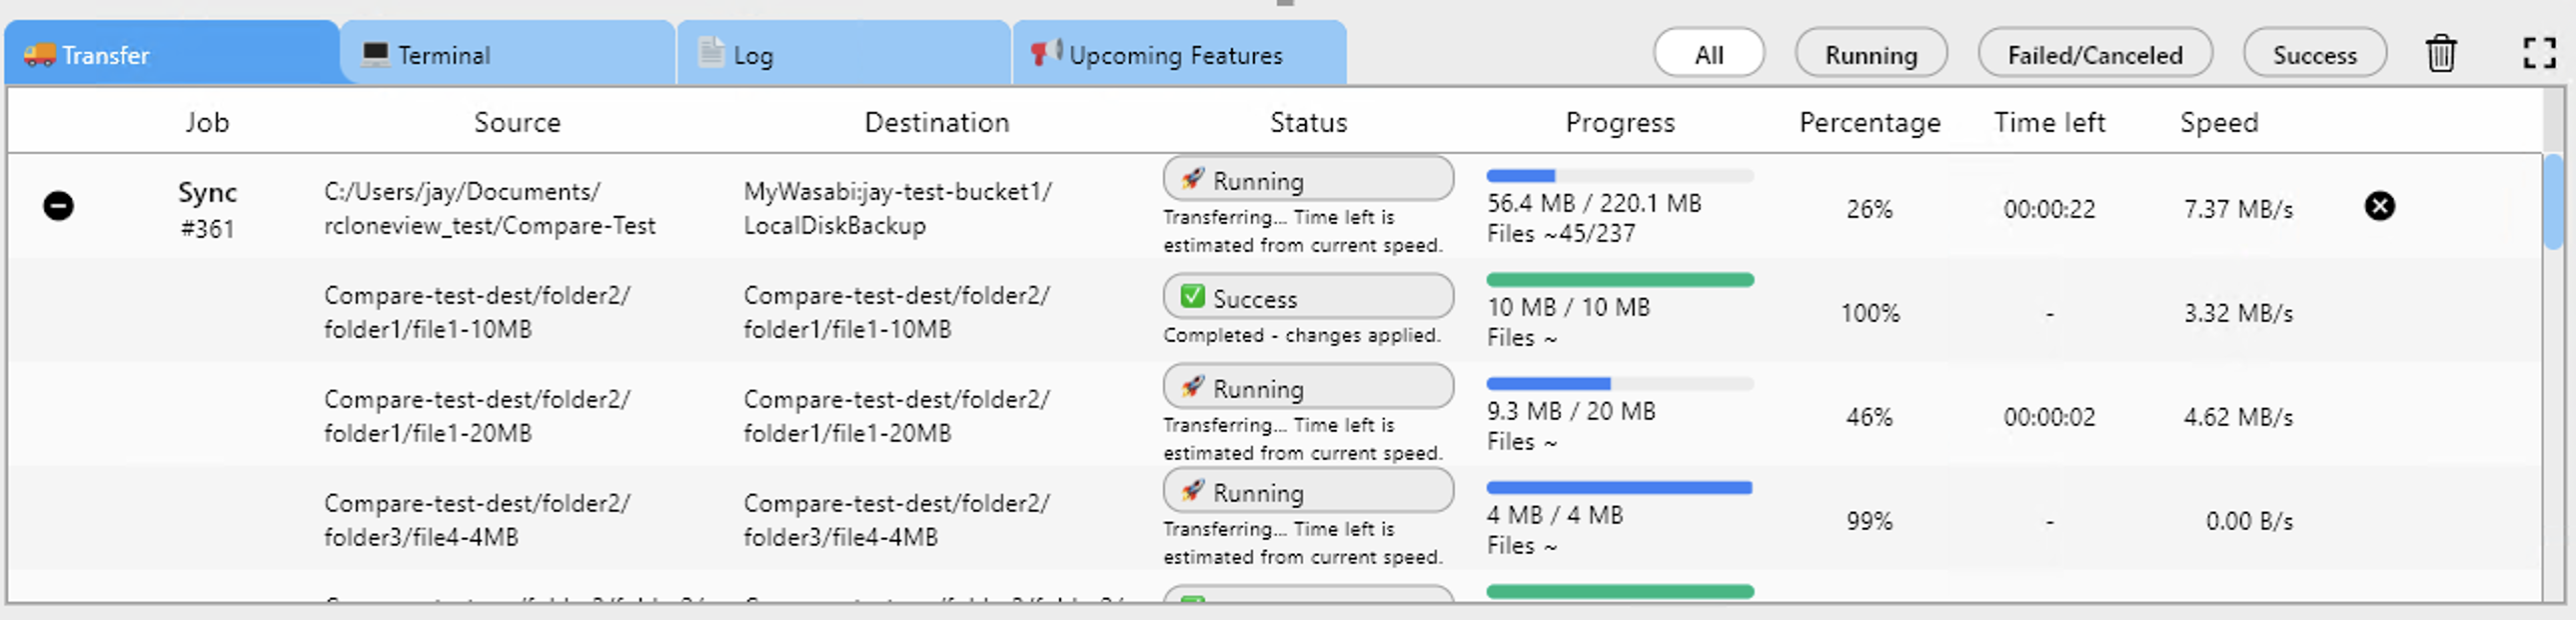
After running Sync, you can monitor the progress of transferring file in real-time.
Reference:
4.3.2 Save a Sync Job for re‑use
If you will run the same local → Wasabi backup regularly:
Configure a sync as above (source on the left, Wasabi destination on the right).
- In the Sync dialog, choose Save to Jobs instead of running immediately.
- Give the job a descriptive name like
SyncLocalToWasabi. - Later, open Job Manager and run the job manually whenever you need an updated backup.

On supported platforms (such as Windows), RcloneView can show a system notification when the job finishes.
Reference:
4.3.3 Schedule automatic Wasabi backups (Job Scheduling)
To fully automate backups to Wasabi, schedule your sync job.
📌 Job scheduling is a PLUS feature. You need a PLUS license to enable scheduling.
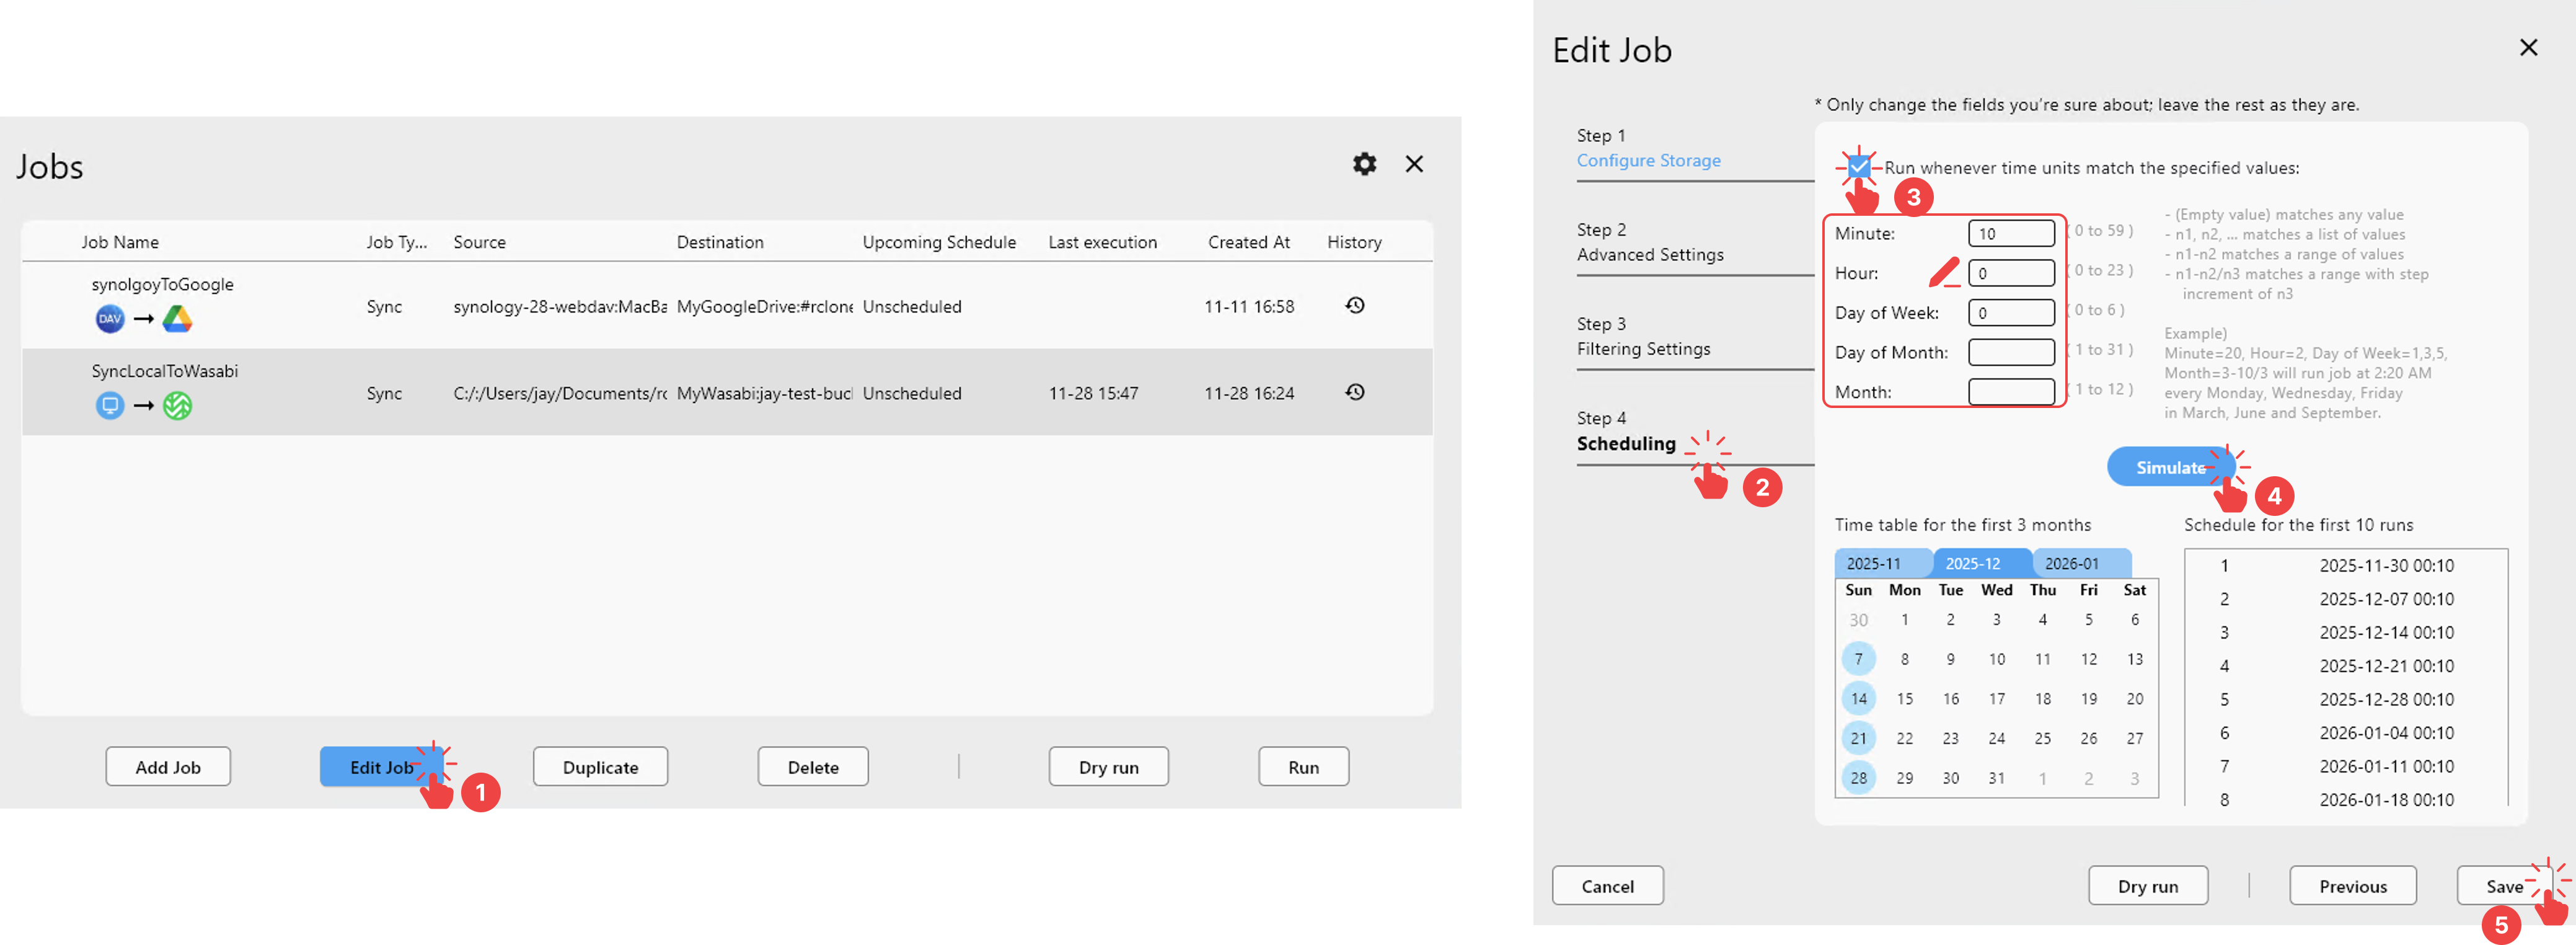
Open Job Manager from the toolbar.
- Select your Wasabi sync job (for example
LocalToWasabi_DailyBackup) and click Edit Job, or create a new job from your current Explorer selection. - Go to Step 4: Scheduling.
- Enable Run whenever time units ~ and set the schedule (for example, daily at 01:00).
- Use Simulate to preview upcoming run times.
- Save the job and keep RcloneView running; the job will execute automatically.
For deeper details:
4.4 Use Mount to work with Wasabi in Windows Explorer
You can mount a Wasabi bucket as a virtual drive or folder on your system and then use Windows Explorer (or Finder on macOS) as usual.
Typical flow:
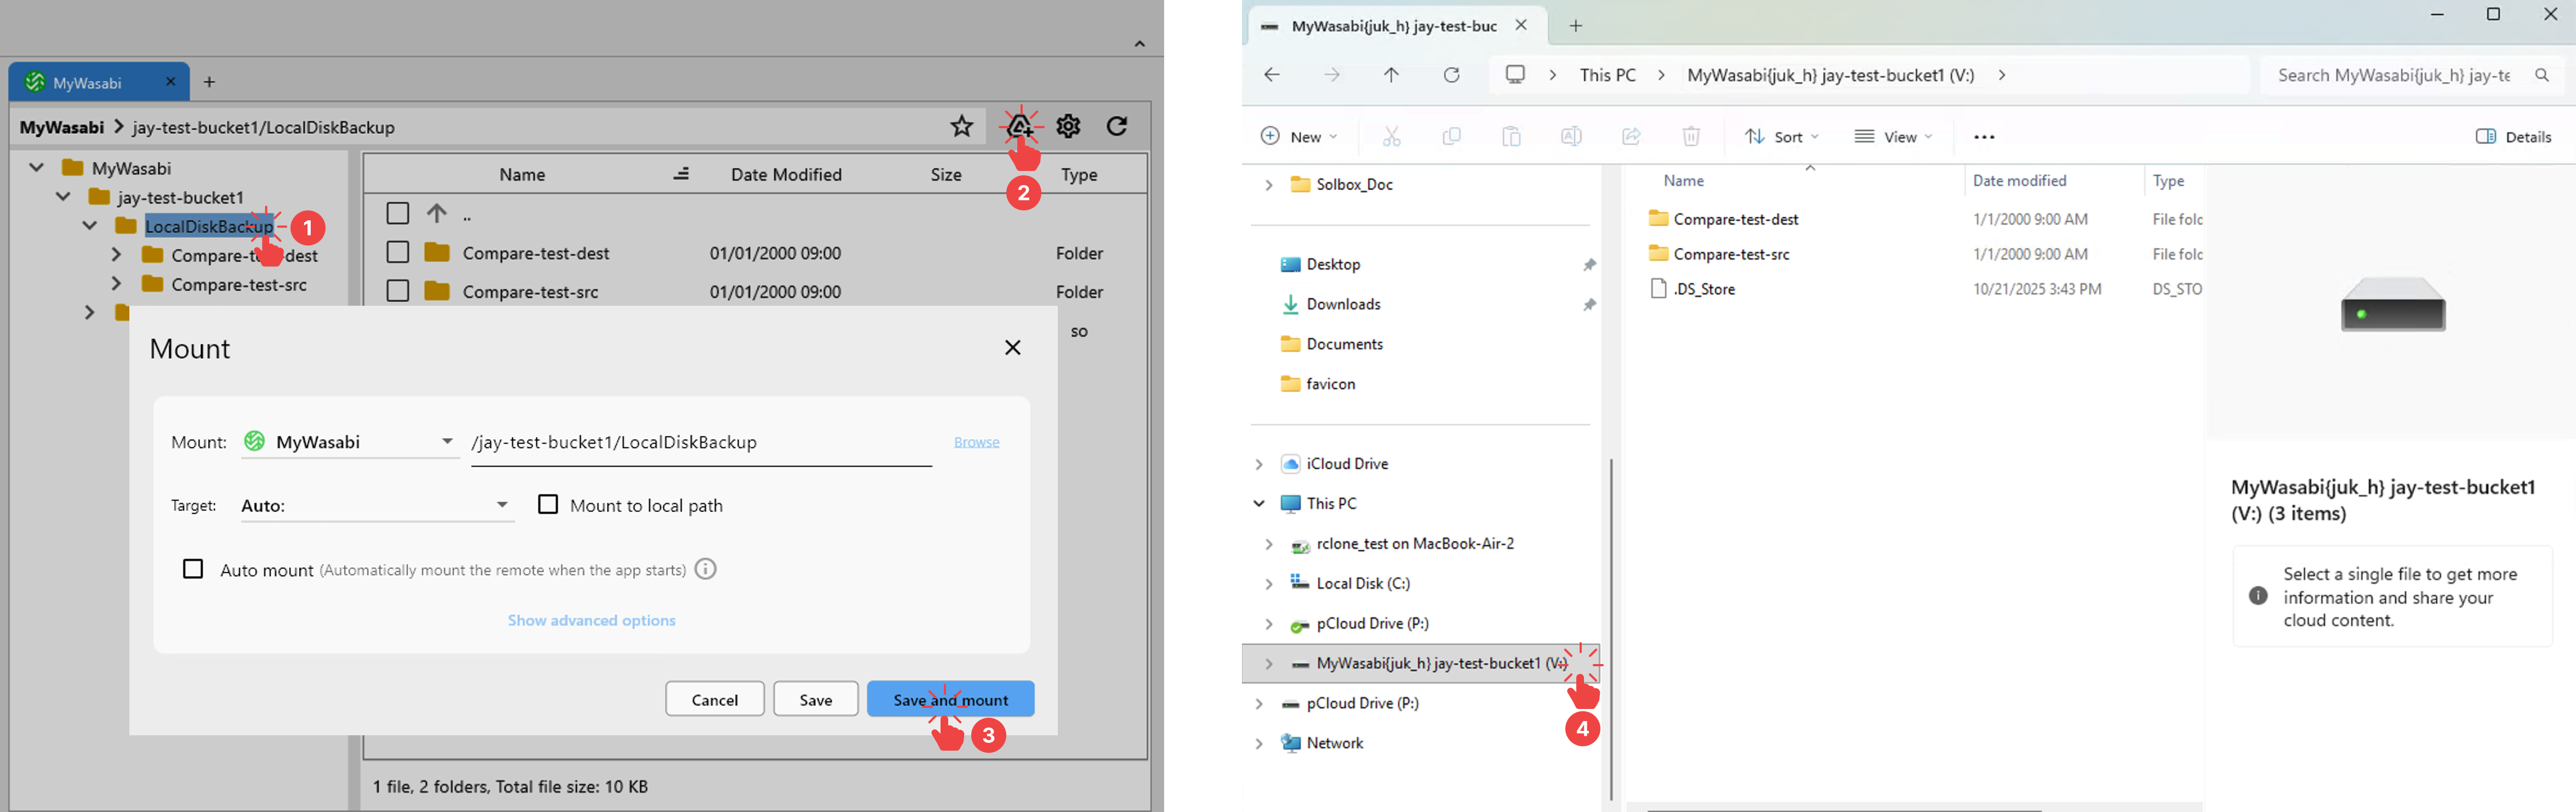
Make sure your Wasabi remote is configured and working.
- Choose the Wasabi folder you want to mount.
- Click the Mount icon in the upper‑right corner of the RcloneView Explorer.
- Click the Save and mount button to start the mount.
- After a few moments, a new drive or folder appears in your OS. Browsing that path reads and writes data directly from Wasabi through RcloneView/rclone.
More information:
5. Where to get help
- RcloneView documentation and how‑to guides: https://rcloneview.com/support
- Wasabi Documentation Portal: https://docs.wasabi.com
By combining Wasabi��’s S3‑compatible object storage with RcloneView’s visual job management, you can build reliable backup, sync, and migration workflows without having to learn rclone command‑line syntax.