Effortless Synology NAS Integration with RcloneView: Auto-Detection, Setup & File Transfer
Easily connect your Synology NAS to cloud services like Google Drive, OneDrive, or iCloud using RcloneView. With auto-detection, built-in support for SMB, WebDAV, and SFTP, and no complex setup required, you can transfer, sync, or schedule jobs between your NAS and cloud drives—all from a user-friendly GUI.
✅ Why Use RcloneView for NAS-to-Cloud Transfers?
If you’re using Synology NAS as your home server, office backup, or media vault, chances are you’ve also got cloud storage accounts. With RcloneView, you don’t need to rely on downloading files manually or learning command-line tools.
Instead, you get:
-
🚀 Auto-detection of NAS devices in your local network
-
🔄 Sync & transfer jobs between NAS and cloud storage
-
👨💻 GUI-based setup for WebDAV, SMB, FTP, and SFTP
-
📅 Schedule automated backup jobs from NAS to cloud
-
✅ Compare folder contents before syncing
-
🧠 No command-line skills required
Whether you’re a beginner or a system administrator, RcloneView makes NAS-to-cloud management simple.
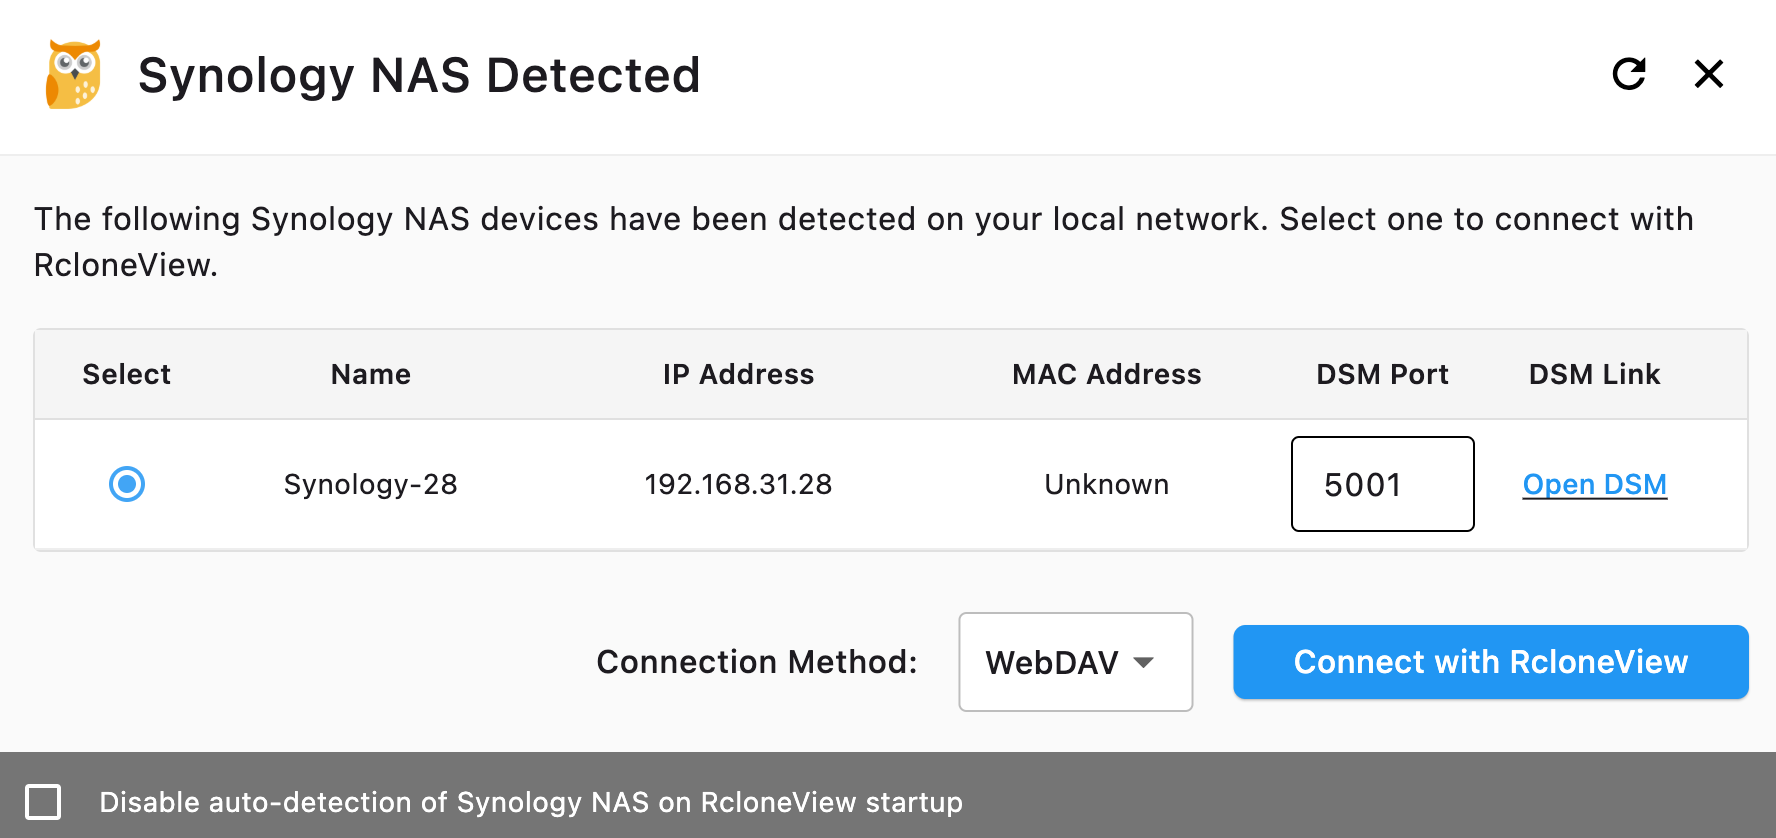
🧰 Step 1: Detect Your NAS on Local Network
RcloneView automatically scans your local network for Synology NAS devices.
-
Make sure your NAS and computer are on the same local network.
-
NAS devices detected will appear in a list showing:
-
Device name, IP, MAC address, DSM port
-
Link to open DSM (DiskStation Manager)
-
If you're using a VLAN (Virtual Local Area Network), RcloneView may not be able to auto-detect your Synology NAS.
This is because the auto-discovery feature relies on multicast or broadcast protocols, which are typically restricted or blocked between VLANs for security and traffic isolation reasons.
Select a Connection Method
From the dropdown, choose how to connect:
- WebDAV (default and recommended)
- SMB
- FTP
- SFTP
🔗 Need to configure these on Synology first?
Refer to the official DSM setup guides:
If your NAS is behind a router or operating in a NAT (Network Address Translation) environment, you must configure port forwarding on your router after enabling WebDAV, SMB, FTP, or SFTP in DSM.
📘 Learn more: Synology Port Forwarding Guide
Additionally, to access your NAS over the internet using domain-based access instead of IP address, you can configure Synology’s DDNS (Dynamic DNS) service.
🌐 Learn more: Synology DDNS Setup Guide
🔗 Step 2: Add Synology NAS as a Remote
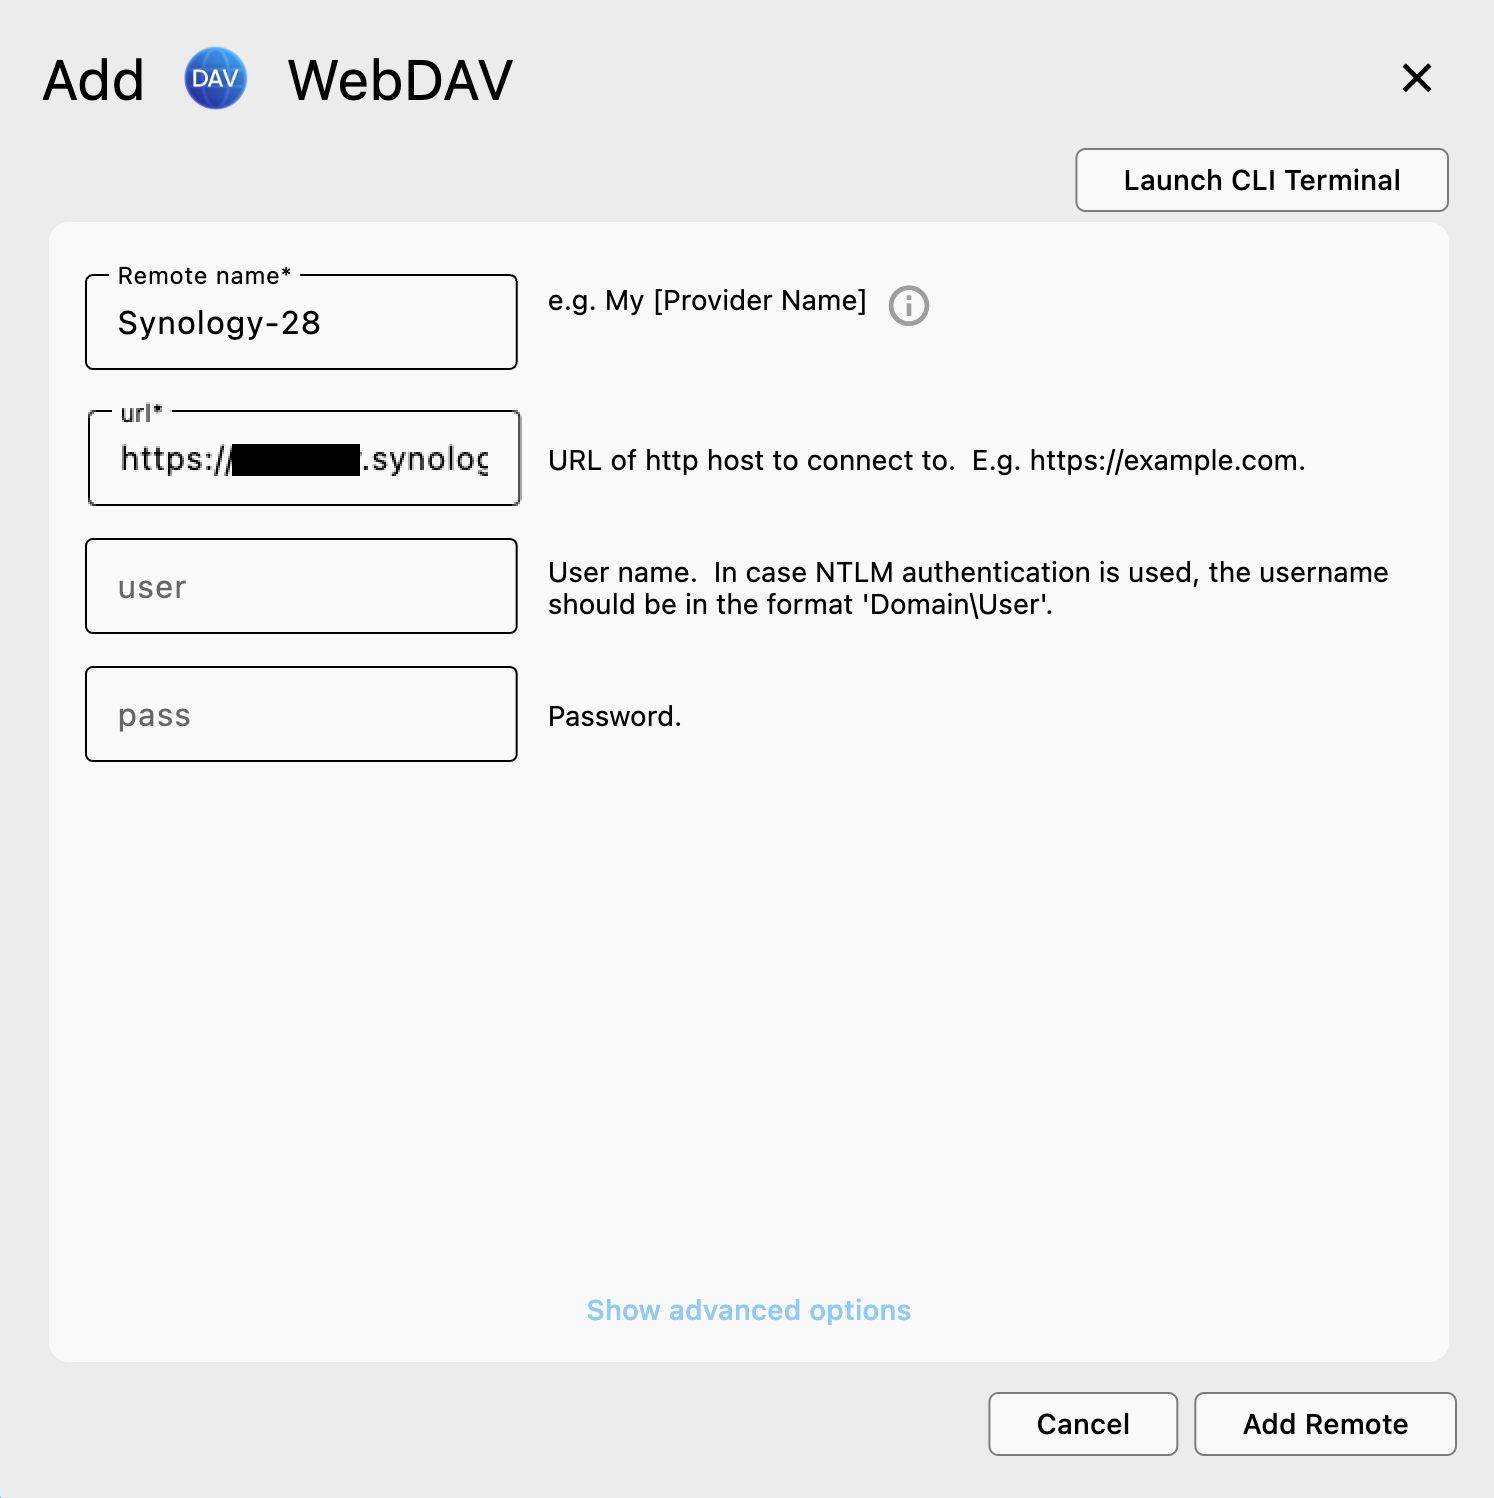
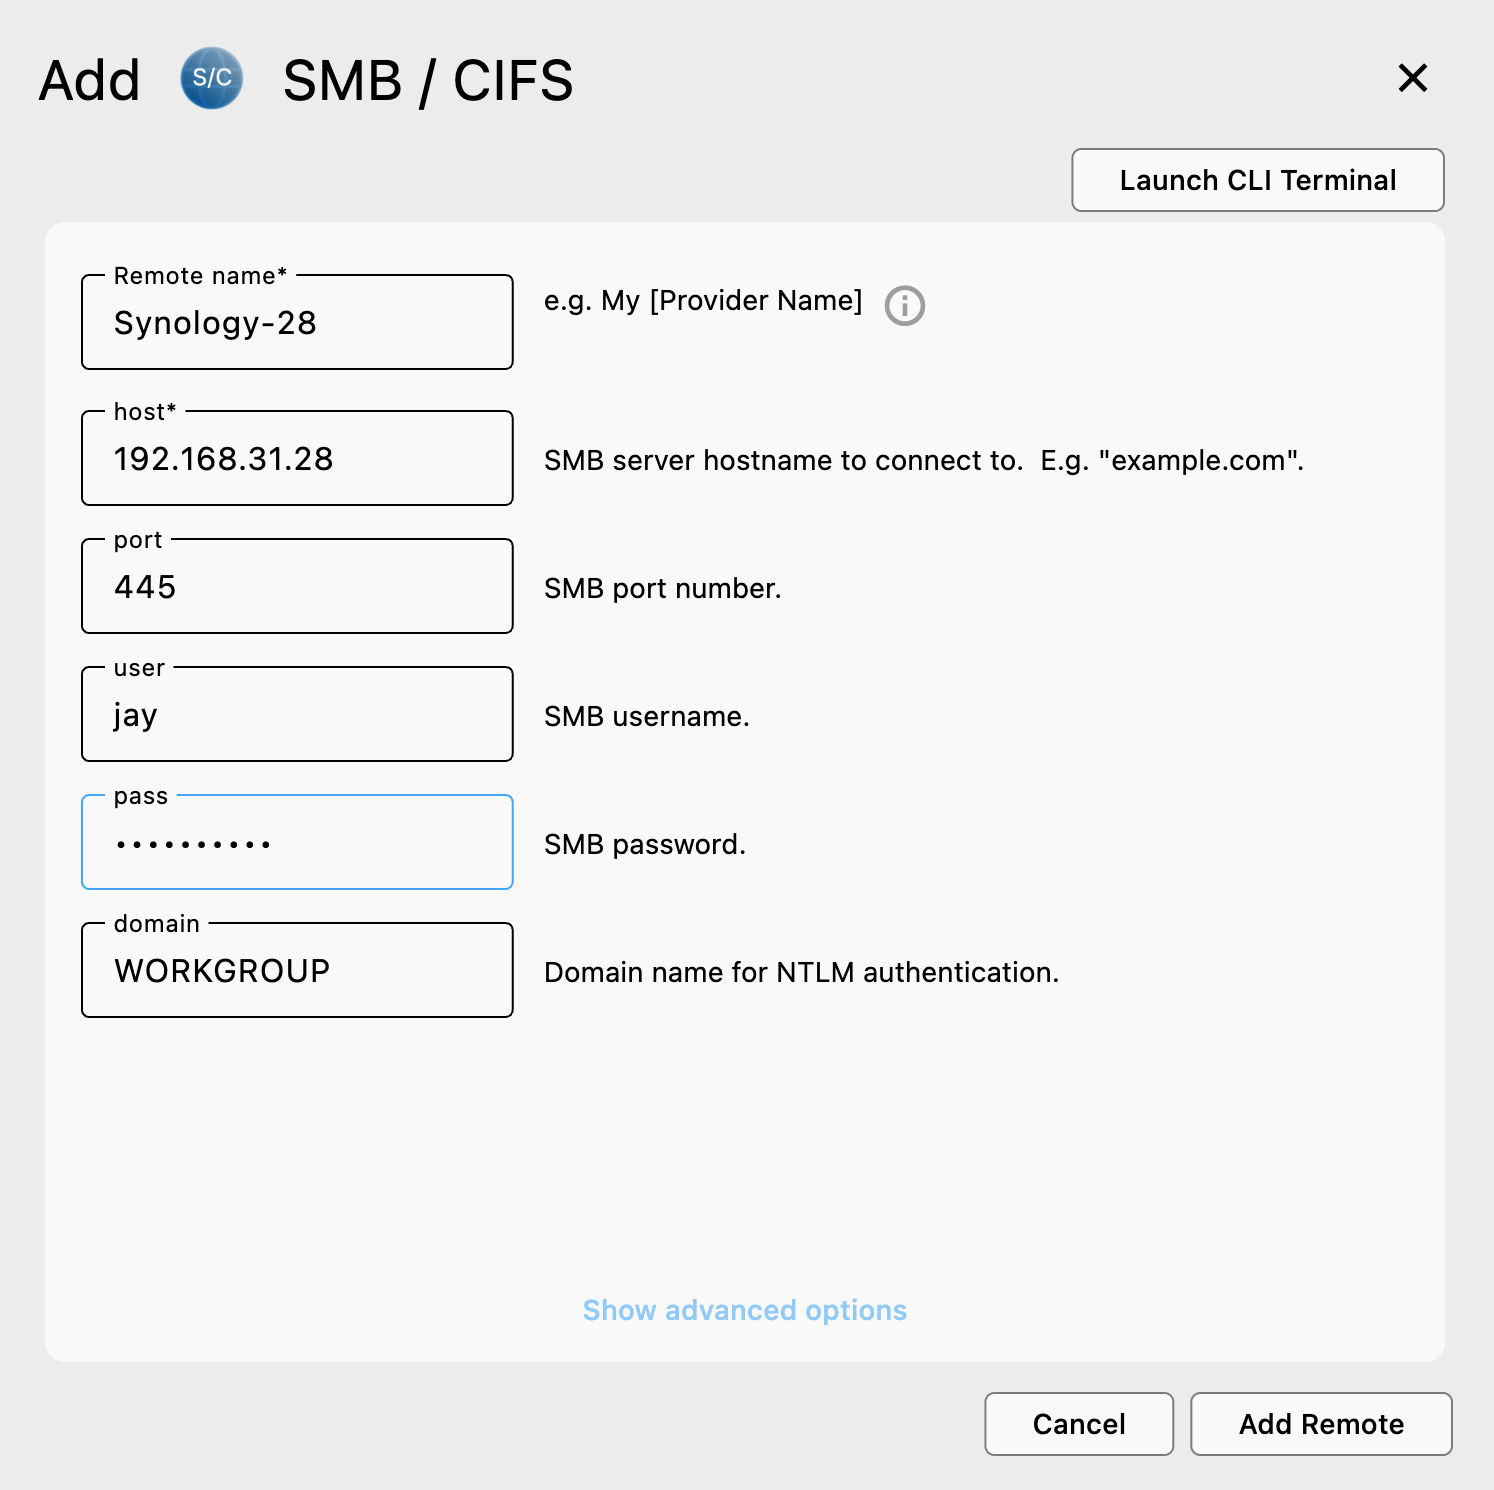
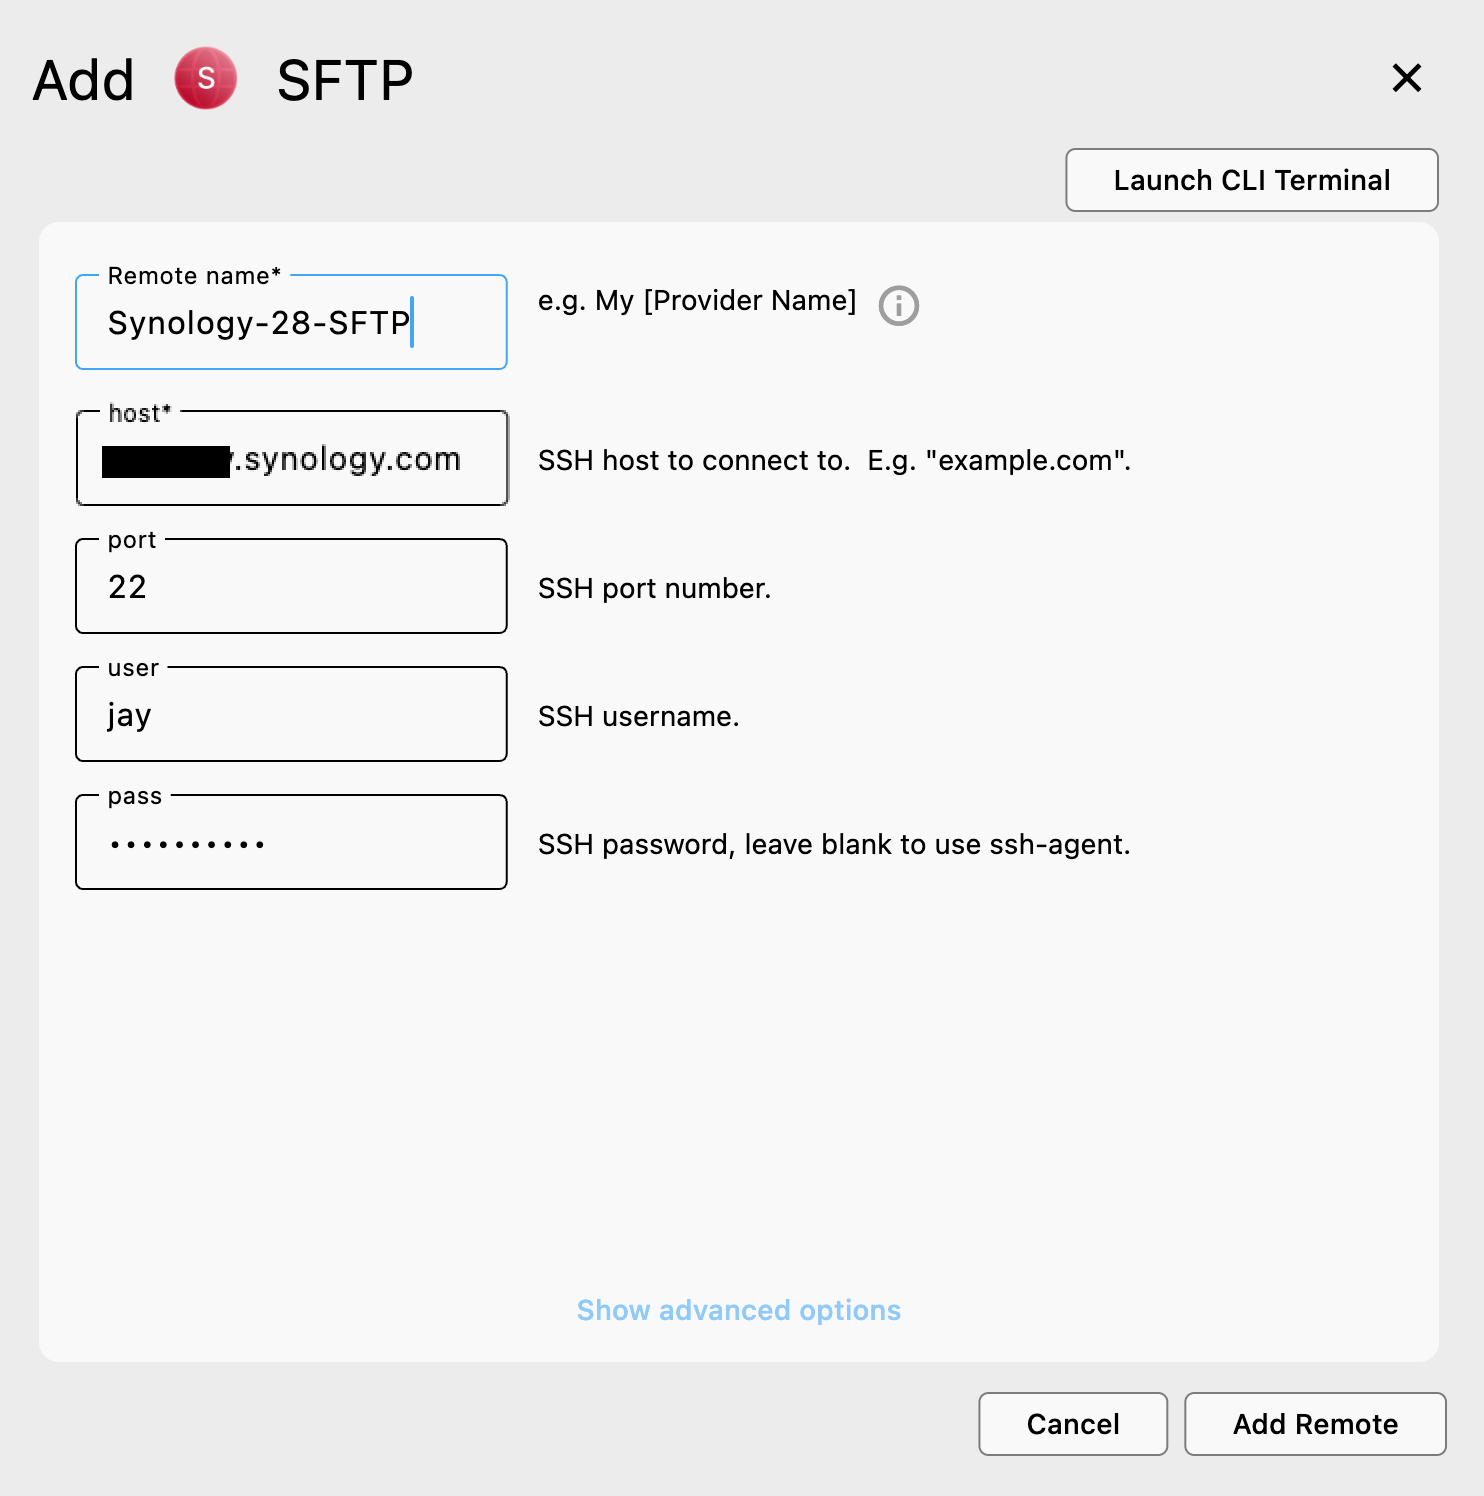
After selecting your NAS and connection method, RcloneView will automatically guide you through the + New Remote wizard:
- Provider is automatically selected based on your chosen connection method (e.g., WebDAV, SMB, SFTP).
- Remote Name is auto-filled (e.g.,
Synology-28) — but you can change it if you'd like. - URL & Port:
- For WebDAV, enter the full URL (e.g.,
https://abc.synology.me:5006) - For SMB / FTP / SFTP, enter the host (e.g.,
192.168.1.100) and appropriate port:445for SMB21for FTP22for SFTP
- For WebDAV, enter the full URL (e.g.,
- Username and Password: Enter the NAS account credentials you use to access shared folders.
📌 Need more help with each method?
Here are detailed setup guides:
✅ Once added, your NAS remote will appear in the Remote List.
You can then open it in the Explorer panel to browse files or start transfers.
💽 Step 2.5: Mount NAS as a Local Drive (Explorer/Finder)
Mount any NAS folder as a local drive on Windows (e.g., W:) or as a location in macOS Finder. Use the Mount button in the Explorer toolbar.
How to Mount
- In RcloneView Browse/Explorer, open your NAS remote and navigate to the folder you want to mount.
- Click the Mount (
 ) icon on the top toolbar.
 - Configure options:
- Windows: choose a drive letter (Auto or pick one)
- macOS: confirm the mount folder name (default like
~/homefolder/<Remote name>),
- Click Save and mount. The folder appears as a local disk:
- Windows: under “This PC”, e.g.,
synology-28-webdav … (W:) - macOS: under Finder “Locations”
- Windows: under “This PC”, e.g.,
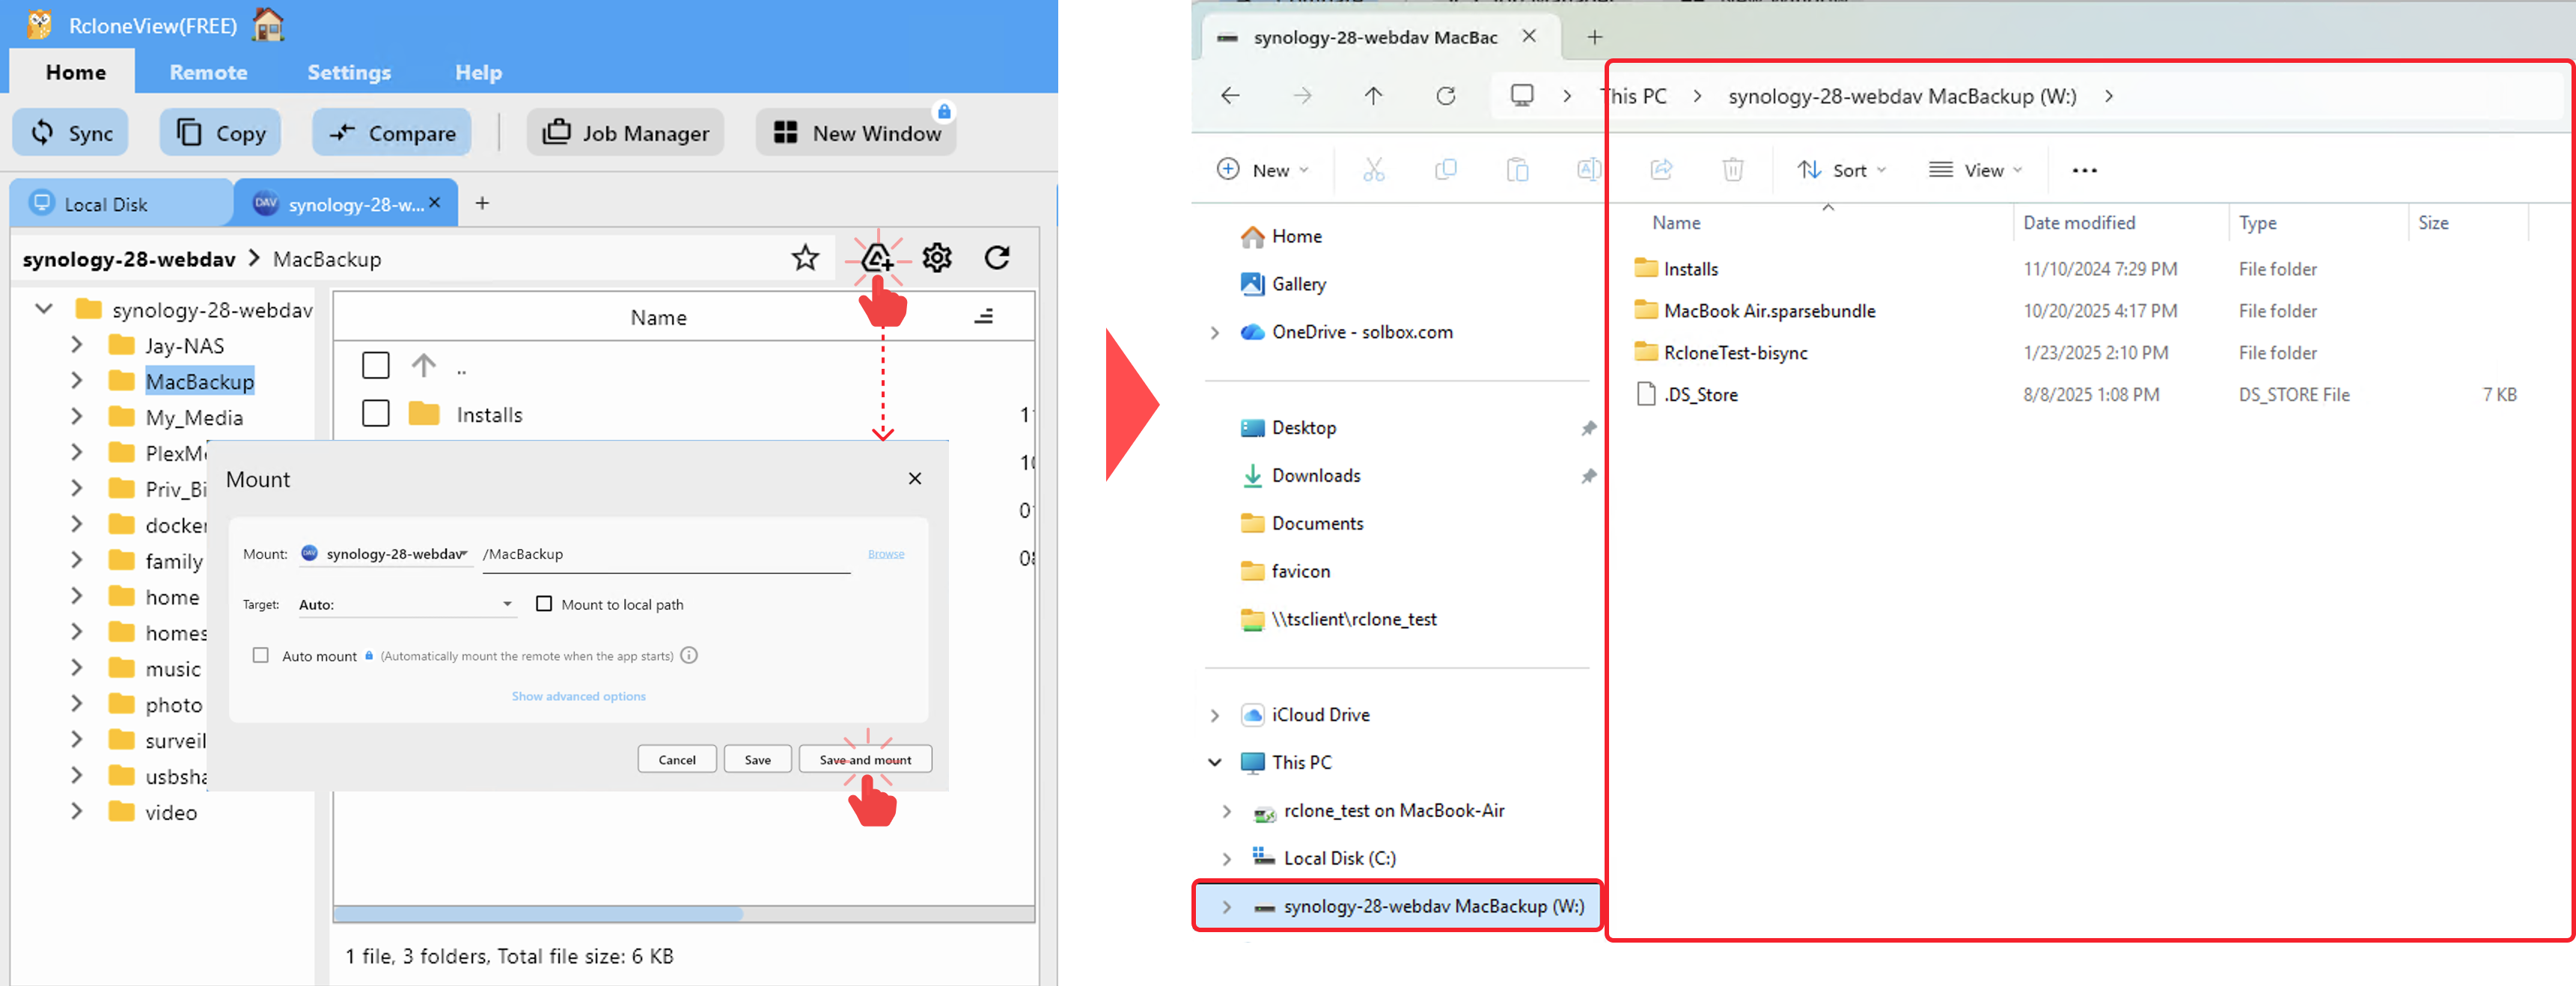
To unmount, click Unmount in RcloneView or eject the drive from the OS.
For full details and additional methods, see:
- Method 1: Mount from Remote Explorer
- Method 2: Mount via Mount Manager
- View and Manage Mounted Drives
- Quick Mount from System Tray
🚚 Step 3: Transfer or Sync Files
Once your NAS is connected as a Remote, RcloneView gives you 4 powerful ways to manage files between it and your cloud storage.
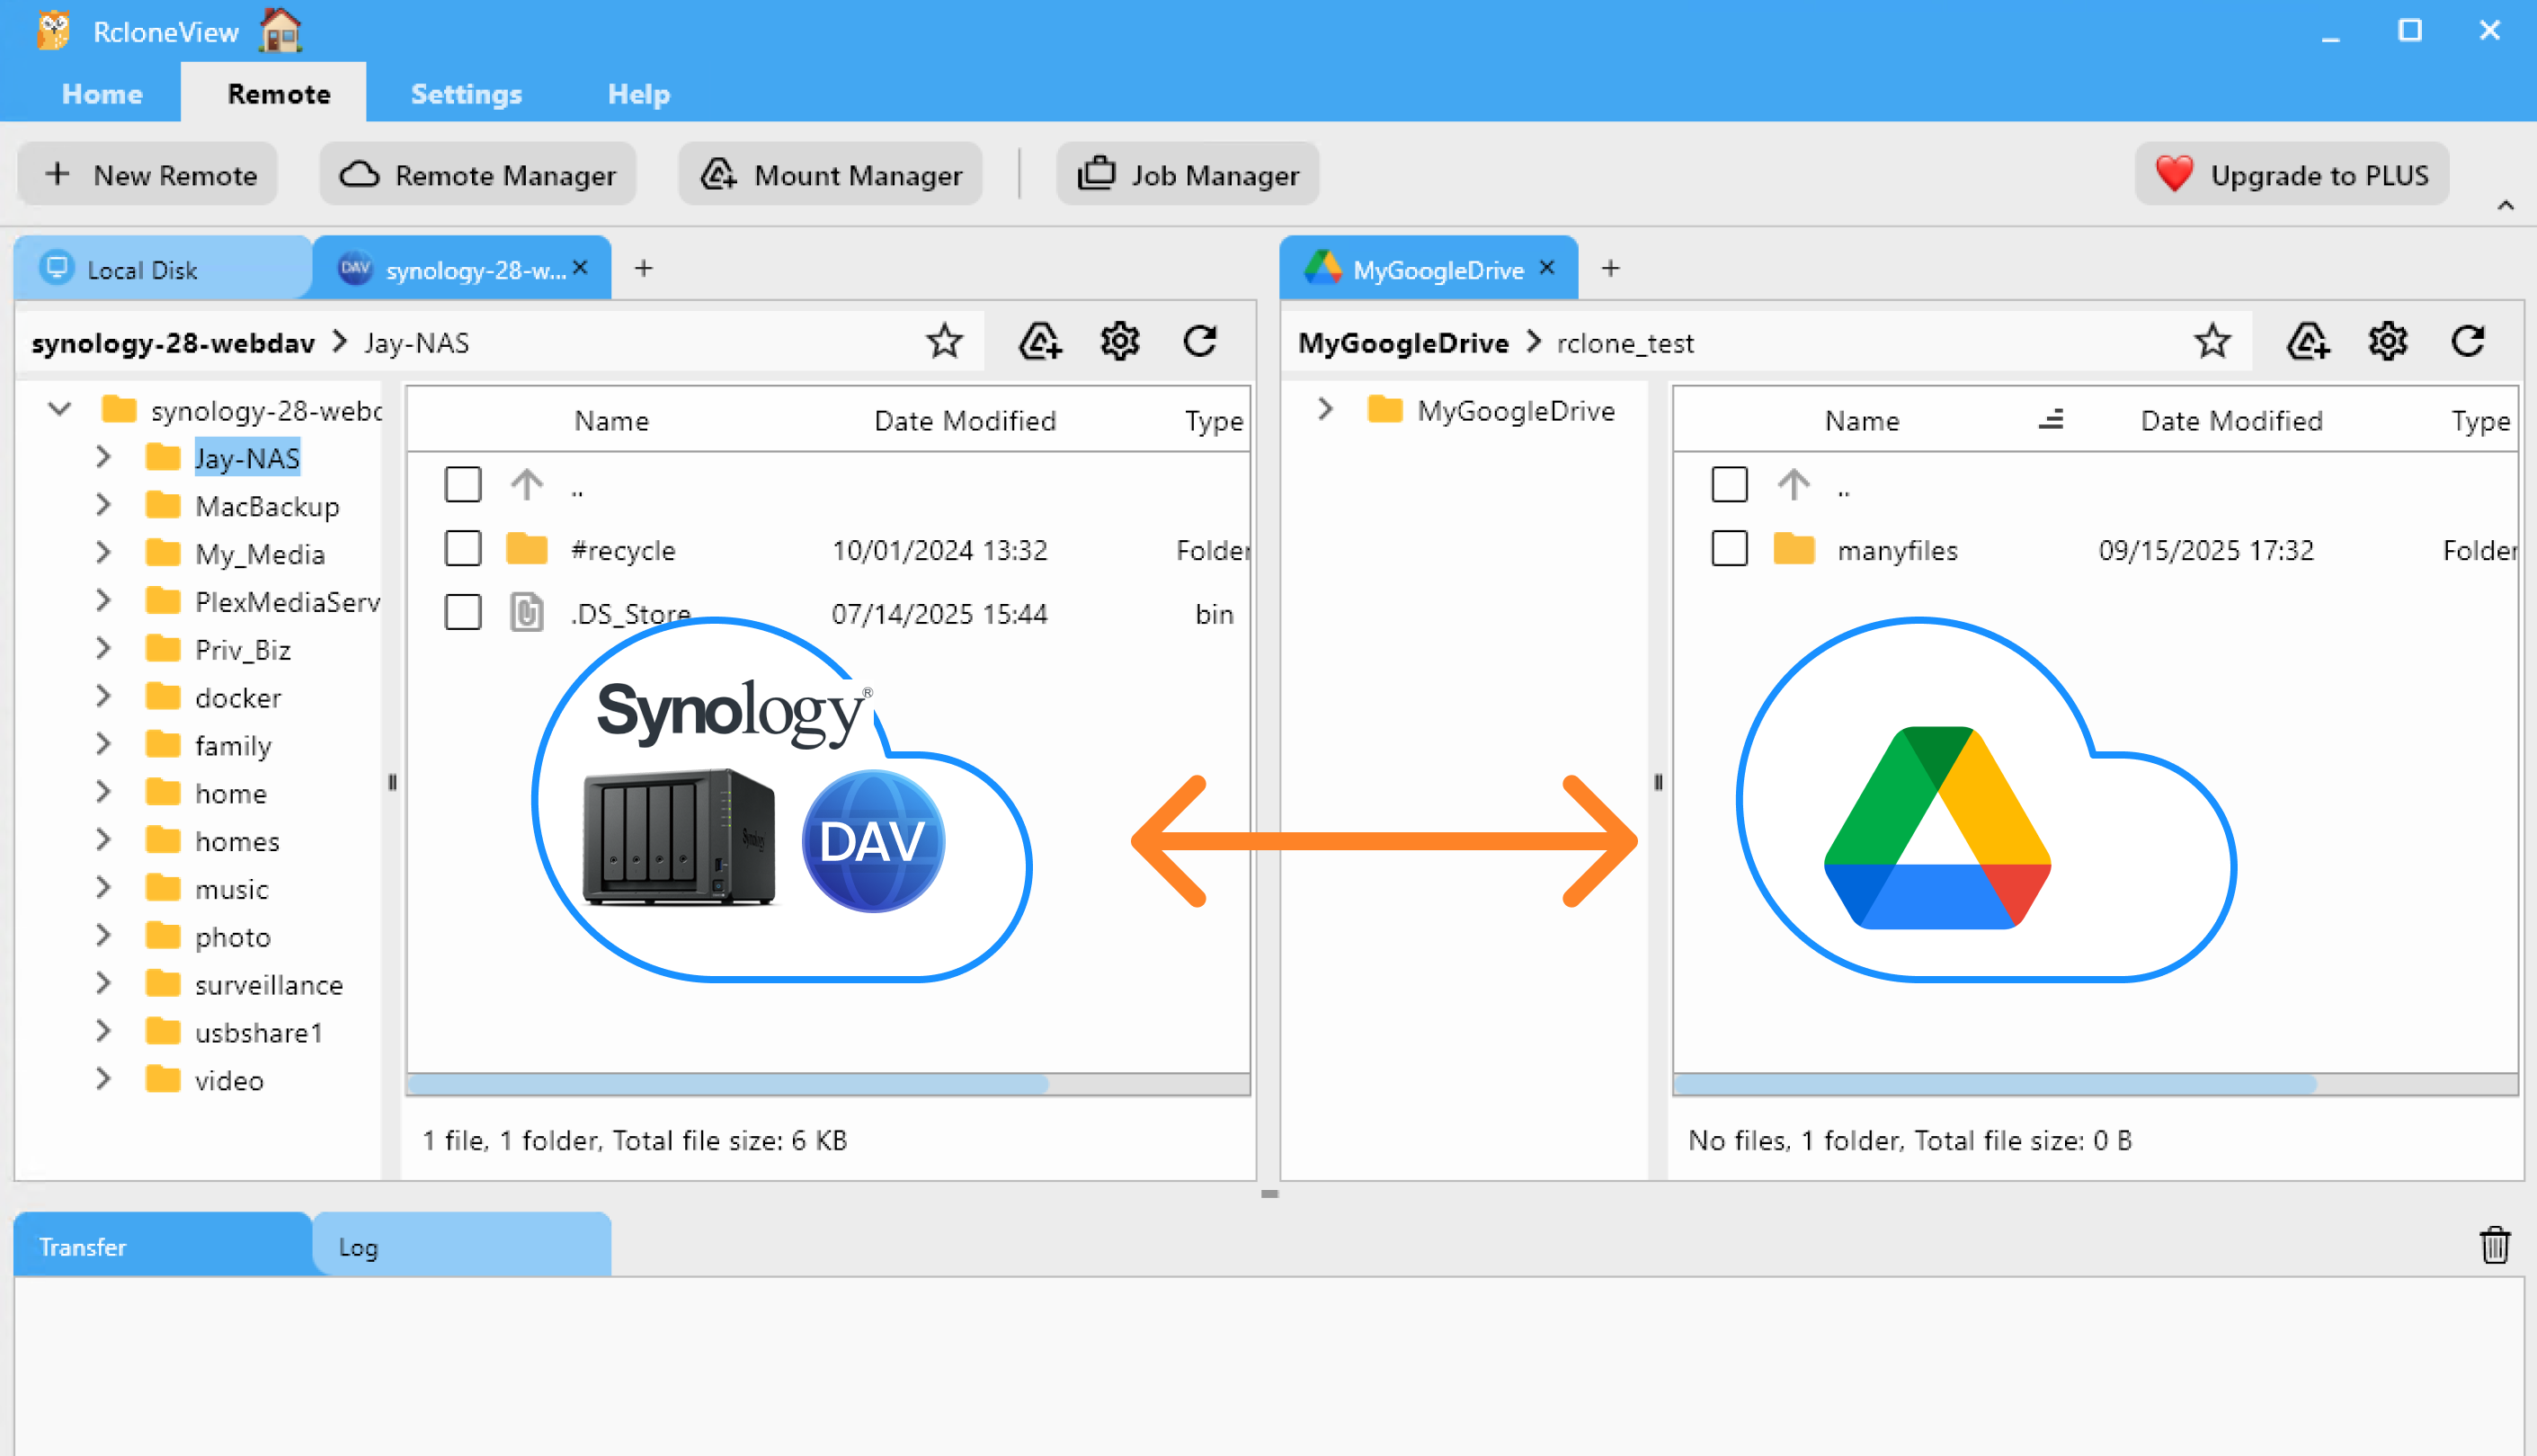
🖱️ Method 1: Drag & Drop
-
Open the Browse tab.
-
Load your NAS remote in one pane, and your cloud remote (e.g. Google Drive) in the other.
-
Simply drag files from one pane and drop into the other.
-
Transfer starts instantly. You can monitor it in the Transfer Logs tab.
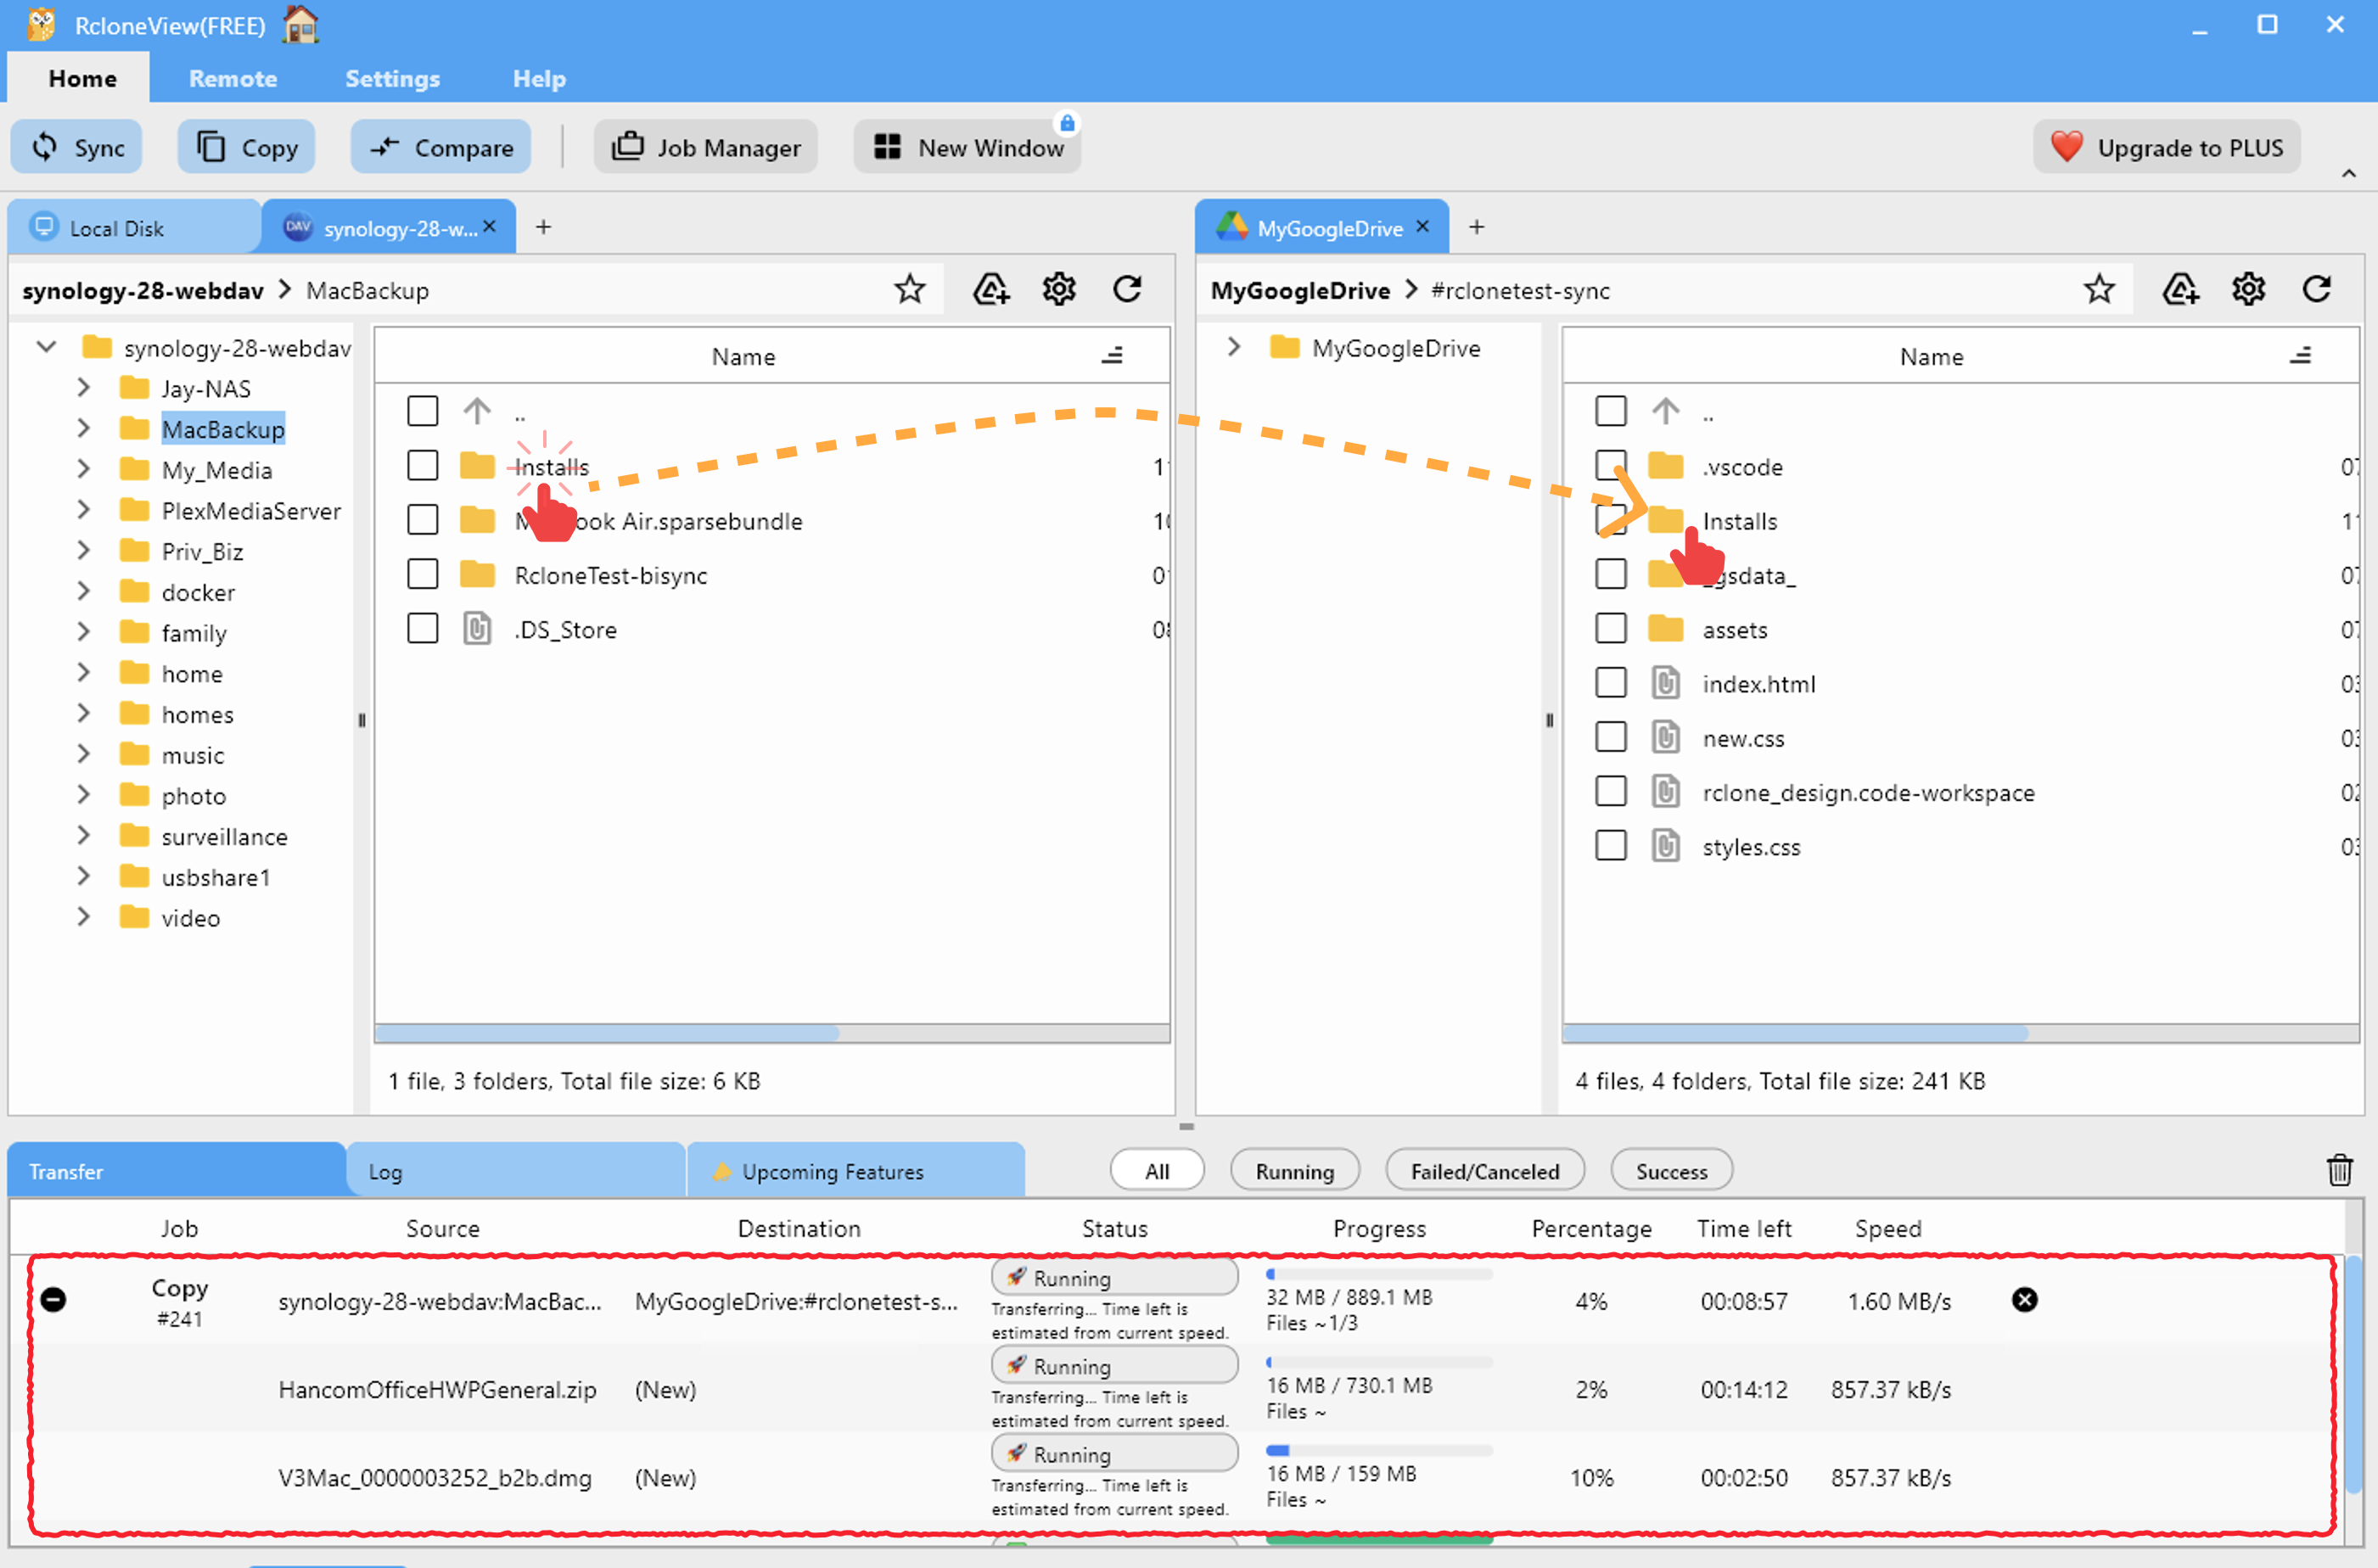
👉 Learn more: Browse Remote Storage
🔍 Method 2: Compare Folder Contents
-
Open both NAS and cloud folders in the Explorer panes.
-
Click Compare on the Home tab in the top menu.
-
RcloneView will highlight:
-
Files only on one side
-
Files with size or checksum conflicts
-
Identical files
-
-
Use Copy →, ← Copy, or Delete to act on files.
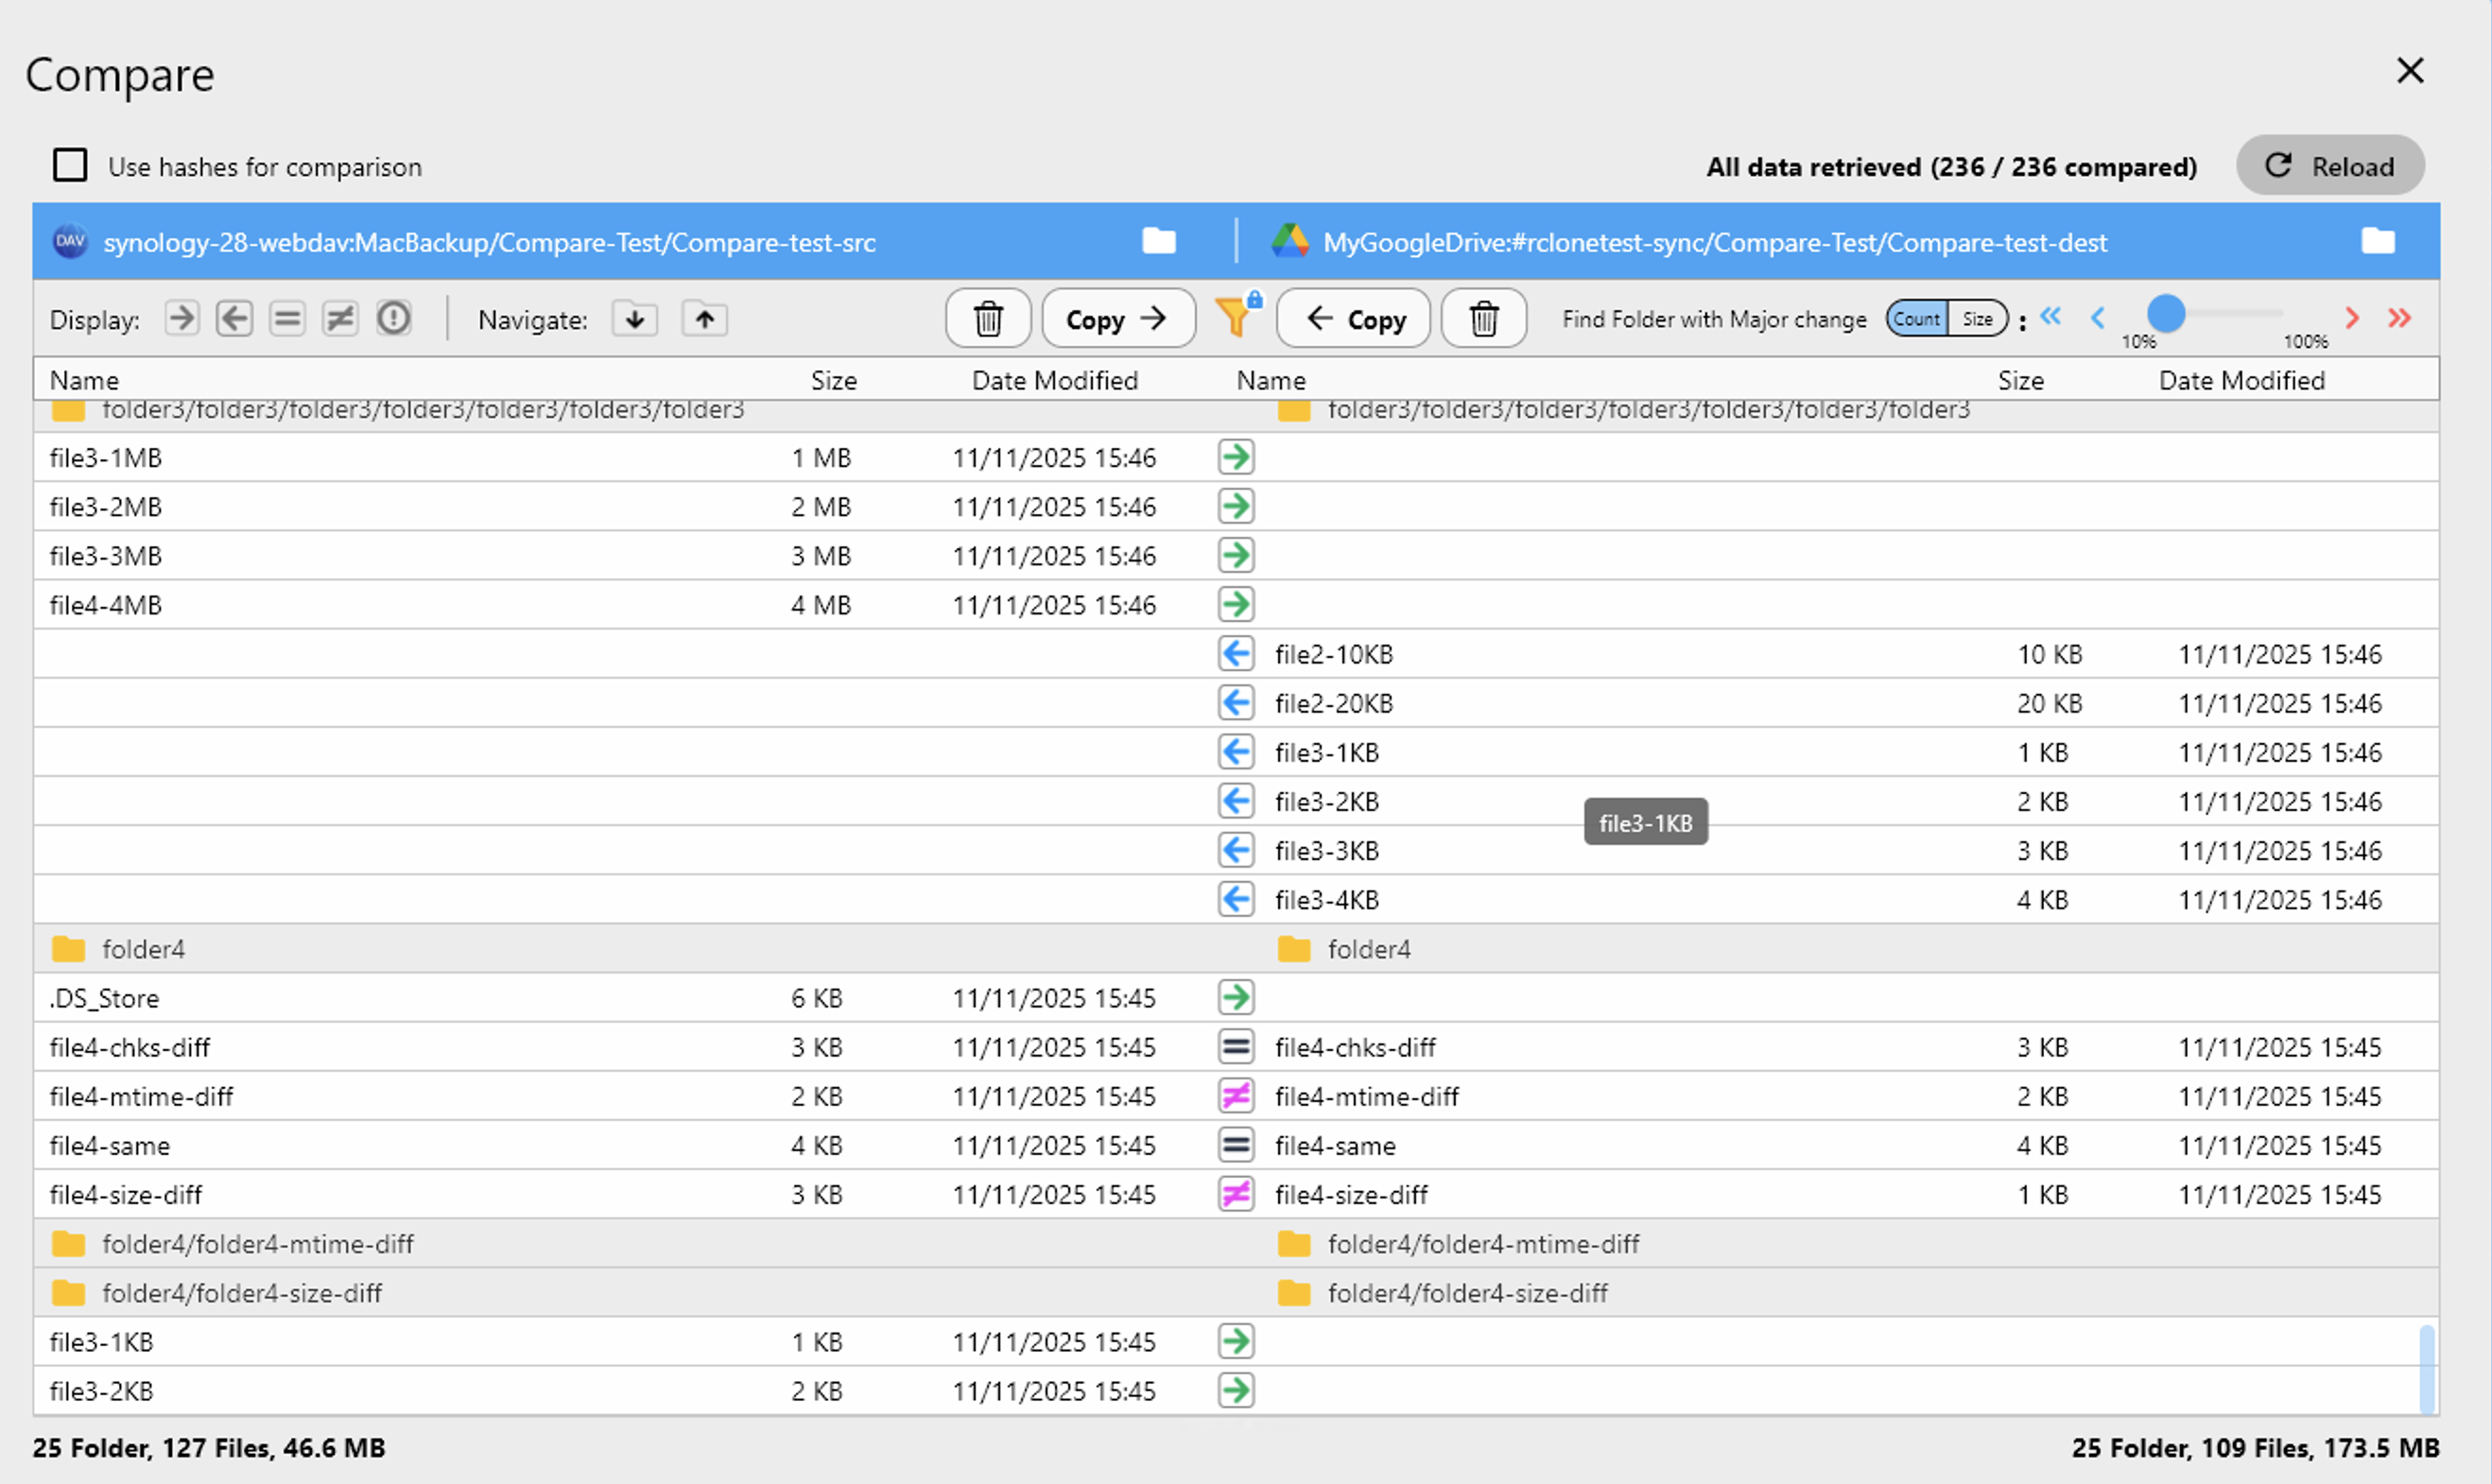
👉 Learn more: Compare Folders
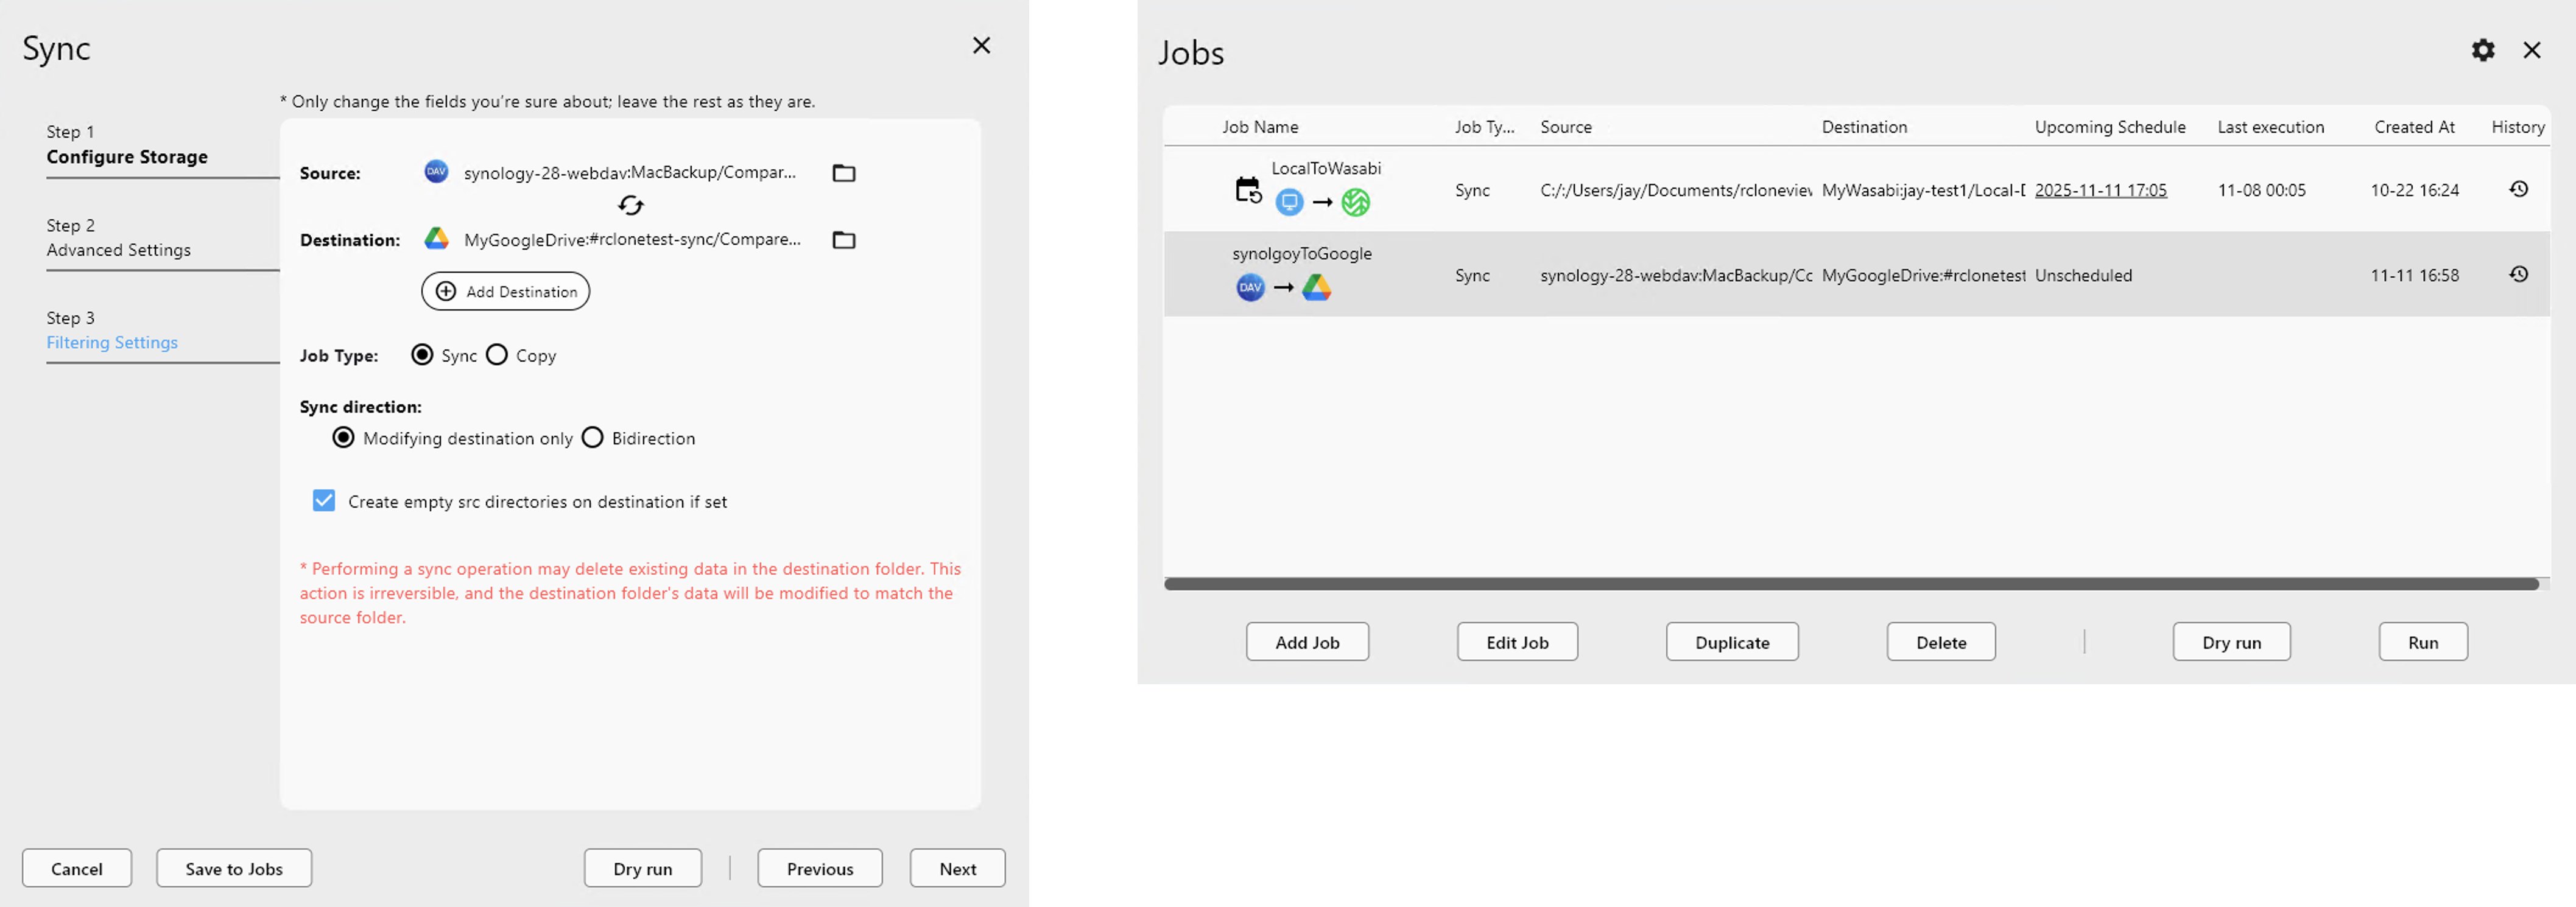
🔁 Method 3: Sync or One-Time Job
-
Select source (NAS) and destination (cloud).
-
Click Sync to open sync options.
-
Choose direction, dry-run, filters, etc.
-
Run the sync immediately or click Save to Jobs.
👉 Learn more:
⏰ Method 4: Schedule a Recurring Job
-
Go to Job Manager → click Add Job.
-
Select your NAS and cloud folders.
-
Define schedule (daily, weekly, cron).
-
Save and enable the job.
✅ Jobs will run automatically in background at the scheduled time.
👉 Learn more: Job Scheduling and Execution
🧾 Summary
With RcloneView’s Synology NAS integration, you can:
-
Detect and connect to NAS without technical setup
-
Use SMB, SFTP, FTP, or WebDAV easily
-
Transfer, sync, or schedule backup jobs to any cloud
No command line. No scripts. Just fast, powerful, and flexible cloud file management.
🔗 Related Guides
- How to Add SFTP Remote
- How to Add WebDAV Remote
- Compare Folder Contents
- Browse & Manage Remote Storage
- Synchronize Remote Storages
- Create Sync Jobs
- Execute & Manage Jobs
- Job Scheduling and Execution
🧠 Start connecting your NAS to the cloud today with RcloneView.