Run RcloneView on NixOS for Cloud Sync and Backup
NixOS offers a unique declarative approach to system configuration, but running third-party GUI applications requires a few extra steps. RcloneView works smoothly on NixOS once you set up AppImage support and FUSE, giving you a powerful visual cloud manager on one of Linux's most reproducible distributions.
NixOS is a Linux distribution built around the Nix package manager and a fully declarative configuration model. Instead of installing packages imperatively, you define your entire system state in a configuration file and rebuild. This approach makes systems reproducible, rollback-friendly, and ideal for developers and power users who want complete control over their environment.
However, NixOS's unconventional filesystem layout (no /lib, no /usr/lib, no traditional FHS) means that standard Linux binaries, including AppImages, do not run out of the box. RcloneView is distributed as an AppImage for Linux, so you need to enable AppImage compatibility on NixOS before launching it.
This guide walks through the entire process: installing rclone, enabling AppImage support, running RcloneView, configuring FUSE for cloud mounts, and setting up automated sync as a systemd service.

Manage & Sync All Clouds in One Place
RcloneView is a cross-platform GUI for rclone. Compare folders, transfer or sync files, and automate multi-cloud workflows with a clean, visual interface.
- One-click jobs: Copy · Sync · Compare
- Schedulers & history for reliable automation
- Works with Google Drive, OneDrive, Dropbox, S3, WebDAV, SFTP and more
Free core features. Plus automations available.
NixOS Overview and Why It Matters for Cloud Storage
NixOS treats system configuration as code. Your /etc/nixos/configuration.nix file defines every installed package, enabled service, and system setting. When you run nixos-rebuild switch, the system transitions atomically to the new state. If something breaks, you roll back to a previous generation in seconds.
For cloud storage workflows, this means you can version-control your entire sync and backup setup. Your rclone installation, FUSE configuration, and systemd services are all defined in one file and can be reproduced on any NixOS machine.
Installing Rclone via Nixpkgs
Rclone is available in the official Nixpkgs repository. Add it to your system configuration:
# /etc/nixos/configuration.nix
environment.systemPackages = with pkgs; [
  rclone
];
Then rebuild your system:
sudo nixos-rebuild switch
Verify the installation by running rclone version. This gives you the rclone backend that RcloneView's GUI manages.
Running the RcloneView AppImage on NixOS
AppImages bundle all dependencies into a single executable, but they rely on FHS paths that NixOS does not provide. NixOS offers two main solutions: appimage-run and nix-ld.
Option A: Using appimage-run
Add appimage-run to your system packages:
environment.systemPackages = with pkgs; [
  rclone
  appimage-run
];
After rebuilding, download the RcloneView AppImage from rcloneview.com, make it executable, and launch it:
chmod +x RcloneView-*.AppImage
appimage-run RcloneView-*.AppImage
Option B: Using nix-ld
The nix-ld module provides a compatibility shim that lets standard Linux binaries find their dynamic libraries. Enable it in your configuration:
programs.nix-ld.enable = true;
After rebuilding, the AppImage should run directly without the appimage-run wrapper:
chmod +x RcloneView-*.AppImage
./RcloneView-*.AppImage
Either approach works. Choose appimage-run for simplicity or nix-ld if you run many third-party binaries.
Setting Up FUSE for Cloud Mounts
RcloneView can mount cloud storage as a local directory, but this requires FUSE (Filesystem in Userspace). On NixOS, enable FUSE in your configuration:
# Enable FUSE
environment.systemPackages = with pkgs; [
  fuse
  fuse3
];

# Allow regular users to mount FUSE filesystems
programs.fuse.userAllowOther = true;
Rebuild and verify that /dev/fuse exists. Now you can use RcloneView's mount feature to access cloud storage as if it were a local folder.
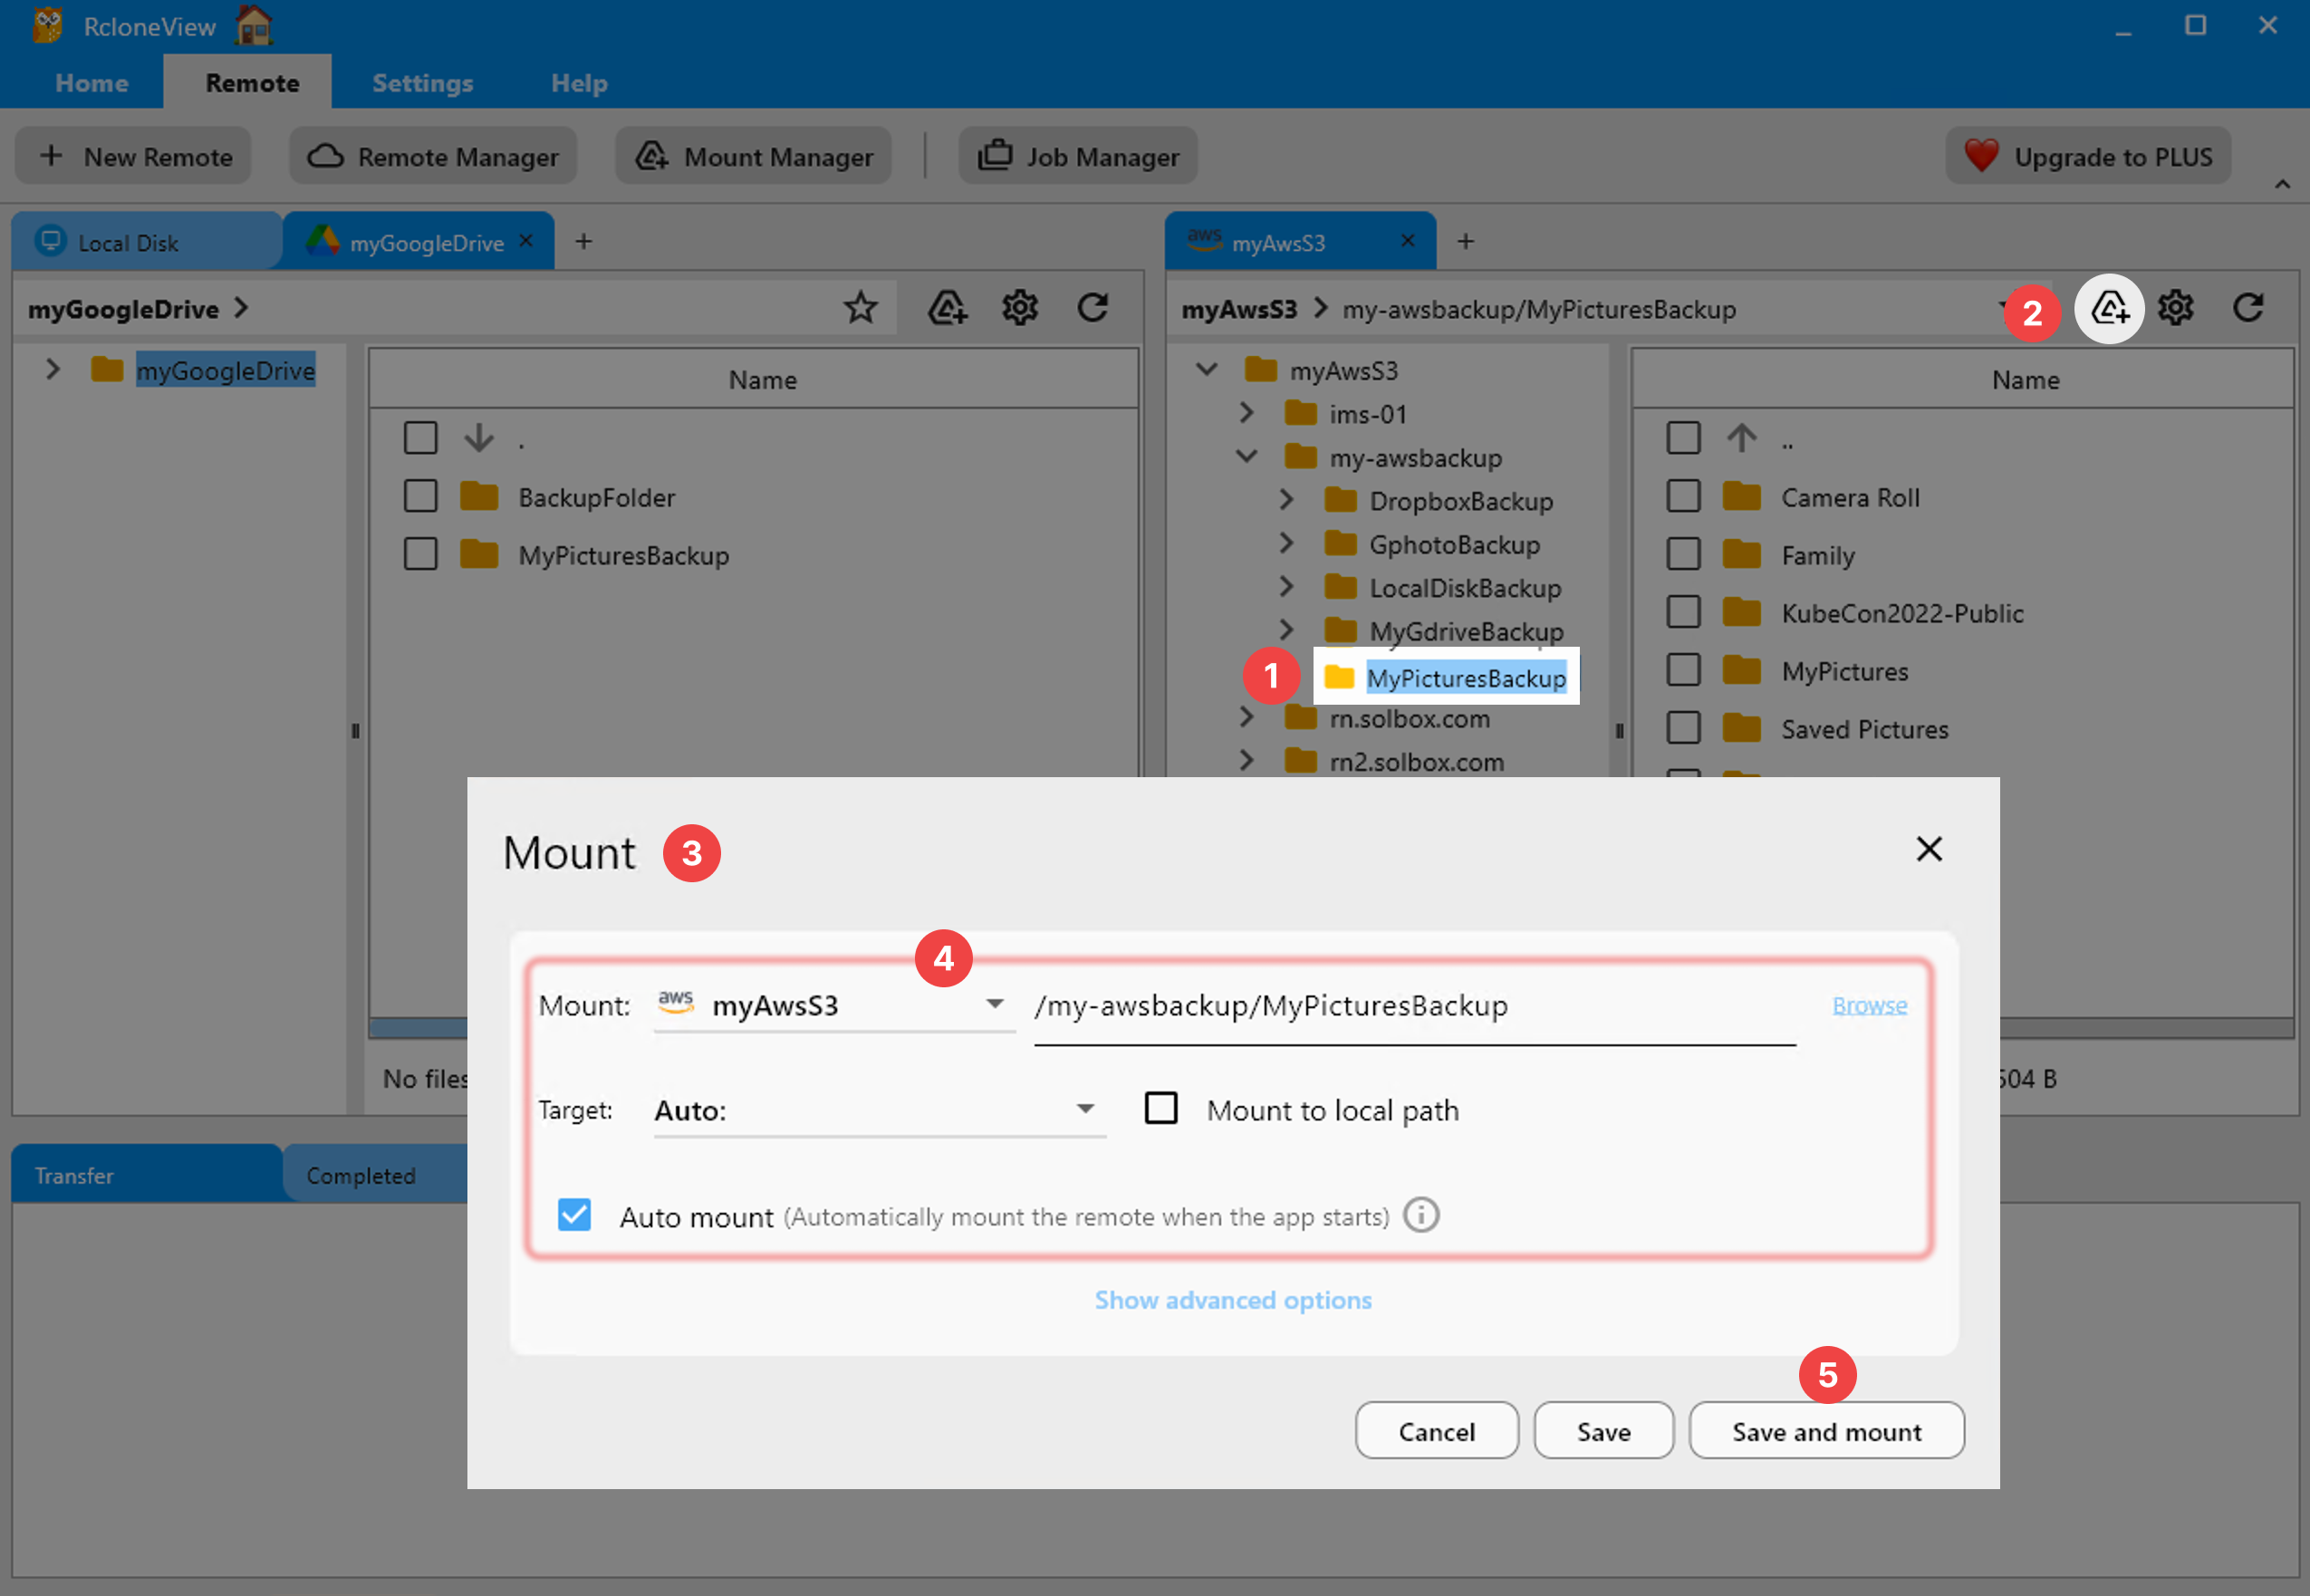
Configuring Cloud Remotes in RcloneView
Launch RcloneView and use the remote configuration wizard to add your cloud providers. The process is the same as on any Linux distribution:

RcloneView supports Google Drive, OneDrive, Dropbox, AWS S3, Wasabi, Backblaze B2, Cloudflare R2, and dozens more. The GUI walks you through authentication for each provider, including OAuth flows that open in your browser.
Your rclone configuration is stored at ~/.config/rclone/rclone.conf by default. On NixOS, this path works normally since it resides in your home directory outside the Nix store.
Creating Sync Jobs and Scheduling Transfers
Once your remotes are configured, use RcloneView's two-pane explorer to browse your cloud storage and create sync jobs. Drag files between panes to initiate transfers, or set up recurring jobs with the job scheduler.
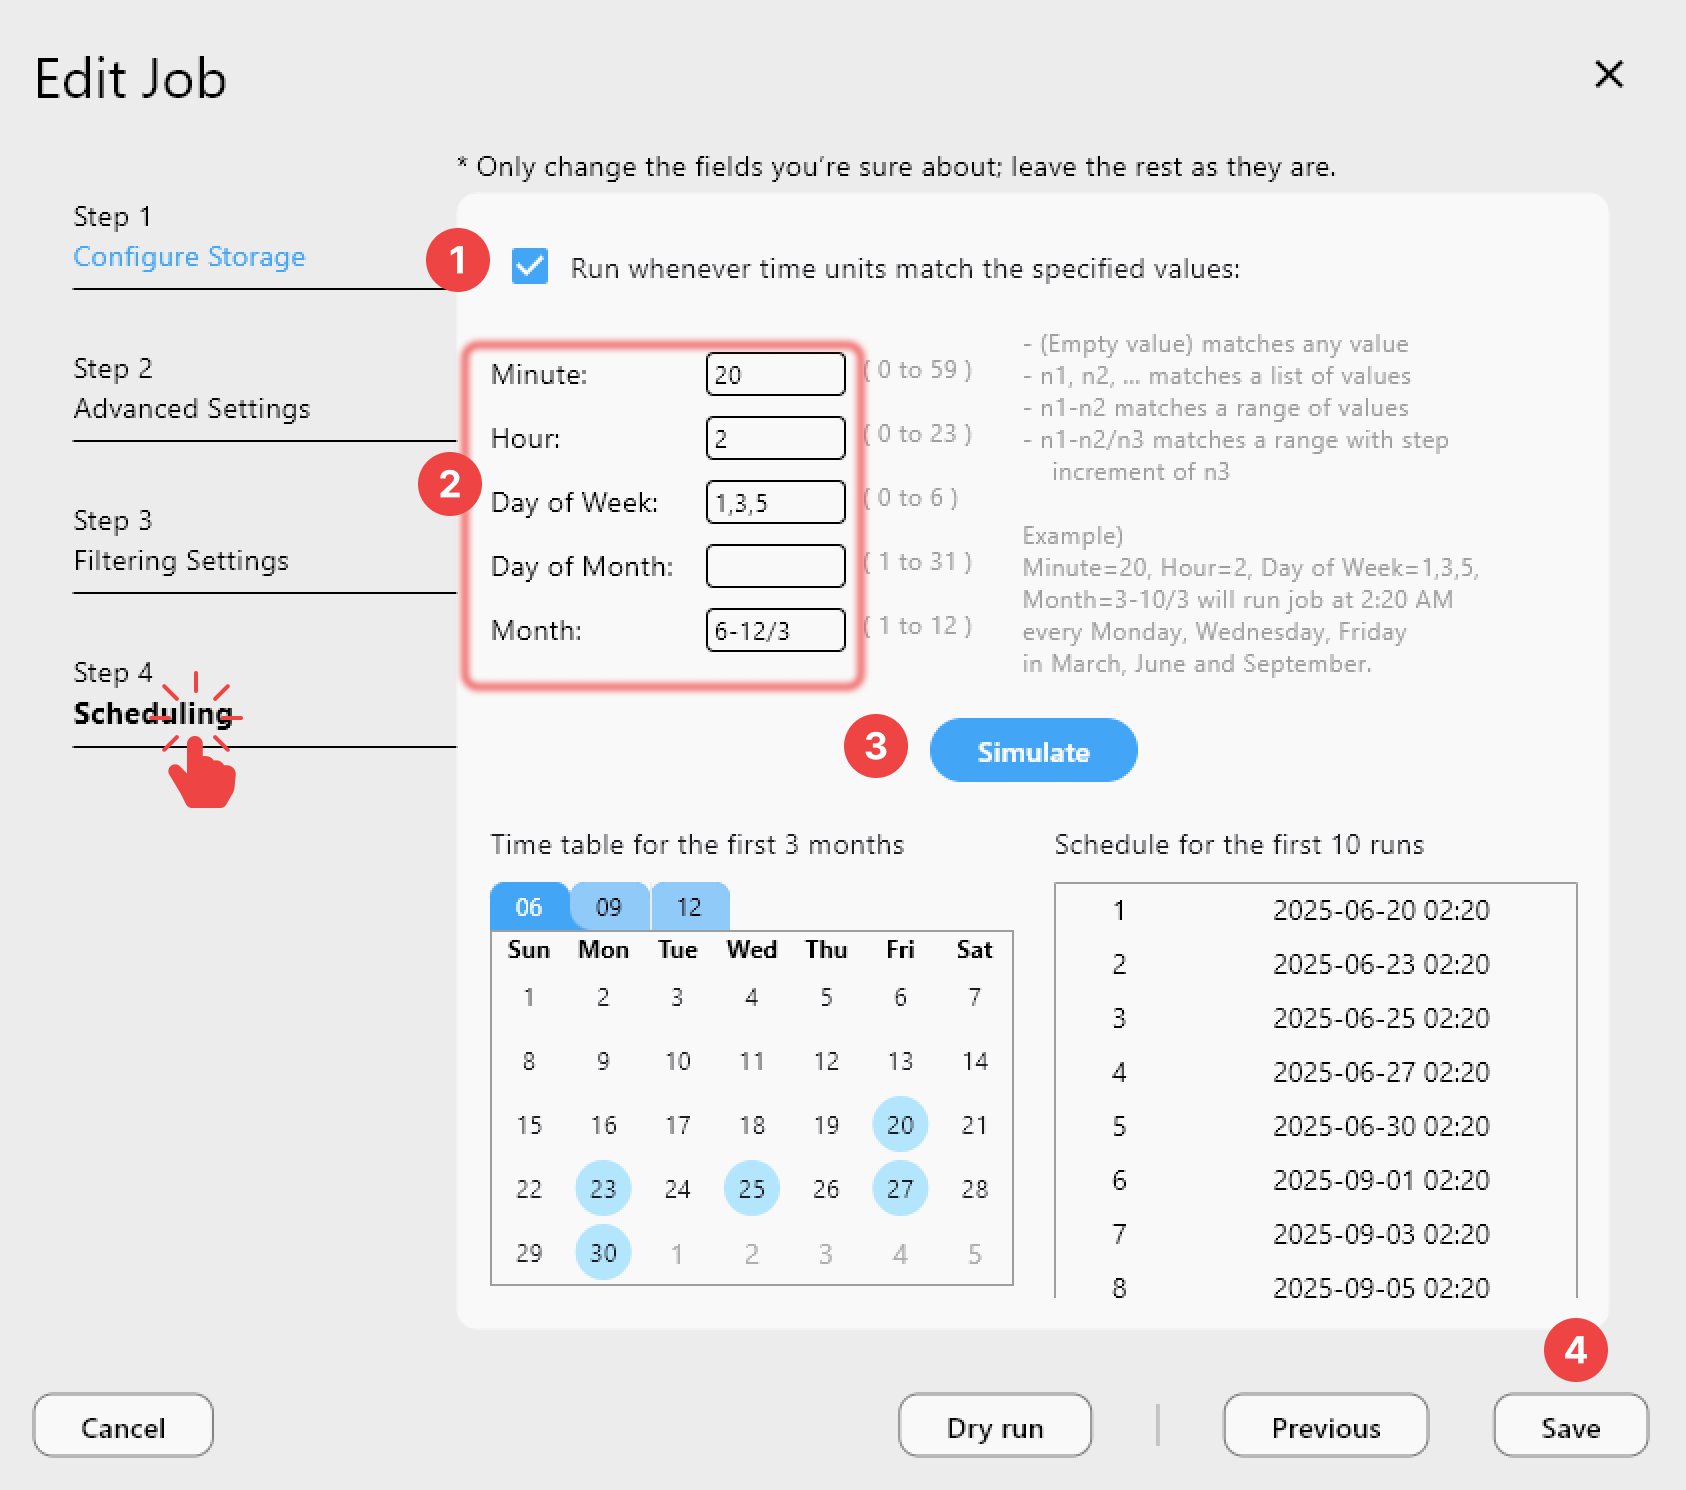
For NixOS users who prefer to integrate with the system's declarative model, you can also define a systemd service that runs rclone sync commands on a timer, complementing RcloneView's built-in scheduler.
Setting Up a Systemd Service for Automated Sync
NixOS makes it straightforward to define custom systemd services declaratively. Add a timer-based sync service to your configuration:
systemd.user.services.rclone-backup = {
  description = "Rclone cloud backup";
  serviceConfig = {
    ExecStart = "${pkgs.rclone}/bin/rclone sync /home/user/documents remote:backup/documents";
    Type = "oneshot";
  };
};

systemd.user.timers.rclone-backup = {
  description = "Run rclone backup daily";
  timerConfig = {
    OnCalendar = "daily";
    Persistent = true;
  };
  wantedBy = [ "timers.target" ];
};
This works alongside RcloneView's GUI scheduler. Use the systemd approach for headless servers and RcloneView's scheduler for interactive workstations.
NixOS-Specific Tips
Pin your rclone version. NixOS makes it easy to pin package versions using overlays or flakes. If a new rclone release introduces breaking changes, you can stay on a known-good version until you are ready to upgrade.
Use Home Manager for user-level config. If you use Home Manager, you can manage your rclone configuration file, AppImage desktop entry, and autostart settings declaratively within your user environment.
Desktop entry for the app launcher. Create a .desktop file so RcloneView appears in your application menu:
xdg.desktopEntries.rcloneview = {
  name = "RcloneView";
  exec = "appimage-run /home/user/Applications/RcloneView.AppImage";
  icon = "rcloneview";
  type = "Application";
  categories = [ "Utility" "FileManager" ];
};
Rollback safety. Since NixOS supports atomic rollbacks, you can safely experiment with rclone configurations. If a sync job is misconfigured, roll back your NixOS generation and your system returns to its previous state.
Getting Started
- Download RcloneView from rcloneview.com.
- Add
rclone,appimage-run, andfuse3to your NixOS configuration and rebuild. - Launch RcloneView with
appimage-run, add your cloud remotes, and start syncing. - Optionally define a systemd timer in your NixOS config for fully declarative automated backups.
NixOS and RcloneView together give you a reproducible, version-controlled cloud storage workflow that you can replicate across any machine.
Related Guides: