Manage PikPak Cloud Storage and Downloads with RcloneView
PikPak offers fast cloud storage with powerful offline download capabilities — but getting your files organized and synced across clouds takes more than PikPak alone. RcloneView gives you a visual interface to browse, transfer, sync, and manage your PikPak library alongside any other cloud provider.
PikPak is a cloud storage service that has gained popularity for its offline download feature, which lets you save files from URLs directly to your cloud storage without downloading them to your local device first. Combined with generous storage quotas and fast transfer speeds, PikPak has become a go-to service for users who need to collect, organize, and distribute large files across their cloud ecosystem.
However, managing PikPak in isolation from your other cloud services creates friction. If you use Google Drive for work, Amazon S3 for archiving, or OneDrive for sharing, you need a way to move files between PikPak and these services efficiently. RcloneView provides exactly that — a two-pane GUI that connects PikPak with 70+ other cloud providers, giving you drag-and-drop transfers, scheduled syncs, folder comparison, and real-time monitoring.

Manage & Sync All Clouds in One Place
RcloneView is a cross-platform GUI for rclone. Compare folders, transfer or sync files, and automate multi-cloud workflows with a clean, visual interface.
- One-click jobs: Copy · Sync · Compare
- Schedulers & history for reliable automation
- Works with Google Drive, OneDrive, Dropbox, S3, WebDAV, SFTP and more
Free core features. Plus automations available.
Why Manage PikPak with RcloneView
PikPak's own apps handle basic file management and offline downloads, but they lack cross-cloud integration. With RcloneView you gain:
- A visual file manager for your PikPak storage — browse folders, check file sizes, and organize your library in a familiar two-pane layout.
- Direct cloud-to-cloud transfers — move files from PikPak to Google Drive, OneDrive, S3, or any supported provider without downloading to your local machine first.
- Scheduled syncs and backups — automate regular transfers from PikPak to a backup destination or from other clouds into PikPak.
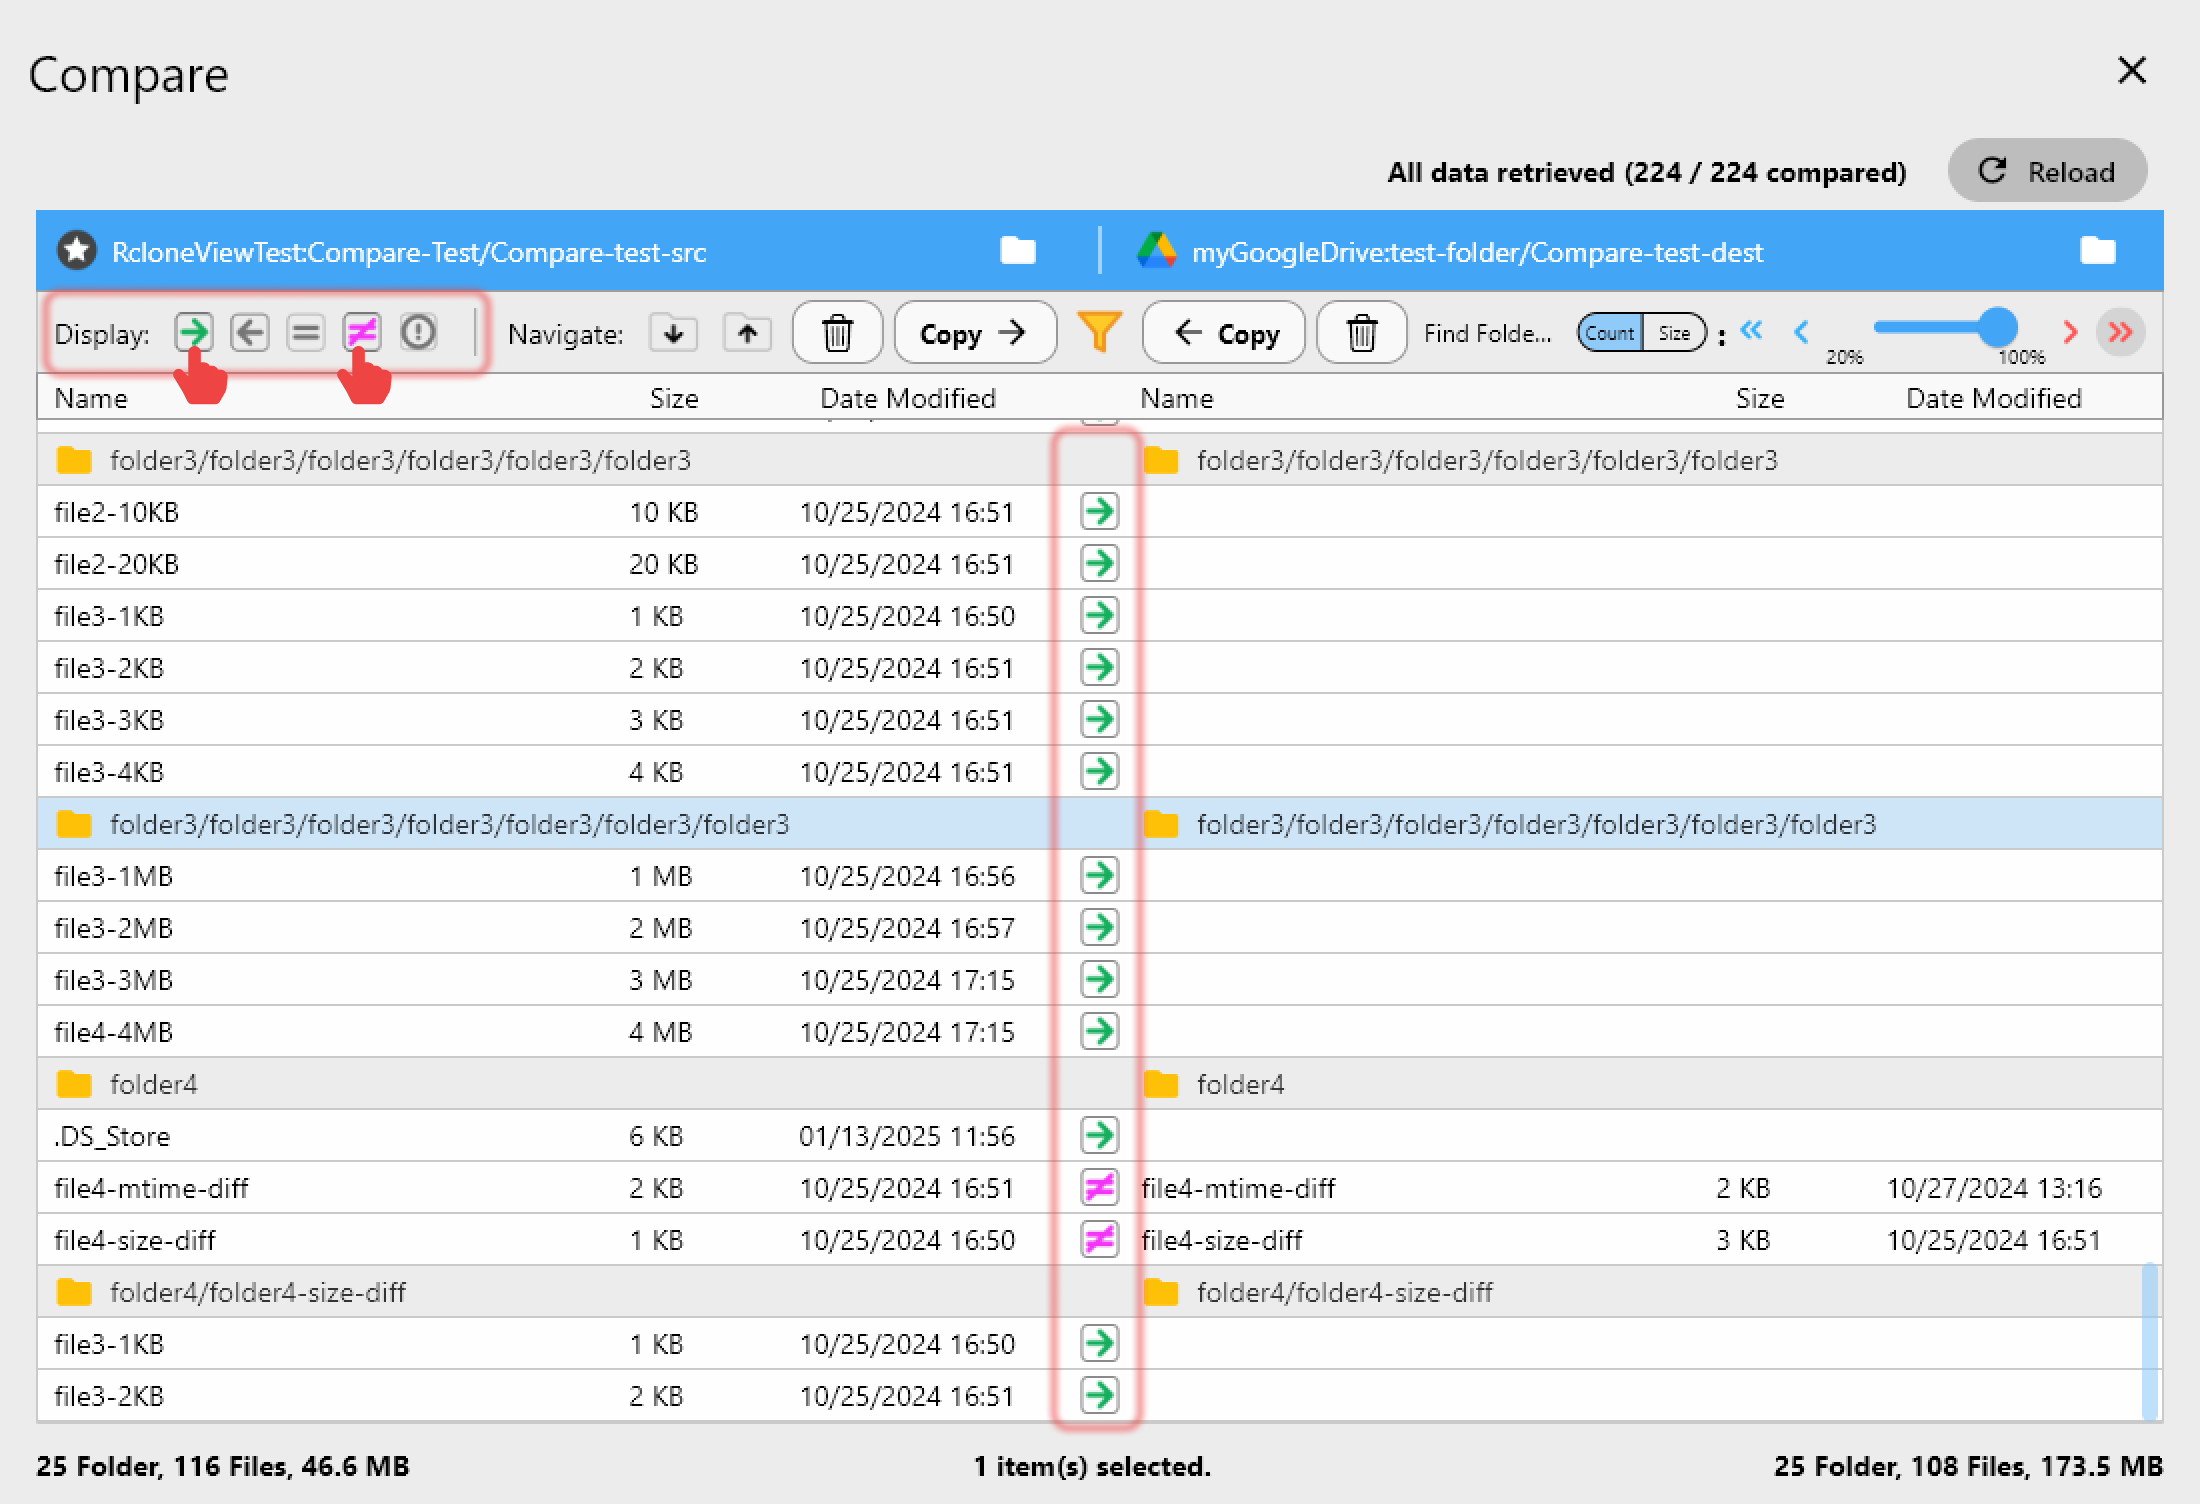
- Folder comparison — detect differences between PikPak and another cloud to ensure your files are complete and up to date.
- Batch operations — select multiple files or folders and transfer them in one operation rather than one at a time.
- Transfer monitoring — watch progress in real time with speed, file counts, and estimated completion.
Setting Up the PikPak Remote
Adding PikPak to RcloneView is straightforward:
- Open RcloneView and click + New Remote.
- Select PikPak from the provider list.
- Enter your PikPak account credentials (username and password).
- Name the remote (e.g.,
MyPikPak) and save.
Once connected, your PikPak storage appears in the Explorer pane. You will see all your folders, including any files saved through offline downloads.

Tip: If you use PikPak's premium tier, you may have access to additional storage and higher transfer speeds. These benefits carry over when accessing PikPak through RcloneView.
Browsing and Organizing Your PikPak Library
PikPak users tend to accumulate large numbers of files through offline downloads, which can quickly become disorganized. RcloneView's Explorer makes it easy to bring order to your storage.
From the two-pane Explorer you can:
- Navigate your entire PikPak folder structure, including deeply nested directories.
- Create new folders to categorize files by project, date, type, or any system that works for you.
- Move and rename files to clean up default naming from offline downloads.
- Delete unwanted files to reclaim storage space.
- Sort and filter by name, size, or date to quickly find what you need.
- Open a second cloud in the opposite pane for side-by-side comparison or direct transfer.

A common workflow is to let PikPak handle the downloading phase, then use RcloneView to sort and distribute files to their final destinations — whether that is Google Drive for sharing, an S3 bucket for archiving, or a local drive for offline access.
Transferring Files from PikPak to Other Clouds
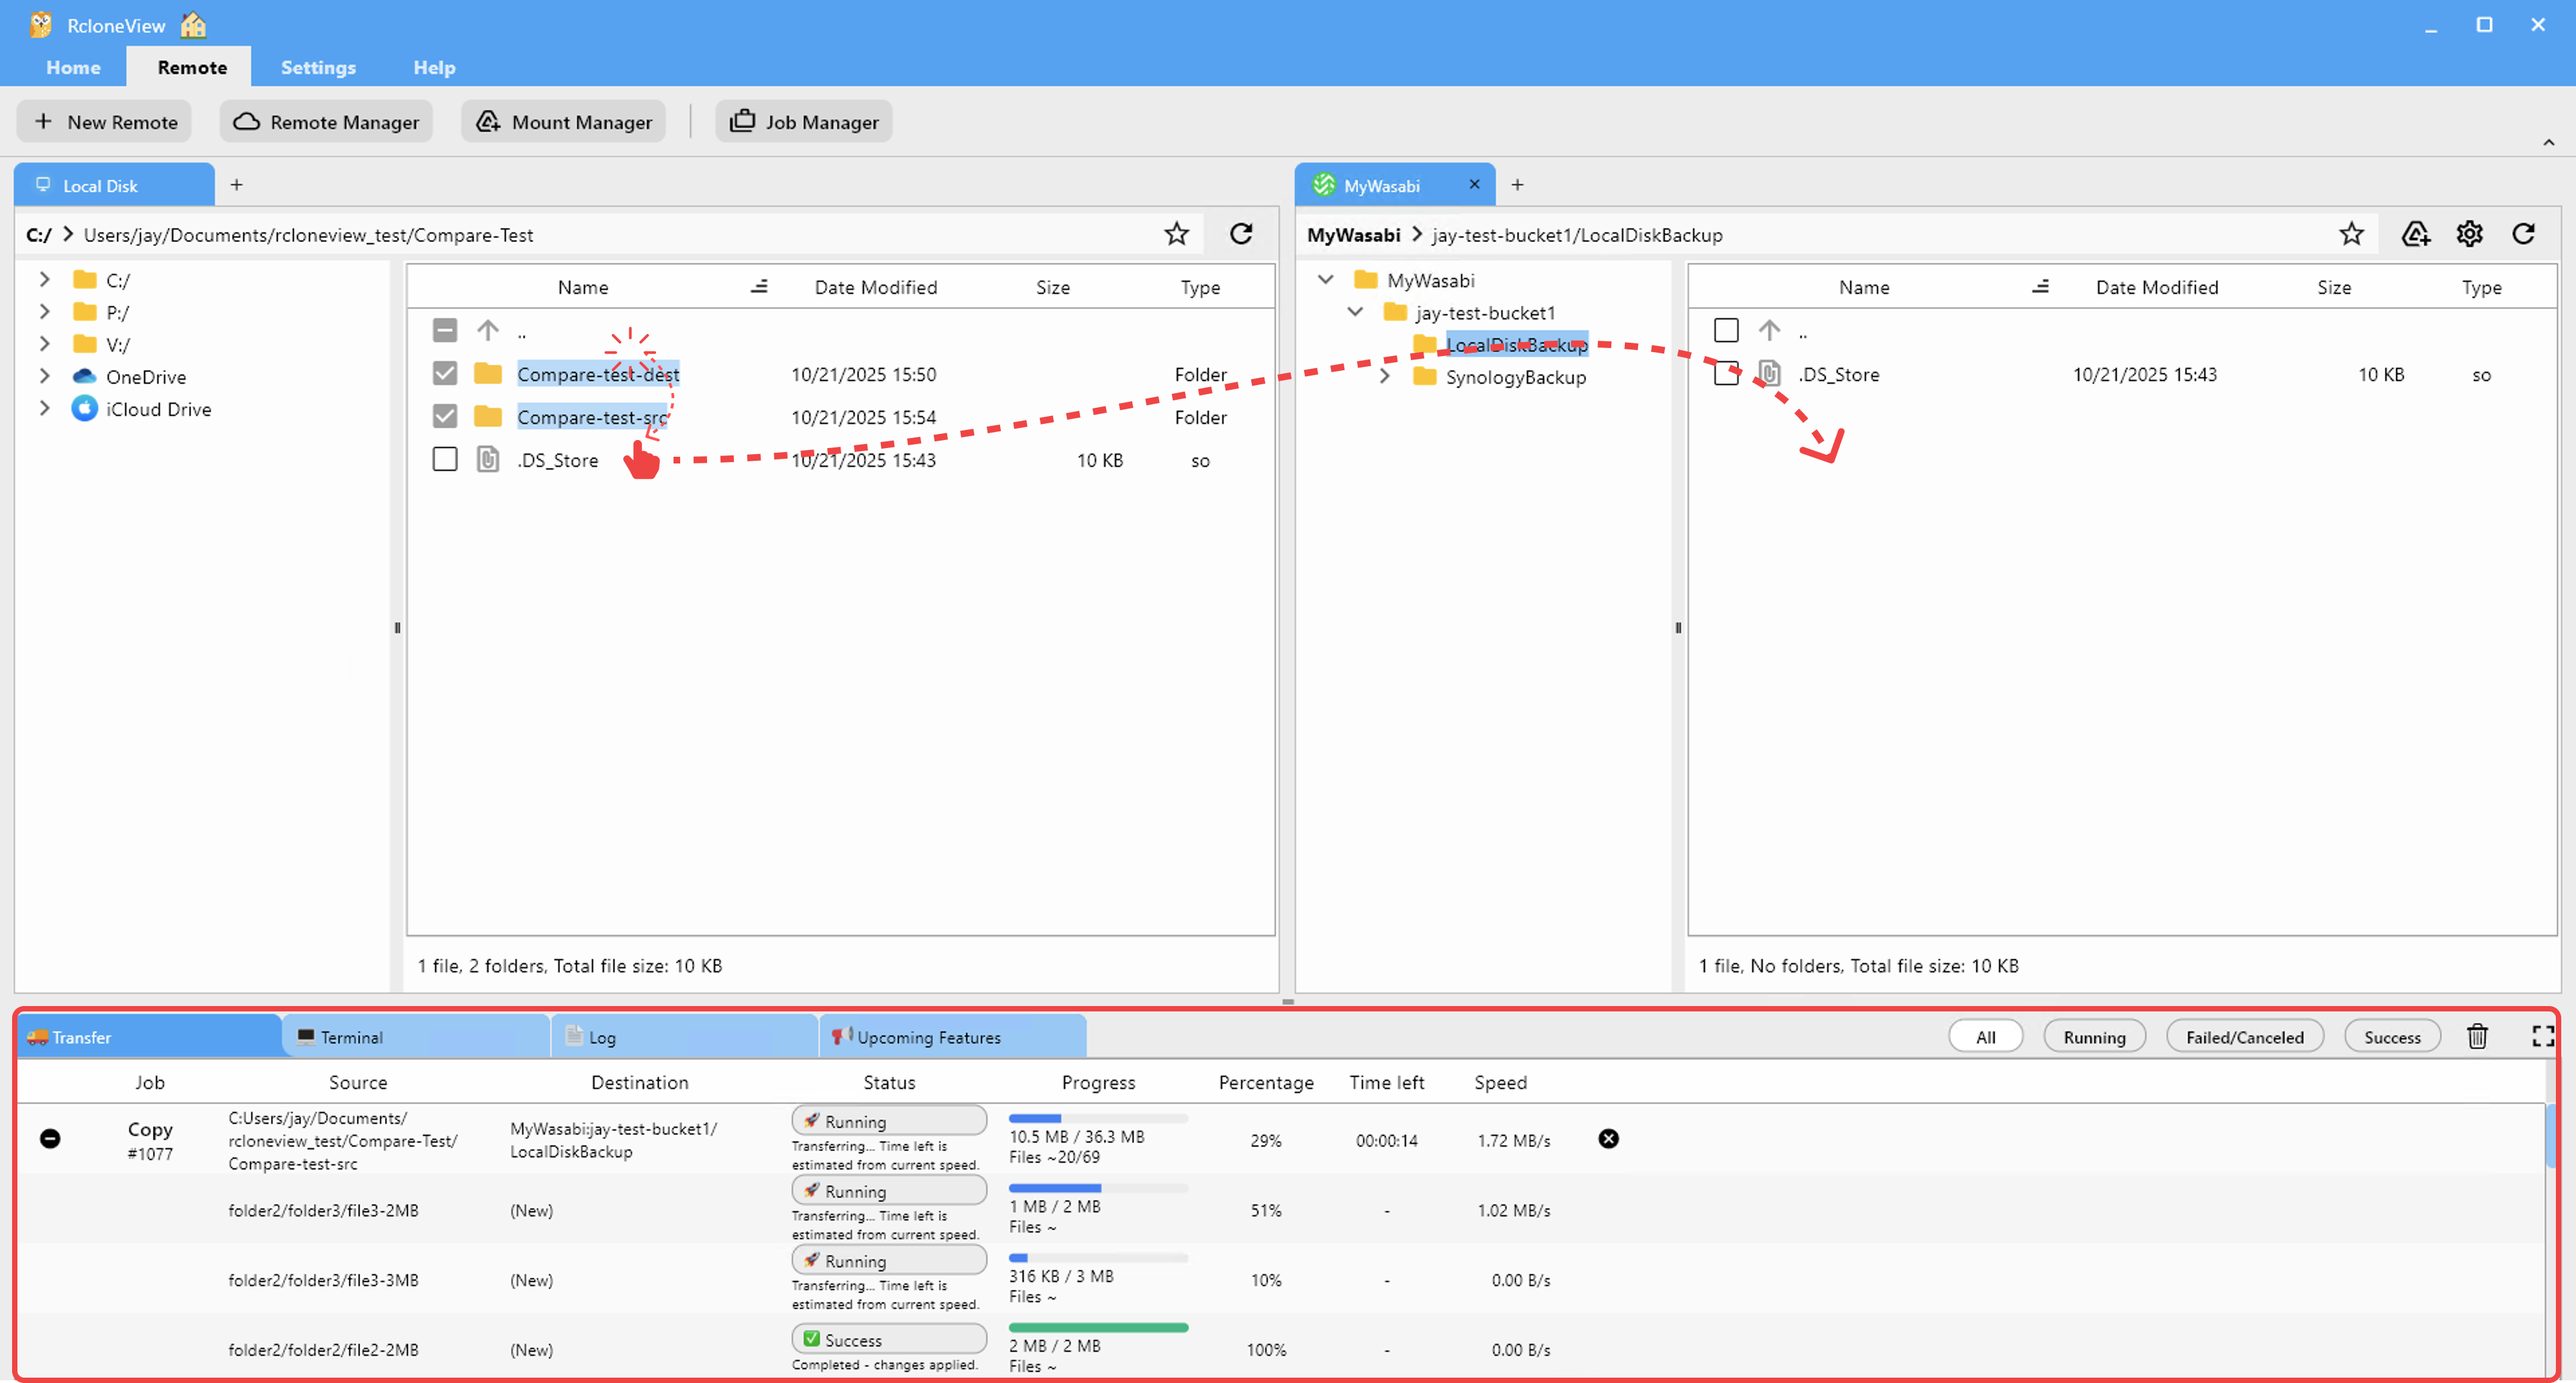
One of the most valuable features of managing PikPak through RcloneView is the ability to transfer files directly to other cloud services without downloading them to your computer first. This saves time, bandwidth, and local disk space.
PikPak to Google Drive
Move files from PikPak to Google Drive for easy sharing with colleagues or access through Google's ecosystem of apps. Open PikPak in one pane and Google Drive in the other, then drag files across.
PikPak to Amazon S3 or Wasabi
For long-term archival, transfer completed downloads from PikPak to S3 or Wasabi. Object storage services offer durable, low-cost retention that is ideal for files you want to keep but do not access frequently.
PikPak to OneDrive
If your work environment uses Microsoft 365, transfer relevant files from PikPak to OneDrive for integration with Teams, SharePoint, and Office apps.
Transfer Methods
RcloneView supports multiple transfer approaches:
- Drag and Drop: The fastest way to move individual files or small batches. Select items in the PikPak pane and drag them to the target.
- Copy Command: Right-click and copy selected files to the other pane for a more controlled transfer.
- Sync: Mirror an entire PikPak folder to another cloud. Use Dry Run first to preview what will be transferred.
Managing Offline Downloads with RcloneView
PikPak's offline download feature saves files from URLs directly to your cloud storage. Once those files land in PikPak, RcloneView becomes your management layer.
A typical workflow looks like this:
- Use PikPak's app or web interface to initiate offline downloads. Files are saved to a designated folder in your PikPak storage.
- Open RcloneView and navigate to the download folder in your PikPak remote.
- Review and organize — rename files, move them into categorized folders, delete anything you do not need.
- Transfer to final destinations — drag completed files to Google Drive for sharing, to S3 for archiving, or to a local drive for offline use.
- Clean up PikPak — once files are transferred, delete them from PikPak to free storage for future downloads.
This workflow turns PikPak into a staging area for content that flows through your broader cloud ecosystem, with RcloneView serving as the traffic controller.
Scheduling Automated Transfers
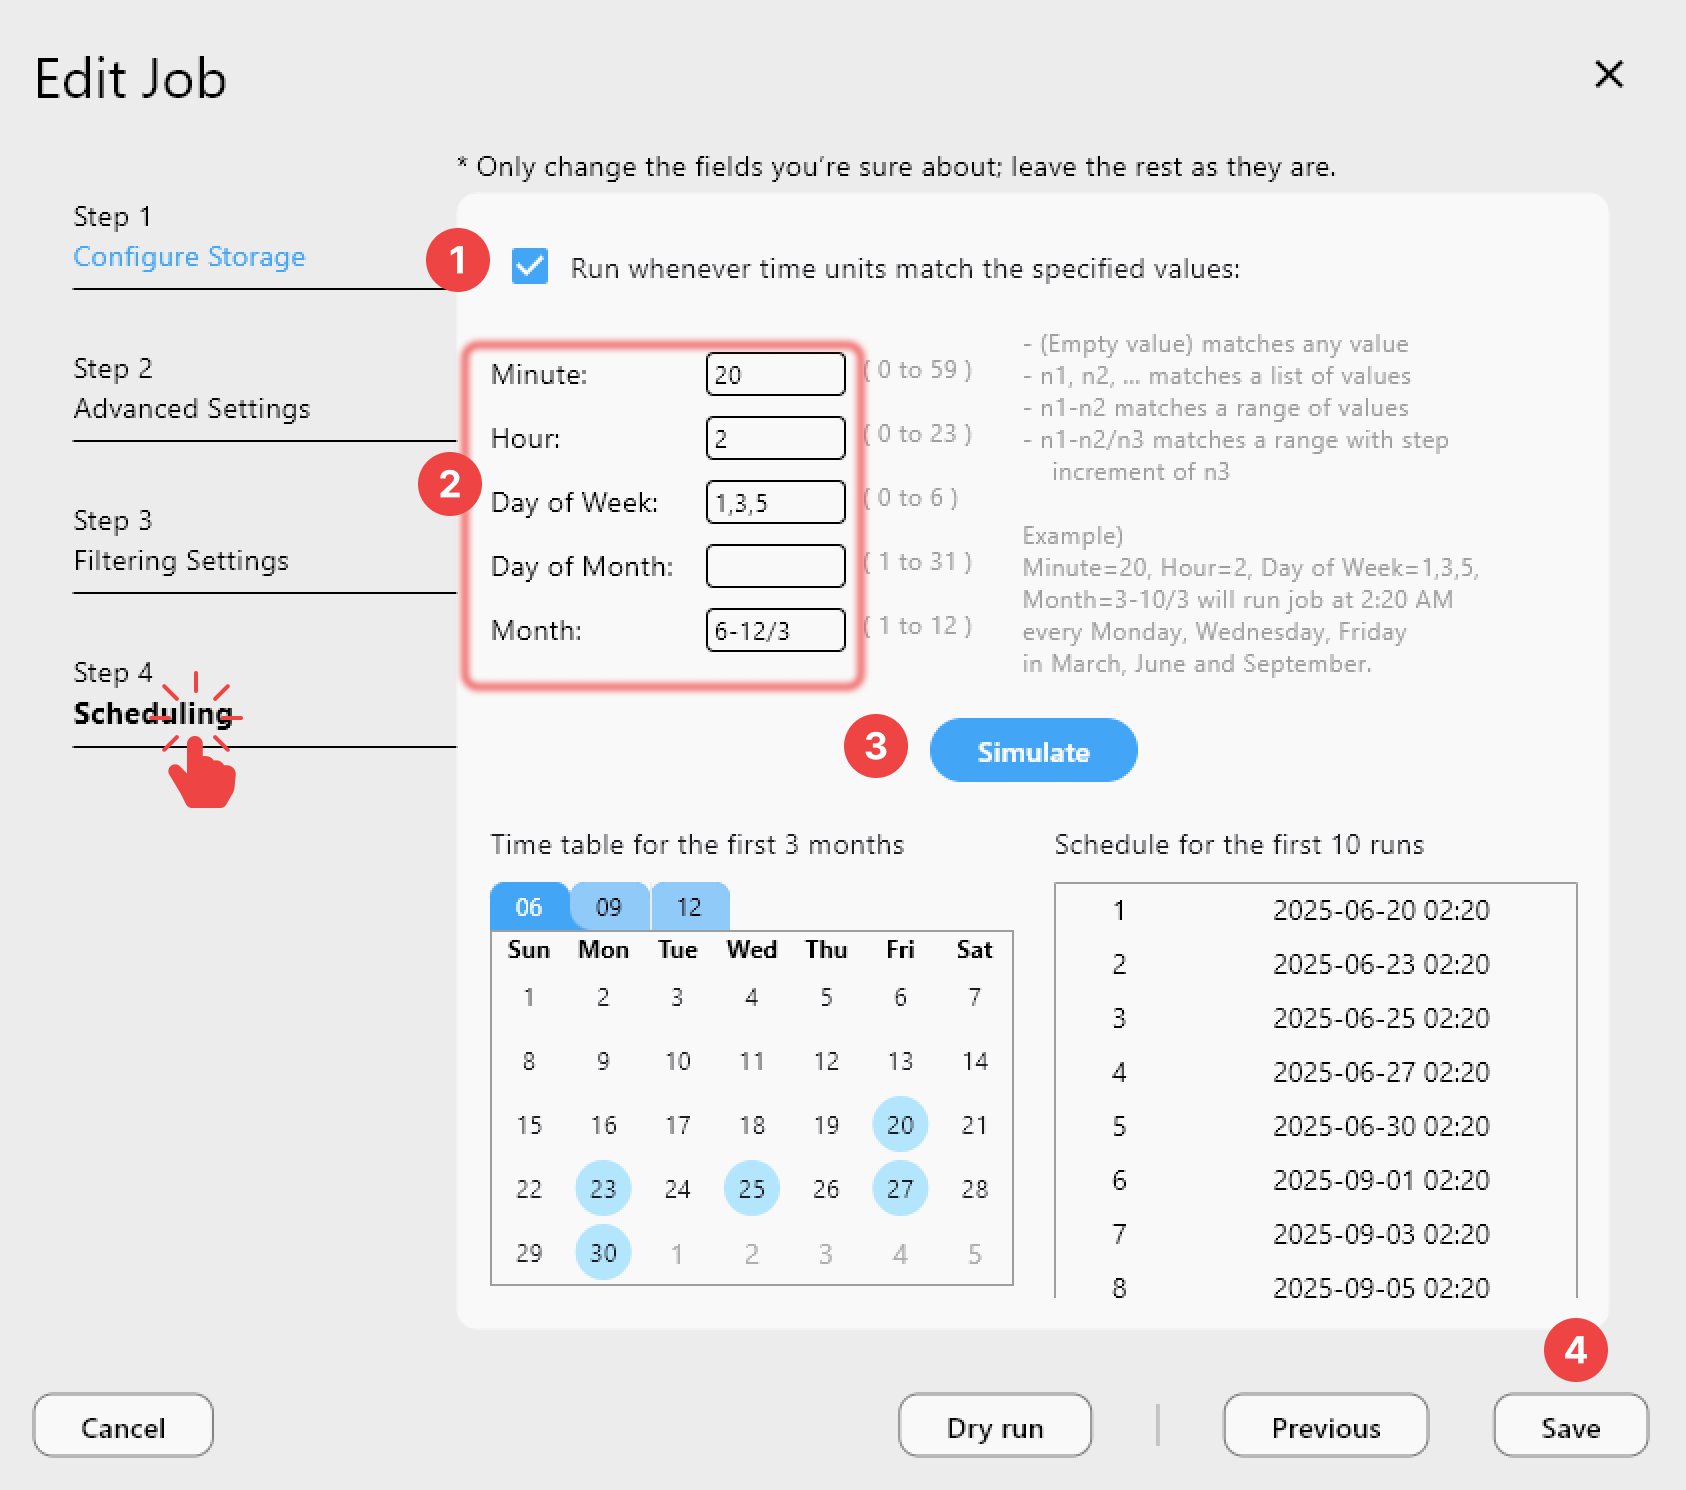
If you regularly accumulate files in PikPak and need them distributed to other clouds, automate the process with RcloneView's job scheduling:
- Create a Copy or Sync job from your PikPak download folder to your target cloud.
- Open the Job Scheduling panel.
- Set a recurring schedule — every few hours if downloads are frequent, daily for less active accounts.
- Save and enable the schedule.
Each run transfers only new and changed files, so subsequent executions are fast even if the initial transfer was large. RcloneView logs every job run in the Job History panel where you can review transfer counts, errors, and durations.
Monitoring Transfers in Real Time
When transferring large files from PikPak — especially media files that can be several gigabytes each — you want visibility into the process. RcloneView's real-time monitoring panel shows:
- Current transfer speed — both upload and download rates.
- Files in progress — which files are currently being transferred.
- Queue status — how many files remain in the transfer queue.
- Estimated time remaining — helpful for planning around large transfers.
- Error notifications — immediate alerts if a transfer fails so you can take action.
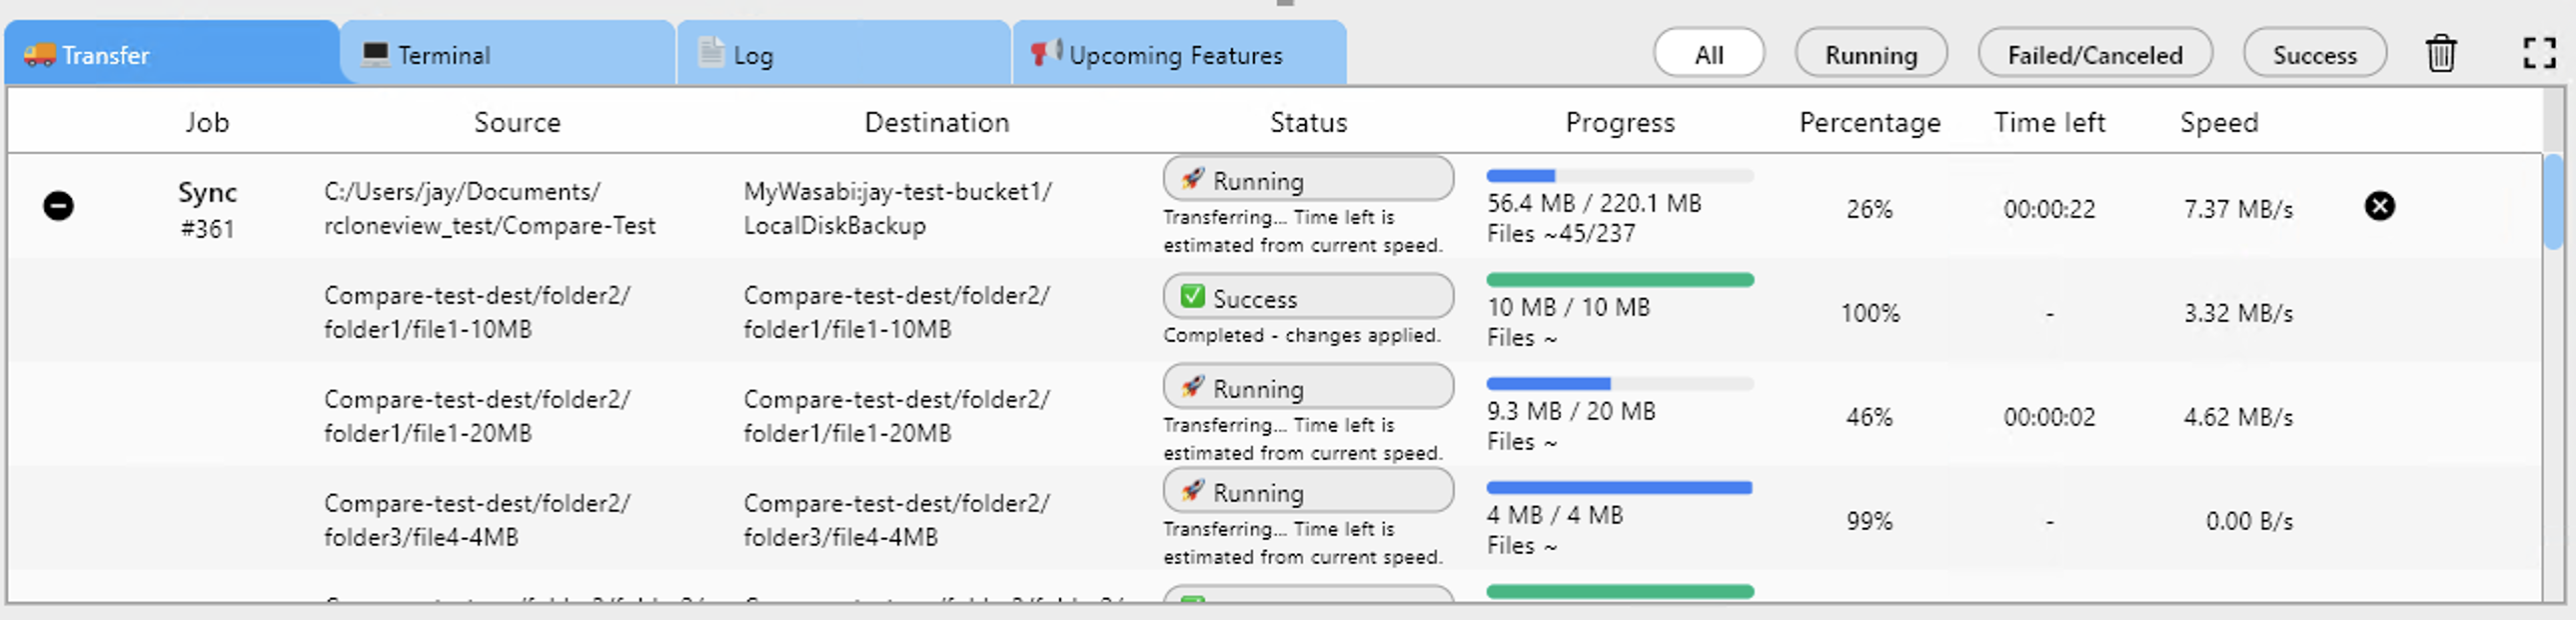
This is especially useful when moving large batches of files from PikPak to other clouds, as you can verify that everything is progressing smoothly without waiting for the entire operation to complete.
Tips for PikPak Users
- Organize before you transfer. PikPak's offline downloads often land with default file names. Take a moment to rename and sort files in RcloneView before pushing them to other clouds.
- Use PikPak as a staging area. Let PikPak handle the downloading, then use RcloneView to distribute files to their permanent homes. This keeps your PikPak storage lean and your other clouds organized.
- Set up filters to exclude temporary files, incomplete downloads, or file types you do not want to sync.
- Monitor your storage quota. PikPak plans have storage limits. Regularly transfer and clean up to avoid running out of space.
- Combine with folder comparison. After a batch transfer, run a comparison between PikPak and the target cloud to verify that all files were copied successfully.
Getting Started
- Download RcloneView from rcloneview.com.
- Connect PikPak using your account credentials in the New Remote wizard.
- Add your other clouds — Google Drive, S3, OneDrive, or any of the 70+ supported providers.
- Browse, organize, and transfer — PikPak downloads, managed visually across all your clouds.
PikPak handles the downloads. RcloneView handles everything else.
Related Guides: