How to Back Up All Google Photos to an External Drive or NAS with RcloneView
Google Photos stores your memories, but what happens if your account is locked, storage fills up, or Google changes its policies? A local backup ensures your photos are always yours.
Google Photos is convenient — until it isn't. Storage limits, account suspensions, and policy changes can all threaten access to years of irreplaceable photos and videos. Google Takeout exists but is painfully slow, fails on large libraries, and doesn't support incremental updates.
RcloneView offers a better way: connect directly to Google Photos, browse your library visually, and sync everything to an external drive, NAS, or another cloud — with automatic scheduling so future photos are backed up too.

Manage & Sync All Clouds in One Place
RcloneView is a cross-platform GUI for rclone. Compare folders, transfer or sync files, and automate multi-cloud workflows with a clean, visual interface.
- One-click jobs: Copy · Sync · Compare
- Schedulers & history for reliable automation
- Works with Google Drive, OneDrive, Dropbox, S3, WebDAV, SFTP and more
Free core features. Plus automations available.
Why Back Up Google Photos Locally?
Google Takeout isn't enough
Google Takeout lets you export photos, but it has significant limitations:
- Slow and unreliable — Large libraries often fail mid-export, requiring you to start over.
- No incremental updates — Every export is a full dump. Took 500 new photos this month? Export everything again.
- ZIP archive format — You get dozens of ZIP files that need manual extraction and organization.
- No automation — It's a fully manual process each time.
Real risks of cloud-only storage
- Storage quota exceeded — Once you hit 15 GB (shared with Gmail and Drive), Google starts prompting you to delete or pay.
- Account lockout — Policy violations, even accidental ones, can freeze your entire Google account.
- Service changes — Google has discontinued products before (Google+, Picasa). Your data strategy should account for this.
A local backup to an external drive or NAS gives you an independent copy that no policy change can take away.
Setting Up Google Photos as a Remote
Step 1: Add Google Photos in RcloneView
Open RcloneView and create a new remote:
- Click the Add Remote button in the Remote Manager.
- Select Google Photos from the provider list.
- Follow the OAuth authentication flow — RcloneView will open your browser to authorize access.
- Once authorized, your Google Photos library appears as a browsable remote.

Step 2: Browse Your Photo Library
Once connected, you can browse your Google Photos library directly in RcloneView's Explorer. Google Photos organizes files by:
- Year/Month folders — Photos are arranged in
media/by-year/2024/01style paths. - Albums — Your albums appear as separate folders under the
albumpath. - Shared albums — Accessible under
shared-album.
This makes it easy to see exactly what you're backing up before starting a transfer.

Backup Strategy 1: Google Photos → External Hard Drive
The simplest approach — copy everything to a USB-connected external drive.
How to set it up
- Connect your external drive and note the drive letter (Windows) or mount point (Mac/Linux).
- Create a Copy job in RcloneView:
- Source: Your Google Photos remote (select the
media/by-yearfolder for all photos) - Destination: Your external drive path (e.g.,
E:\Google Photos Backup)
- Source: Your Google Photos remote (select the
- Run the job — RcloneView downloads all photos and videos while preserving the folder structure.
Recommended settings
- Parallel transfers: 4–6 (Google Photos API has rate limits)
- Job type: Copy (not Sync — you don't want to delete local files if you remove them from Google Photos)
For incremental updates
After the initial backup, subsequent runs only download new photos. RcloneView compares what's already on your drive and skips existing files. This turns a multi-hour first backup into a quick daily update.
Backup Strategy 2: Google Photos → Synology NAS
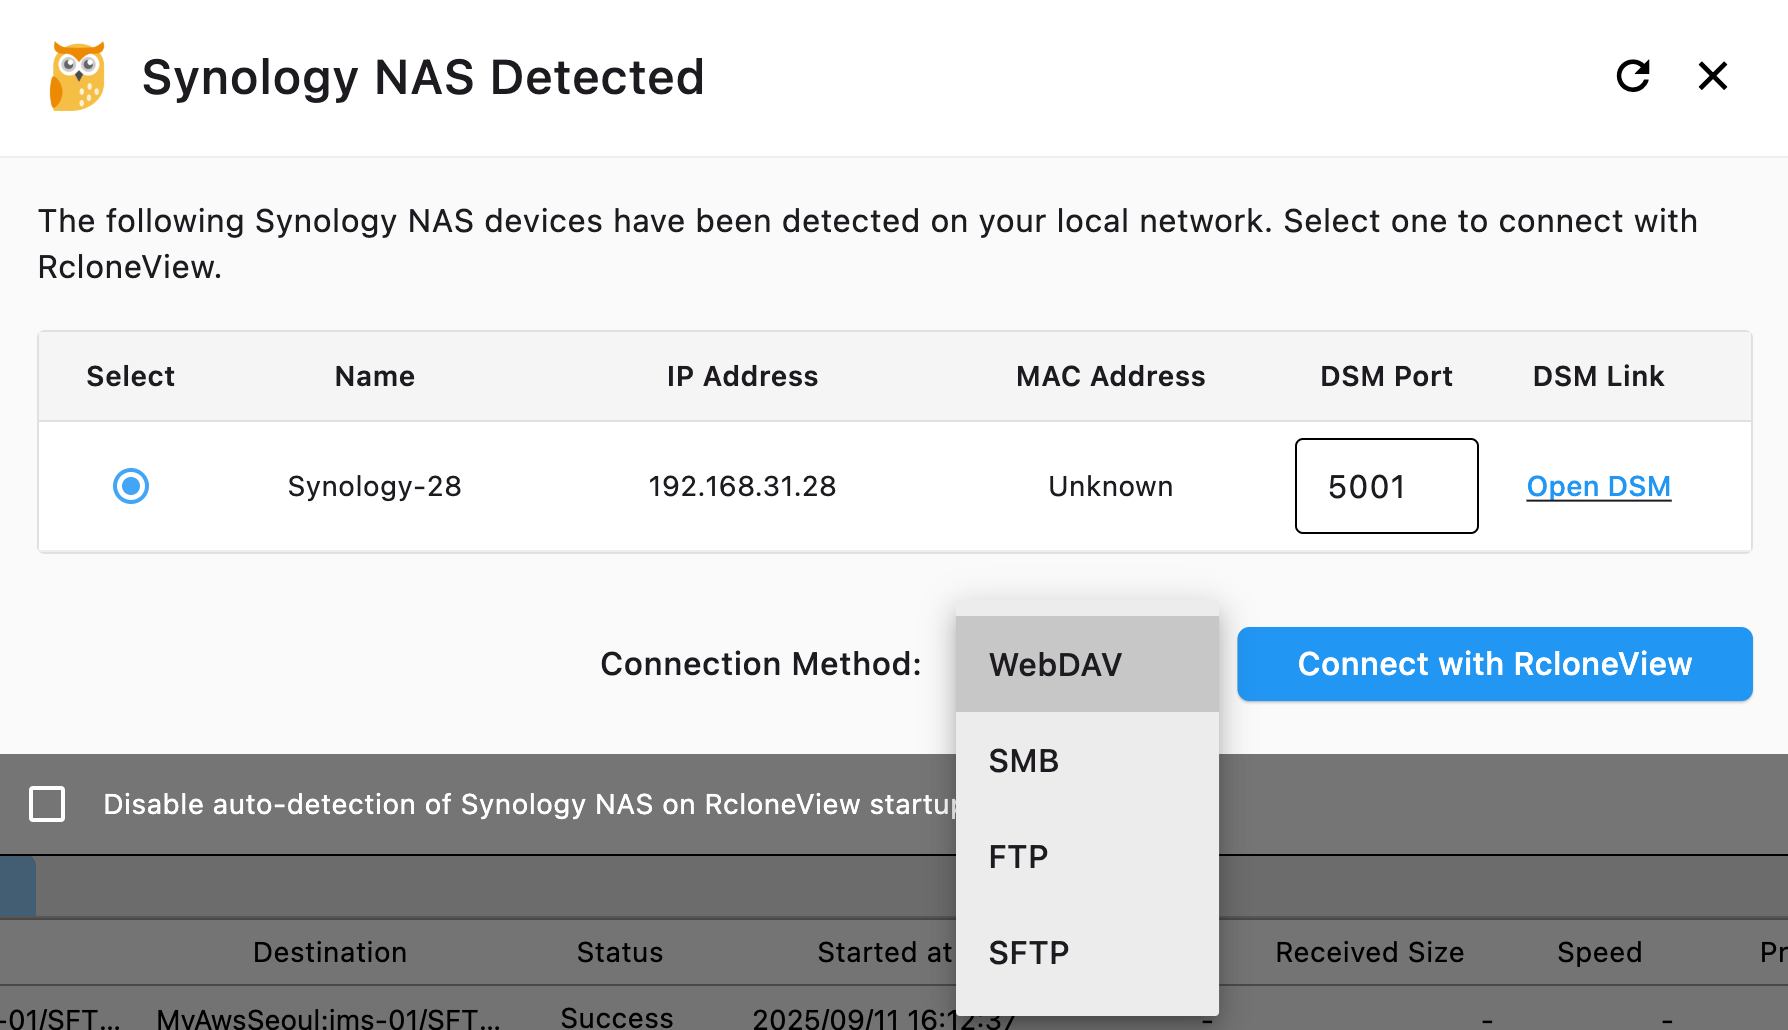
For users with a Synology NAS, RcloneView offers an even more integrated experience. Since v1.0, Synology NAS devices are automatically detected on your network.
How to set it up
- Launch RcloneView — your Synology NAS should appear automatically in the Local tab.
- Create a Copy job:
- Source: Google Photos remote
- Destination: A shared folder on your NAS (e.g.,
/photos/google-backup)
- Schedule the job to run daily or weekly using Job Scheduling.
Why NAS is ideal for photo backup
- Always on — Unlike an external drive, your NAS is always connected and ready.
- RAID protection — Most NAS setups use RAID for disk failure protection.
- Access from anywhere — View your backed-up photos from any device on your network.
- Secondary cloud backup — Use another RcloneView job to sync the NAS to S3 or Backblaze B2 for offsite redundancy.
Backup Strategy 3: Google Photos → Another Cloud
Want to keep a copy in a different cloud provider? RcloneView makes cloud-to-cloud transfers seamless:
- Google Photos → OneDrive — Leverage your Microsoft 365 storage.
- Google Photos → AWS S3 — Archive to cheap, durable object storage.
- Google Photos → Backblaze B2 — Low-cost unlimited backup storage.
- Google Photos → Wasabi — S3-compatible with no egress fees.
Simply create a Copy job with Google Photos as the source and your target cloud as the destination. No data passes through your local machine's storage — RcloneView handles the transfer through its rclone engine.
Automating Your Photo Backup
A one-time backup is good. An automated, recurring backup is better.
Set up scheduled backups
- Create your Copy job using any of the strategies above.
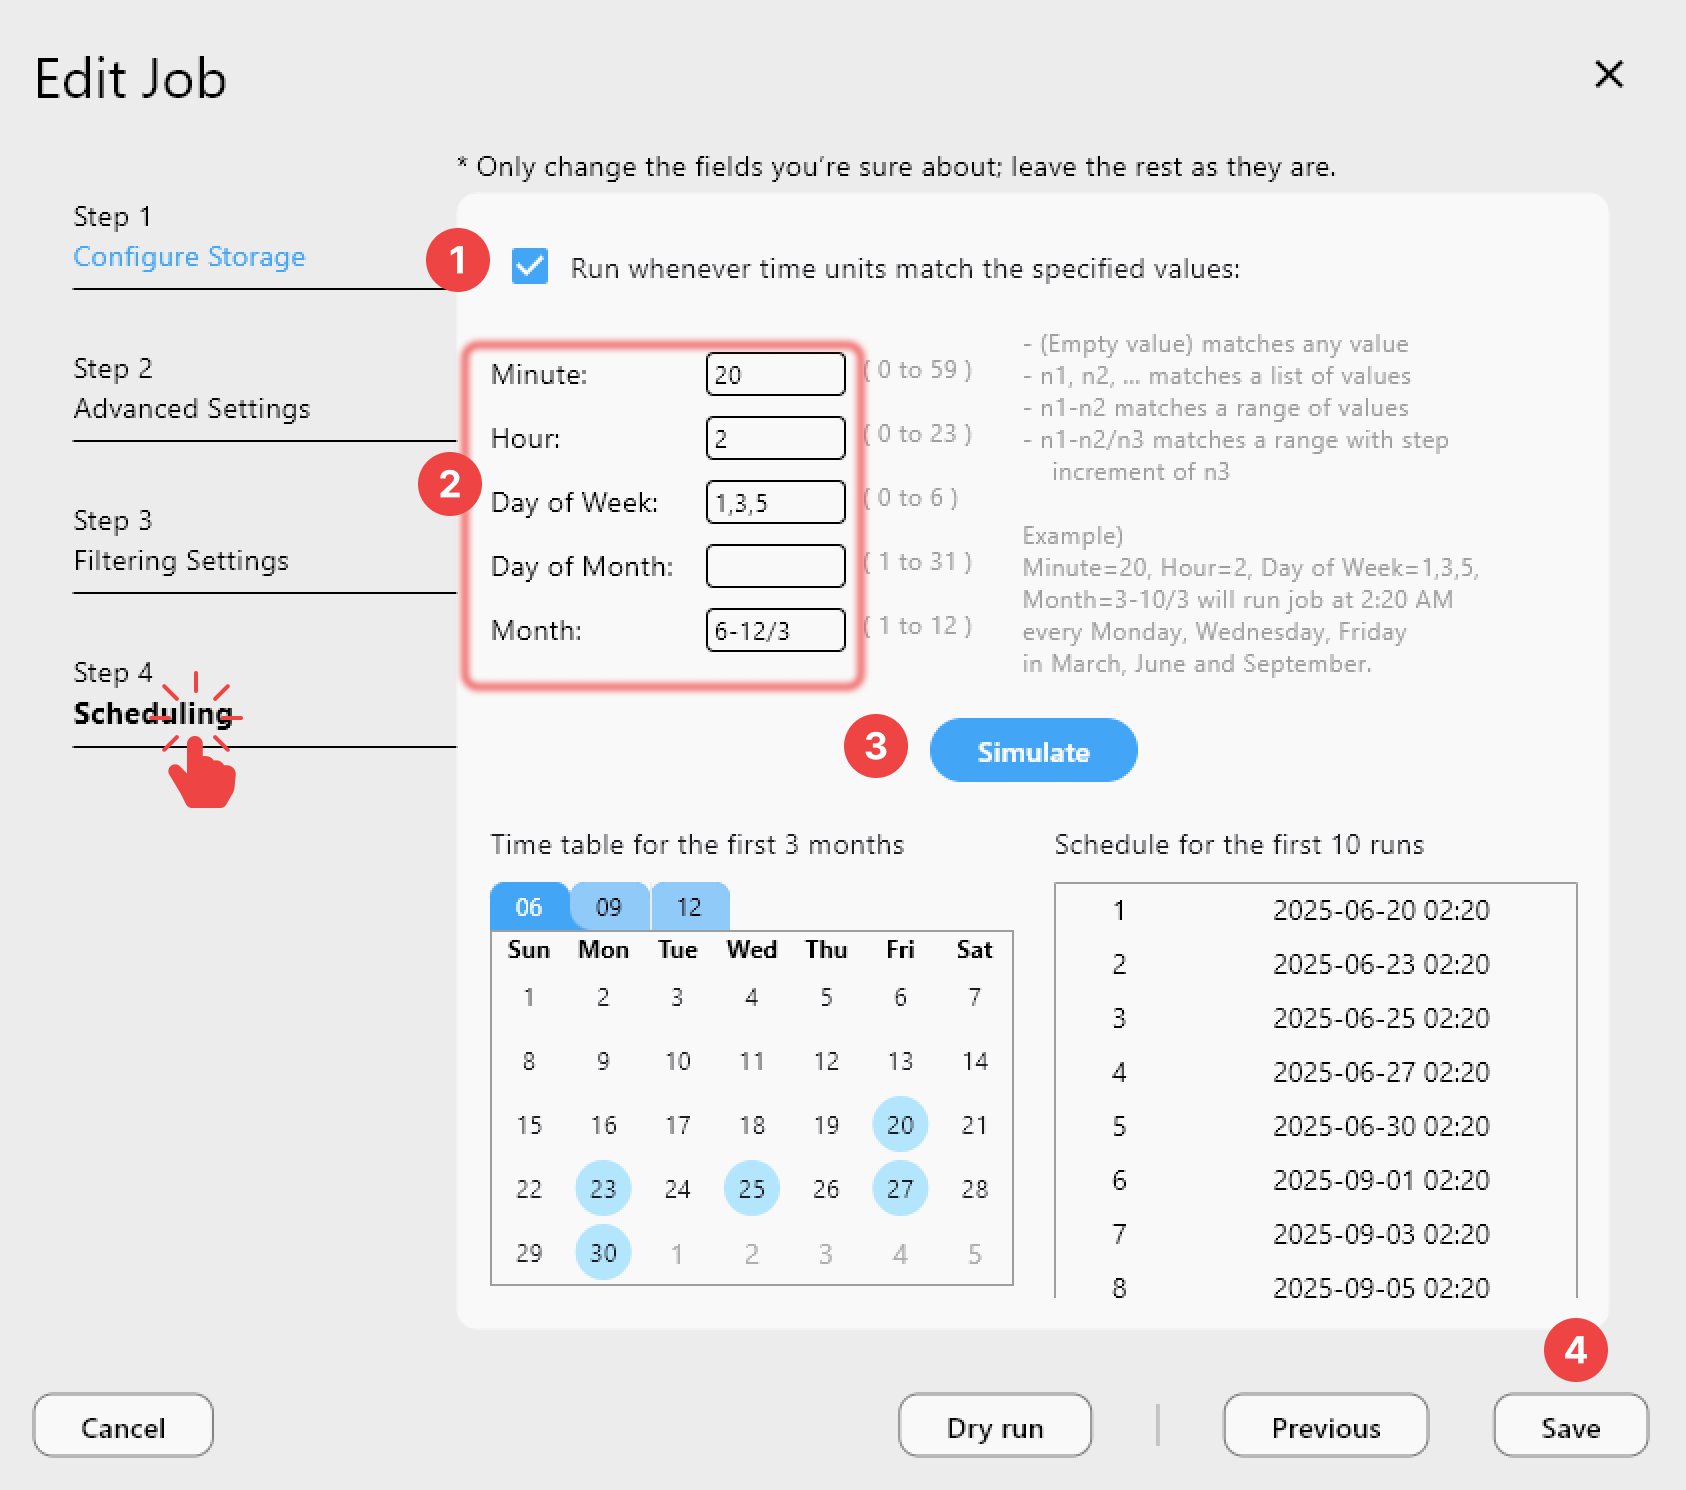
- Open Job Scheduling and set a recurring schedule:
- Daily at 2 AM — Catch all new photos from the previous day.
- Weekly on Sunday — A lighter approach for smaller libraries.
- Add notifications so you know it worked:
- Slack alerts for teams
- Telegram alerts for personal use
- Discord alerts for communities
Use Batch Jobs for multi-destination backup
With v1.3 Batch Jobs, you can back up Google Photos to multiple destinations in one automated sequence:
- Copy Google Photos → External Drive
- Copy Google Photos → NAS
- Copy Google Photos → Backblaze B2
One click (or one scheduled trigger) runs all three.
Monitoring and Verification
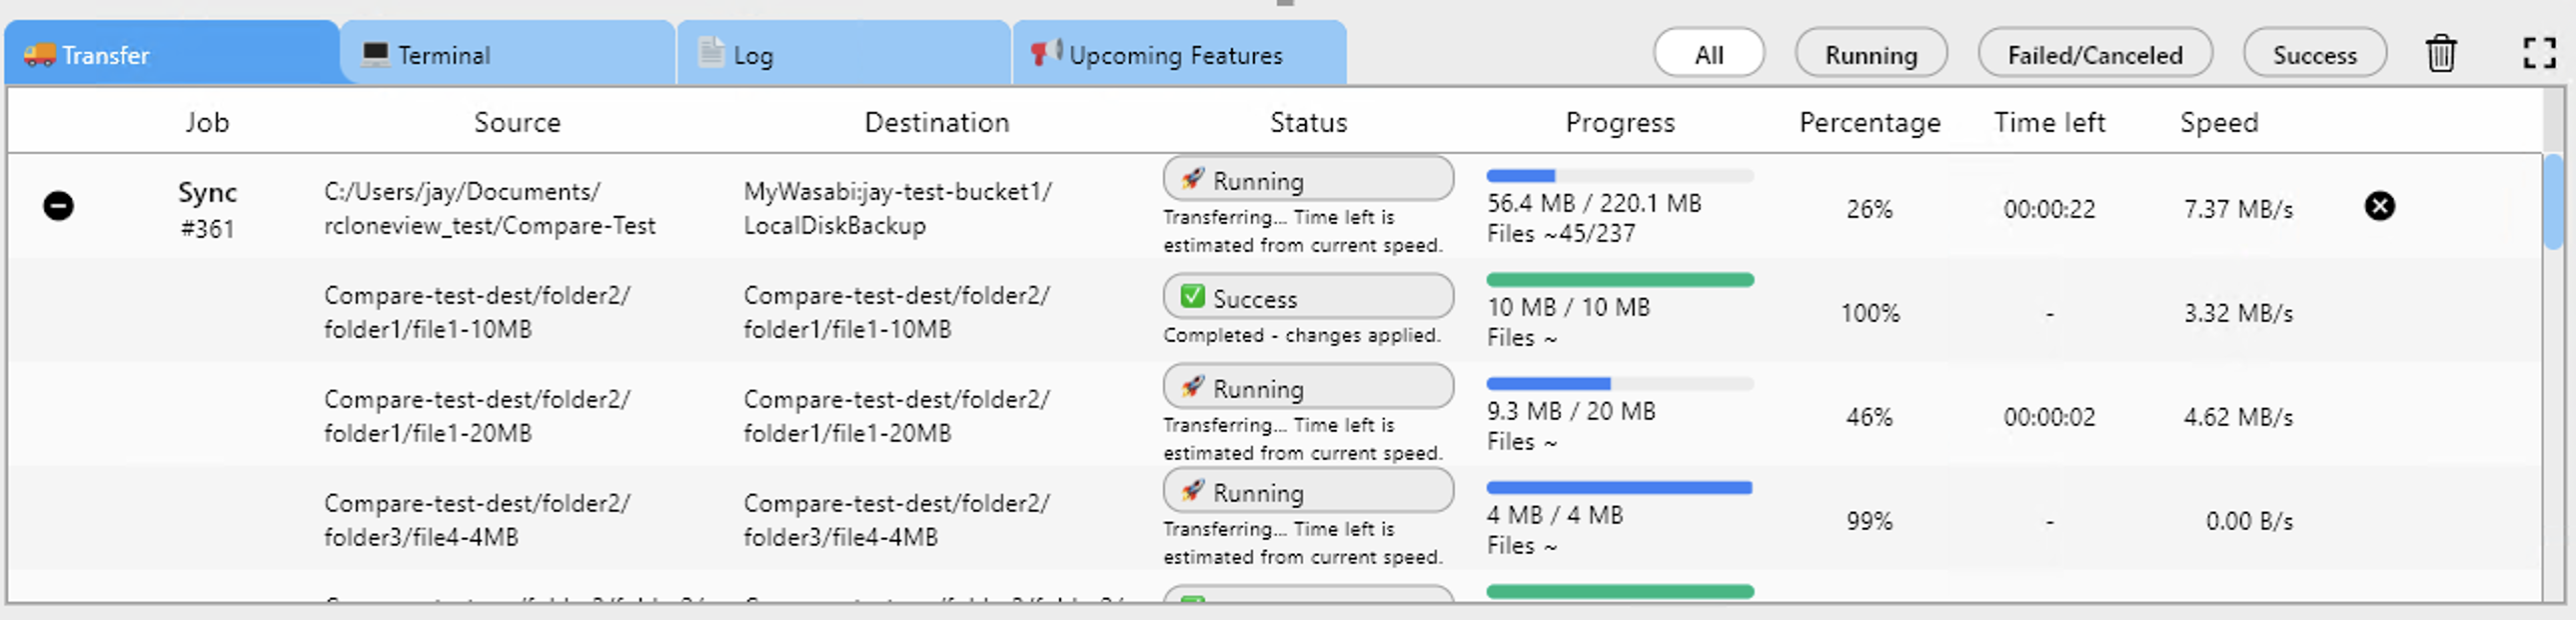
Real-time transfer monitoring
Watch your backup progress in real time — see file counts, transfer speeds, and estimated completion time.
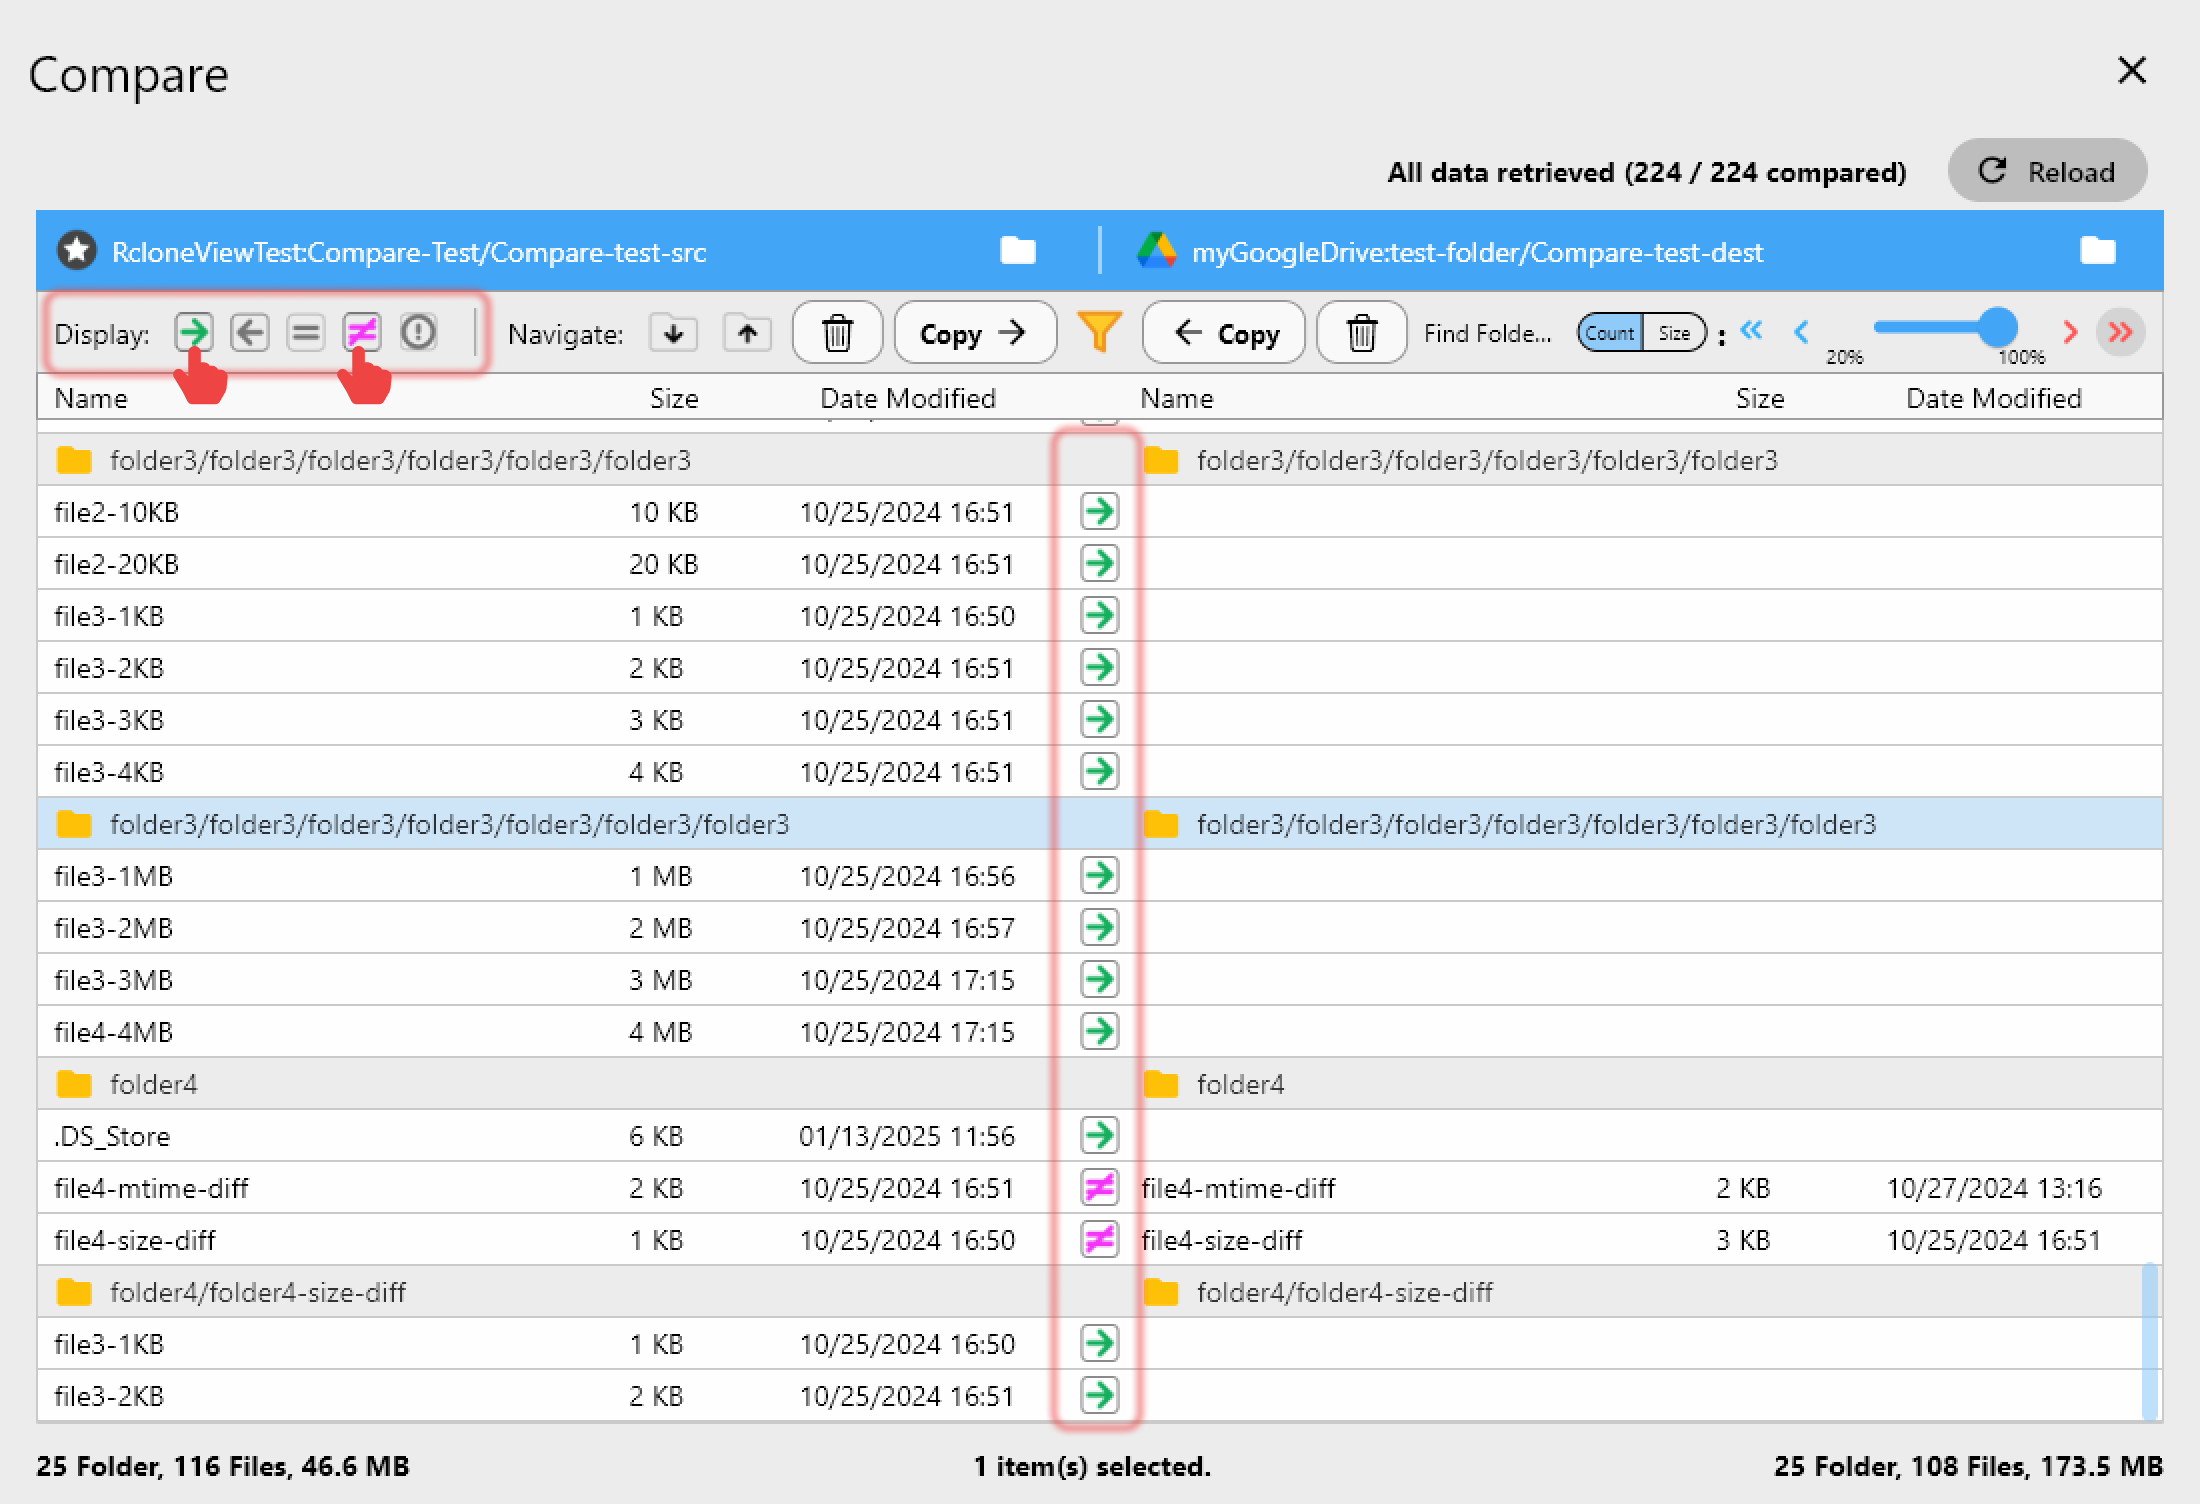
Verify with Folder Comparison
After a backup completes, use Folder Comparison to verify that your local copy matches the Google Photos library. This gives you confidence that nothing was missed.
Check Job History
Review Job History to see a complete log of past backup runs, including files transferred, errors encountered, and total duration.
Tips for Large Google Photos Libraries
If you have tens of thousands of photos:
- Start with recent years — Back up the last 2–3 years first, then work backward. This protects your most recent memories fastest.
- Use incremental Copy — After the initial run, only new files are transferred.
- Be patient with rate limits — Google Photos API limits are stricter than Google Drive. Keep parallel transfers at 4–6.
- Retry on failure — v1.3's Retry Failed Jobs feature handles temporary API errors gracefully.
- Consider scheduling off-hours — Run large backups overnight to avoid network congestion.
Getting Started
- Download RcloneView from rcloneview.com (Windows, macOS, Linux).
- Add Google Photos as a remote using OAuth authentication.
- Browse your library in the Explorer to see what you're backing up.
- Create a Copy job to your chosen destination (external drive, NAS, or cloud).
- Schedule it for automatic recurring backups.
- Verify with Folder Comparison after the first run.
Your photos are irreplaceable. Your backup shouldn't depend on a single provider. RcloneView makes it easy to keep an independent copy — automatically, reliably, and with zero CLI required.
Related Guides:
- Add Remote via Browse-based Log-in (OAuth)
- Browse & Manage Remotes
- Compare Folder Contents
- Create Sync Jobs
- Job Scheduling
- Synology NAS Auto Detection and Connection