Run RcloneView on ASUSTOR NAS for Automated Cloud Backup
Your ASUSTOR NAS runs 24/7 — make it your always-on cloud backup engine. RcloneView turns your NAS into a multi-cloud file management hub with scheduled backups, cloud mounting, and real-time transfer monitoring.
ASUSTOR NAS devices ship with Intel or ARM processors, run ADM (ASUSTOR Data Master) OS, and support Docker through the Portainer app or command line. This makes them capable of running RcloneView as a containerized service — always on, always backing up, without tying up a desktop or laptop. Whether you want to back up NAS shares to Backblaze B2, sync folders with Google Drive, or mount S3 as a local volume, RcloneView on your ASUSTOR NAS handles it all from a web-based GUI.

Manage & Sync All Clouds in One Place
RcloneView is a cross-platform GUI for rclone. Compare folders, transfer or sync files, and automate multi-cloud workflows with a clean, visual interface.
- One-click jobs: Copy · Sync · Compare
- Schedulers & history for reliable automation
- Works with Google Drive, OneDrive, Dropbox, S3, WebDAV, SFTP and more
Free core features. Plus automations available.
Why Run Cloud Backup on Your NAS
Running cloud backup directly on your NAS has several advantages over running it on a workstation:
- Always-on operation — your NAS is already running 24/7. Backups execute on schedule without requiring a PC to be awake.
- LAN-speed access to NAS data — no need to pull files over the network to a PC before uploading. The NAS reads directly from its own disks.
- Centralized management — all backup jobs, schedules, and logs live on the NAS. Any device with a browser can manage them.
- No workstation resource drain — offload the CPU and bandwidth cost of large transfers to the NAS.
ASUSTOR NAS Compatibility
RcloneView via Docker runs on ASUSTOR models with:
- Intel-based (x86_64) processors: AS31, AS32, AS33, AS52, AS54, AS61, AS62, AS63, AS64, AS65, AS67, Lockerstor, Lockerstor Pro, and Flashstor series.
- ARM-based processors: Drivestor and Drivestor Pro series (AS11, AS33 ARM variants) — verify Docker support for your specific model.
- ADM 4.0 or later with Docker (Portainer) installed from App Central.
- At least 2 GB RAM recommended (4 GB+ for concurrent large transfers).
Installing RcloneView via Docker
Step 1 — Install Docker from App Central
- Open App Central in your ADM web interface.
- Search for Portainer (or Docker-CE if available).
- Install and launch the Portainer app.
Step 2 — Deploy RcloneView container
Open Portainer at http://your-nas-ip:9443 and create a new container, or use SSH to deploy via command line:
docker run -d \
  --name rcloneview \
  -p 5572:5572 \
  -v /volume1/Docker/rcloneview/config:/config/rclone \
  -v /volume1:/data/volume1 \
  --restart unless-stopped \
  rcloneview/rcloneview:latest
Key volume mappings:
/volume1/Docker/rcloneview/config— stores your rclone remote configurations persistently./volume1— exposes your main NAS volume to RcloneView for backup operations.
Step 3 — Access the web interface
Open your browser and navigate to http://your-nas-ip:5572. You should see the RcloneView dashboard.

Connecting Cloud Remotes
From the RcloneView interface, add your cloud storage providers:
Common setups for NAS backup
- Backblaze B2 — cost-effective for large NAS backups at $6/TB/month.
- Wasabi — flat-rate S3-compatible storage with no egress fees.
- Google Drive — sync important folders between NAS and Drive.
- Amazon S3 — enterprise-grade durability with flexible storage classes.
- SFTP — back up to a remote server or second NAS.
Each remote is configured once and saved permanently. The setup wizard walks you through authentication for each provider — API keys for S3-compatible services, OAuth for Google Drive and OneDrive.
Scheduling Automated Backups
The core value of running RcloneView on your NAS is automated, unattended backup. Here is how to set it up:
Creating a backup job
- Open the two-pane explorer in RcloneView.
- Set the left pane to your NAS local path (e.g.,
/data/volume1/Photos). - Set the right pane to your cloud remote (e.g.,
backblaze-b2:nas-backup/photos/). - Choose Sync to mirror the NAS folder to the cloud, or Copy to add new files without removing deletions.
- Save the operation as a named job.

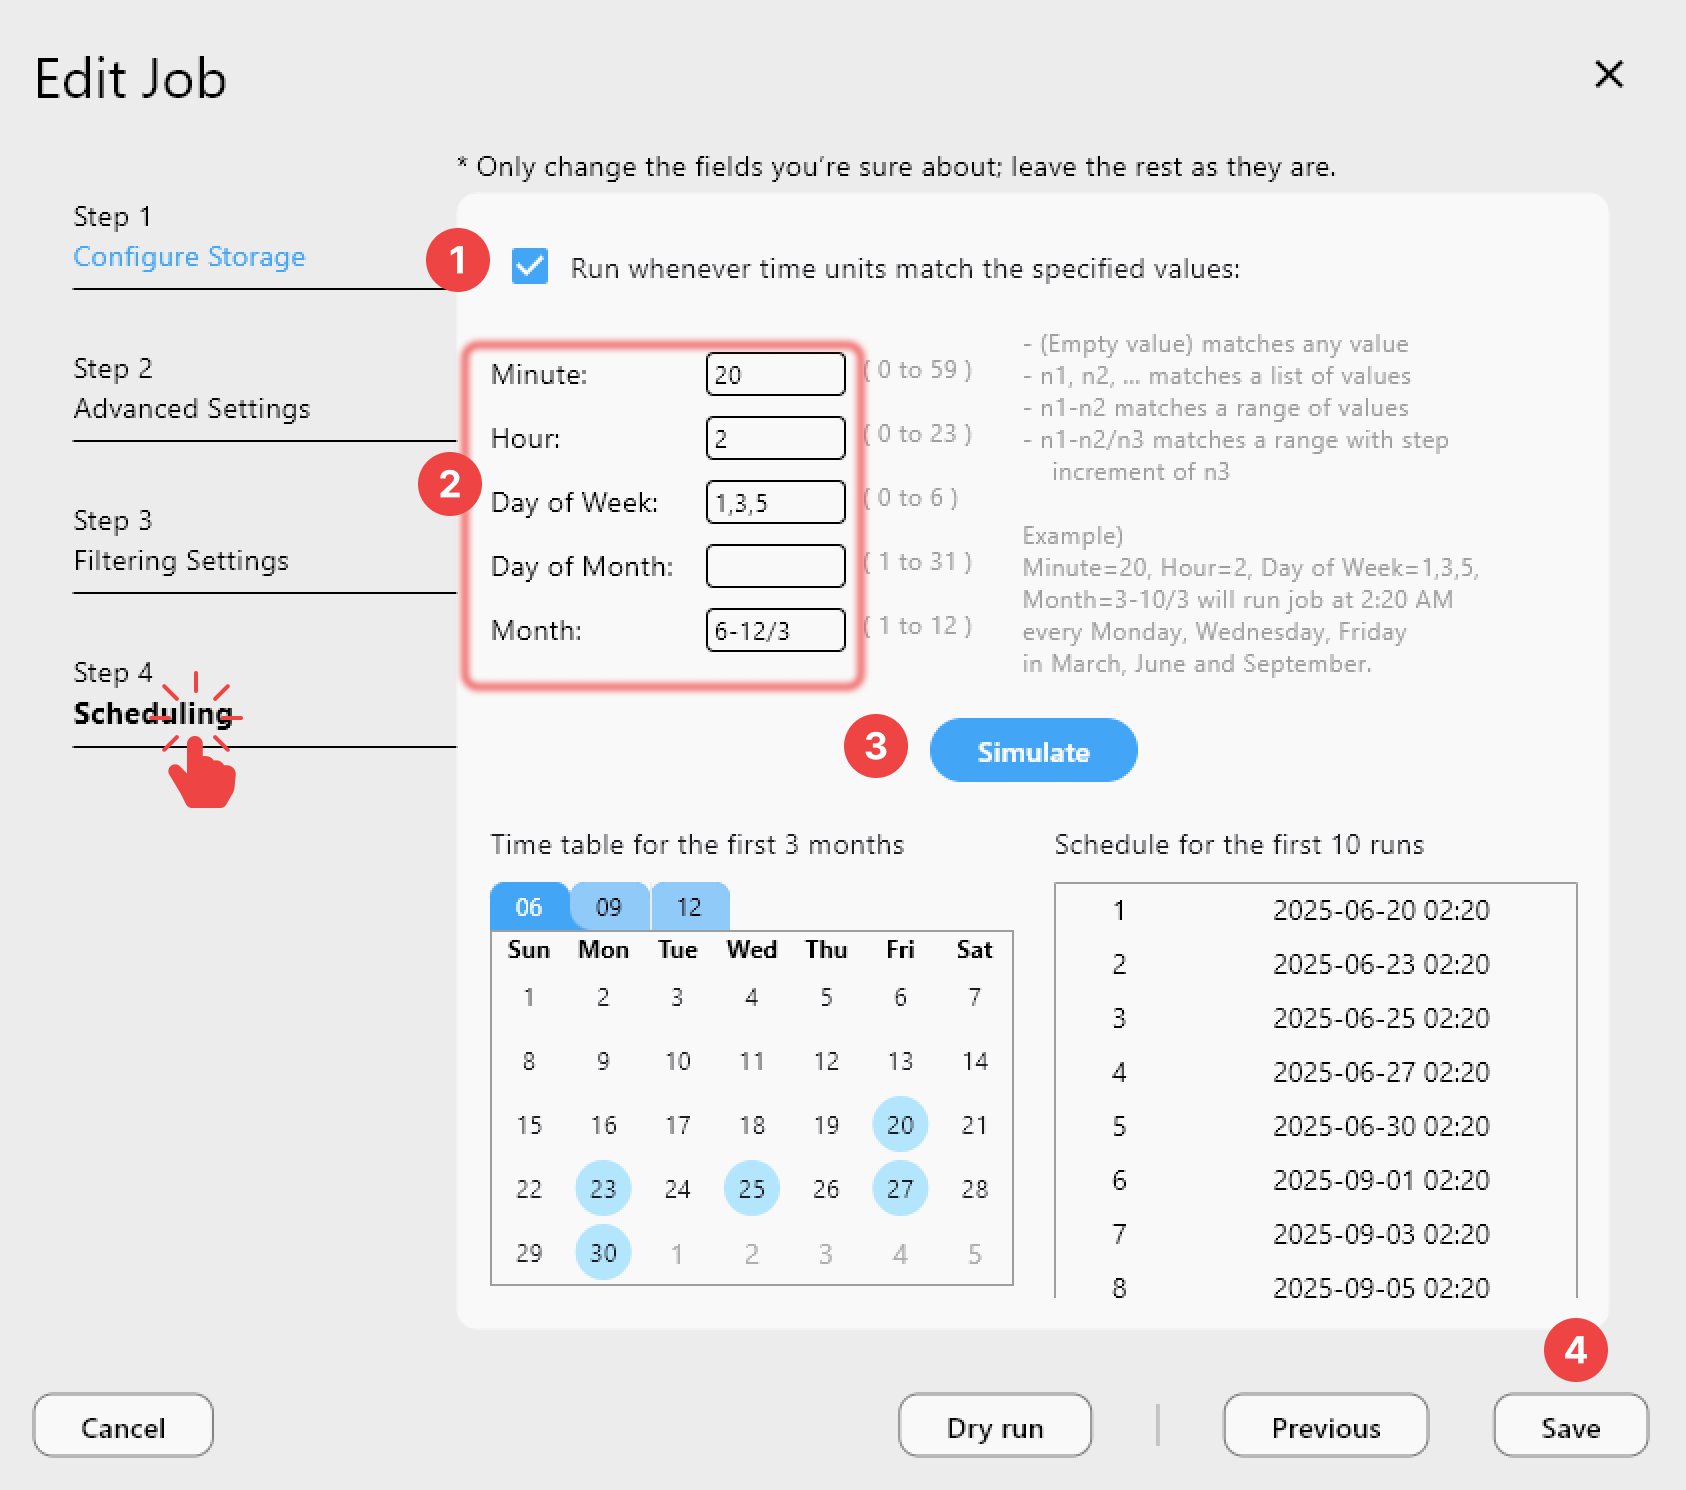
Scheduling the job
Set the job to run automatically:
- Daily at 2:00 AM — back up during low-usage hours to avoid impacting NAS performance.
- Weekly full sync — a comprehensive sync on weekends when bandwidth demand is lowest.
- On-demand — trigger a backup manually before making major changes.
Mounting Cloud Storage
RcloneView can mount cloud storage as a local path on your NAS, making remote files accessible as if they were on a local disk. This is useful for:
- Extending NAS capacity with cloud storage.
- Accessing archived files without downloading them manually.
- Streaming media from cloud storage through your NAS media apps.
To enable FUSE mounts in Docker, add these flags to your container:
--device /dev/fuse --cap-add SYS_ADMIN
Then use RcloneView's Mount Manager to mount any remote to a local path.
Monitoring Transfers
When backup jobs are running, RcloneView's transfer monitoring shows real-time progress:
- Files currently being transferred
- Transfer speed and ETA
- Errors and retries
- Completed file counts
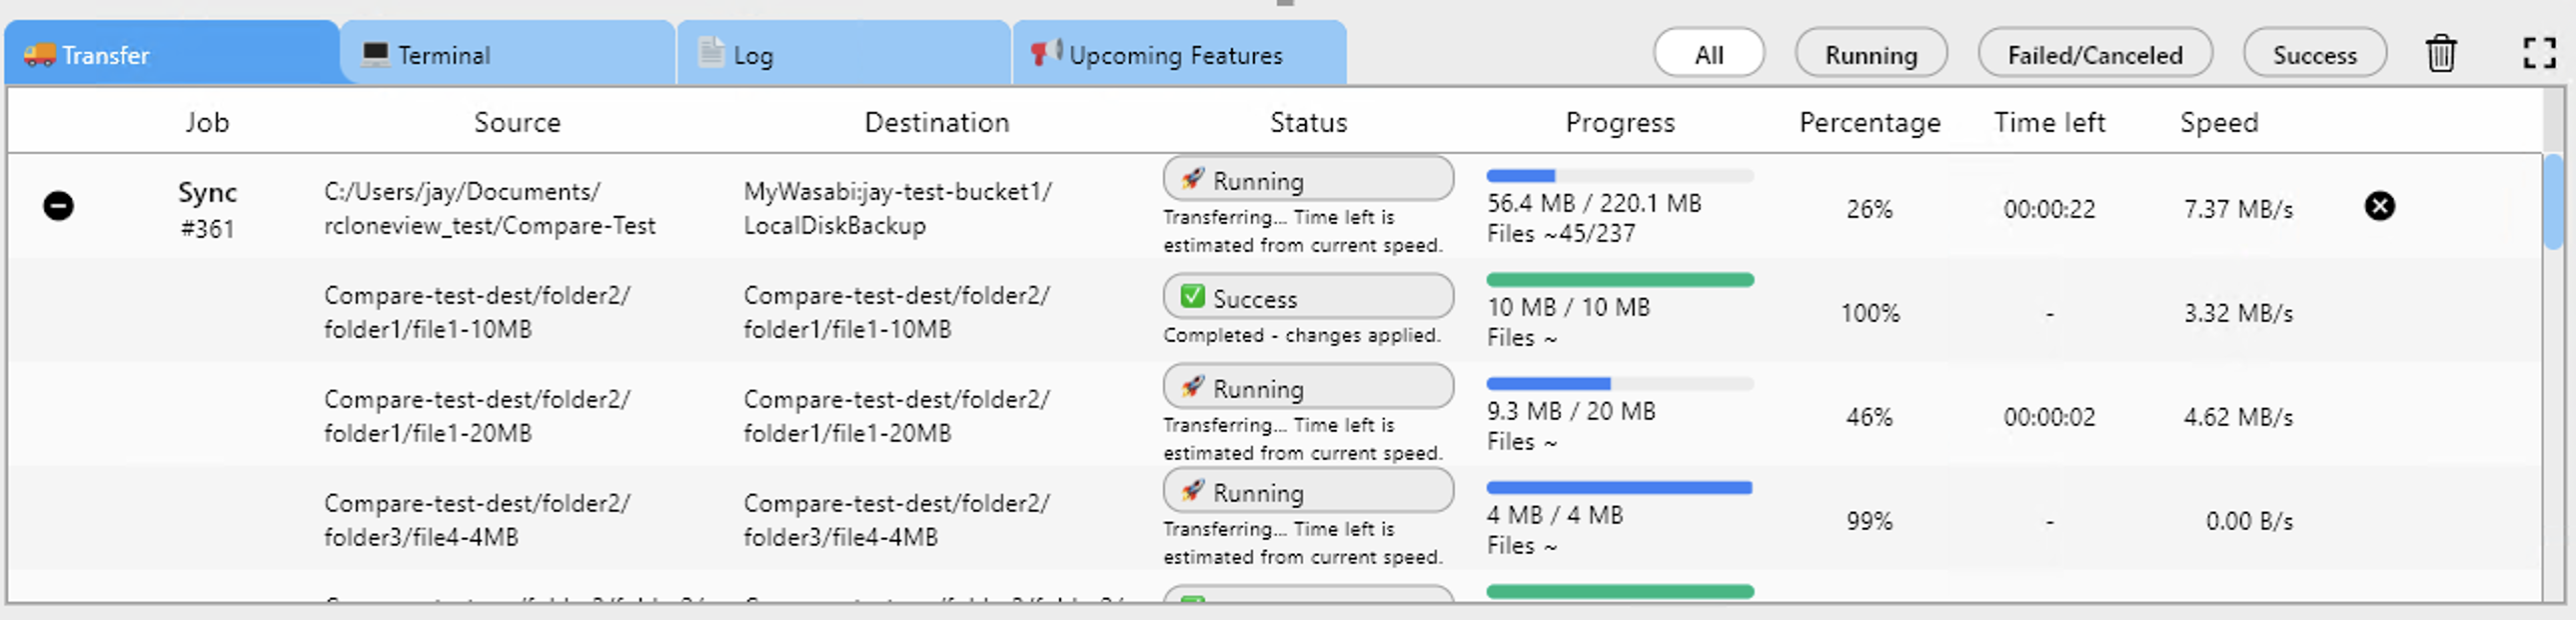
Check job history to confirm that scheduled backups completed successfully. If a job fails (network outage, credential expiry), RcloneView logs the error for troubleshooting.
Best Practices for ASUSTOR NAS Backups
- Start with your most critical data — photos, documents, and databases first. Media libraries can follow.
- Use bandwidth limits during business hours to avoid saturating your internet connection: set
--bwlimit 10Min job options. - Enable versioning on your cloud storage to protect against ransomware or accidental overwrites.
- Back up your rclone config — the
/config/rclonedirectory contains your cloud credentials. Copy it to a second location. - Monitor disk health — cloud backup does not help if the NAS disk fails before the backup runs. Use ADM's Storage Manager alerts.
Getting Started
- Install Portainer from ASUSTOR App Central.
- Deploy the RcloneView Docker container with the volume mappings shown above.
- Add your cloud remotes — Backblaze B2, S3, Google Drive, or any supported provider.
- Create and schedule backup jobs for your most important NAS shares.
- Check job history weekly to confirm everything is running smoothly.
Your ASUSTOR NAS is already protecting your data locally with RAID. Adding automated cloud backup with RcloneView gives you true off-site protection — and it runs itself.
Related Guides: