Run RcloneView on Raspberry Pi — Build a Low-Power Cloud Backup Appliance
A Raspberry Pi draws 5–15 watts. That's less than a lightbulb. Leave it running 24/7, and it becomes a silent, always-on cloud backup appliance that syncs your data while you sleep.
The Raspberry Pi is a surprisingly capable computer for cloud storage tasks. Pair it with an external USB drive and RcloneView, and you have a dedicated backup machine that syncs local files to cloud storage (or vice versa) around the clock — at a fraction of the power cost of a full PC or NAS.

Manage & Sync All Clouds in One Place
RcloneView is a cross-platform GUI for rclone. Compare folders, transfer or sync files, and automate multi-cloud workflows with a clean, visual interface.
- One-click jobs: Copy · Sync · Compare
- Schedulers & history for reliable automation
- Works with Google Drive, OneDrive, Dropbox, S3, WebDAV, SFTP and more
Free core features. Plus automations available.
Why Raspberry Pi for Cloud Backup?
Always-on, low power
| Device | Power Draw | Yearly Cost (24/7) |
|---|---|---|
| Raspberry Pi 4 | 5–7W | ~$8 |
| Raspberry Pi 5 | 8–15W | ~$14 |
| Desktop PC | 100–300W | ~$150–400 |
| NAS (2-bay) | 20–40W | ~$30–60 |
A Raspberry Pi costs practically nothing to run 24/7.
Quiet and compact
No fans (Pi 4), no noise. Put it on a shelf and forget about it.
Capable enough
The Raspberry Pi 4 and 5 can handle:
- Syncing thousands of files to cloud storage.
- Running scheduled backup jobs.
- Mounting cloud storage for local access.
- Managing multiple cloud accounts simultaneously.
Hardware Setup
Recommended hardware
- Raspberry Pi 4 (4 GB) or Raspberry Pi 5 (4–8 GB).
- USB 3.0 external drive or SSD for local storage.
- MicroSD card (32 GB) for the OS.
- Ethernet connection (recommended over Wi-Fi for large transfers).
- Power supply (official Pi power supply recommended).
Storage architecture
External USB Drive → Raspberry Pi → Cloud Storage
                          ↕
                    RcloneView (scheduling, monitoring)
The external drive holds your local files. RcloneView on the Pi syncs them to cloud storage on a schedule.
Installation
1) Install Raspberry Pi OS
Use Raspberry Pi Imager to flash Raspberry Pi OS (64-bit) to your microSD card. The Desktop edition is needed for RcloneView's GUI.
2) Install RcloneView
Download the ARM64 .deb package from rcloneview.com:
sudo dpkg -i rcloneview_*_arm64.deb
sudo apt-get install -f
3) Install FUSE (for mounting)
sudo apt-get install fuse3
4) Mount your external drive
sudo mkdir /mnt/backup
sudo mount /dev/sda1 /mnt/backup
Add to /etc/fstab for automatic mounting on boot.
5) Launch RcloneView
rcloneview
If running headless (via VNC), ensure VNC is enabled in raspi-config.
Configure Cloud Backup
Add your cloud remotes

Add your backup destinations — Google Drive, S3, Backblaze B2, or any of the 70+ supported providers.
Create backup jobs
Set up Copy jobs from your external drive to cloud storage:

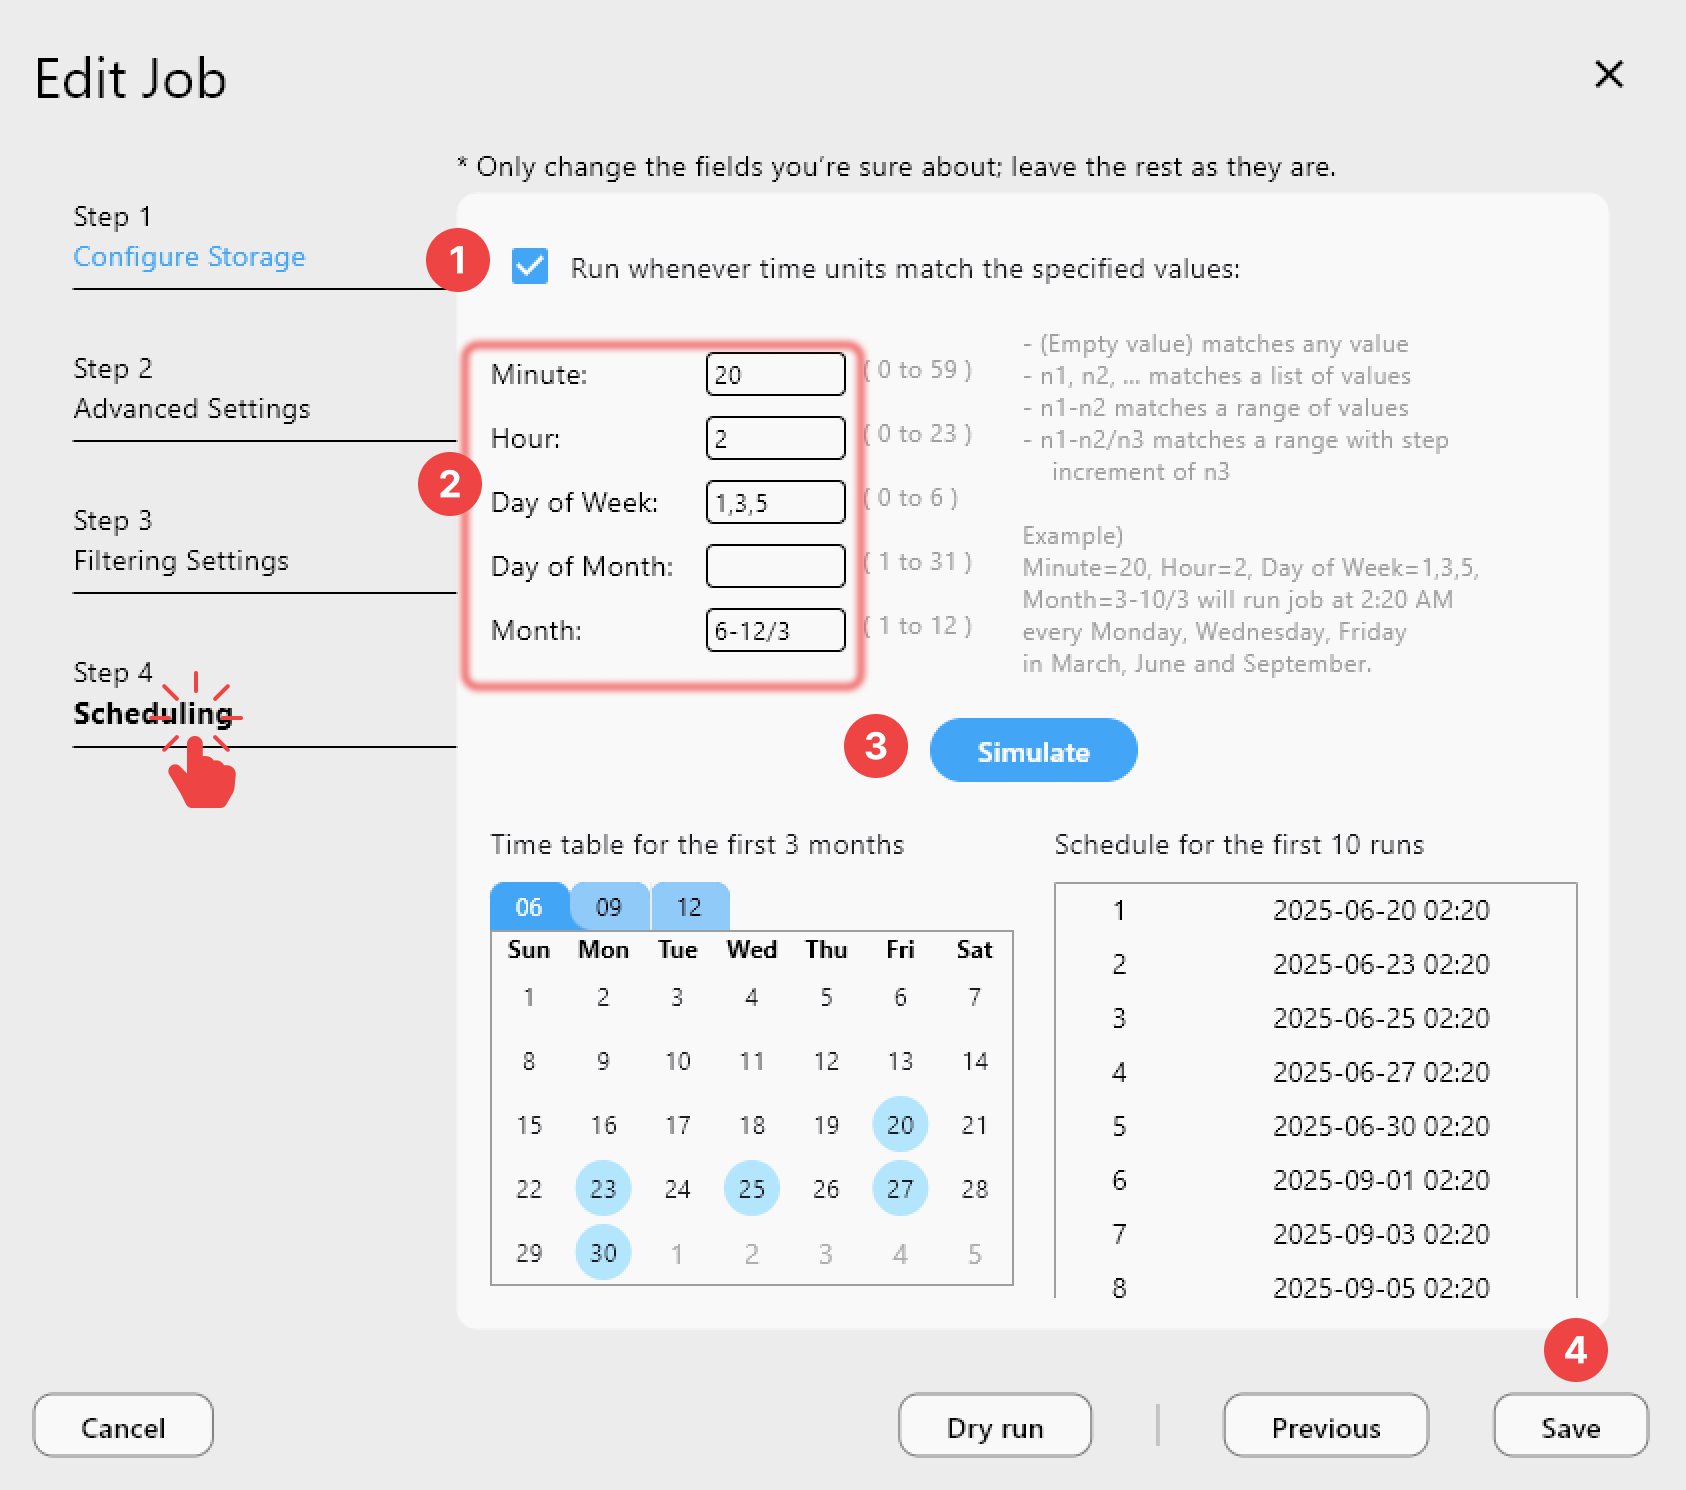
Schedule automated backups
Schedule nightly backups:
Use Cases
1) Home file server backup
Connect a USB drive with your family photos, documents, and media. Schedule nightly backups to Google Drive or Backblaze B2.
2) NAS supplement
If your NAS doesn't have a good cloud sync feature, use a Pi as a bridge:
NAS (SMB share) → Pi (reads via mount) → Cloud Storage (via RcloneView)
3) Security camera archive
Back up security camera footage from a local NVR to cloud storage for off-site protection.
4) Developer backup
Sync your code repositories and project files to cloud storage:
- Filter to include only source files (exclude
node_modules,.git). - Schedule hourly backups.
5) Media library mirror
Keep a cloud mirror of your local media library. Use it to stream from Google Drive when away from home.
Performance Expectations
Be realistic about Pi performance:
| Task | Raspberry Pi 4 | Raspberry Pi 5 |
|---|---|---|
| Small file sync (docs) | Good | Great |
| Large file transfer | Limited by USB 3/network | Good |
| Thousands of small files | Slow checking phase | Moderate |
| Encrypted transfers | CPU limited | Better (AES support) |
| Network speed | ~300 Mbps (Gigabit Ethernet) | ~1 Gbps |
For large transfers, patience helps. The Pi isn't fast, but it's running 24/7 — it finishes eventually.
Optimization tips
- Reduce parallel transfers — 2–4 is optimal for Pi 4. Pi 5 can handle 4–8.
- Use ethernet — Wi-Fi adds latency and reduces throughput.
- Schedule off-peak — Run intensive jobs at night.
- SSD over HDD — USB SSD reads much faster than spinning disks.
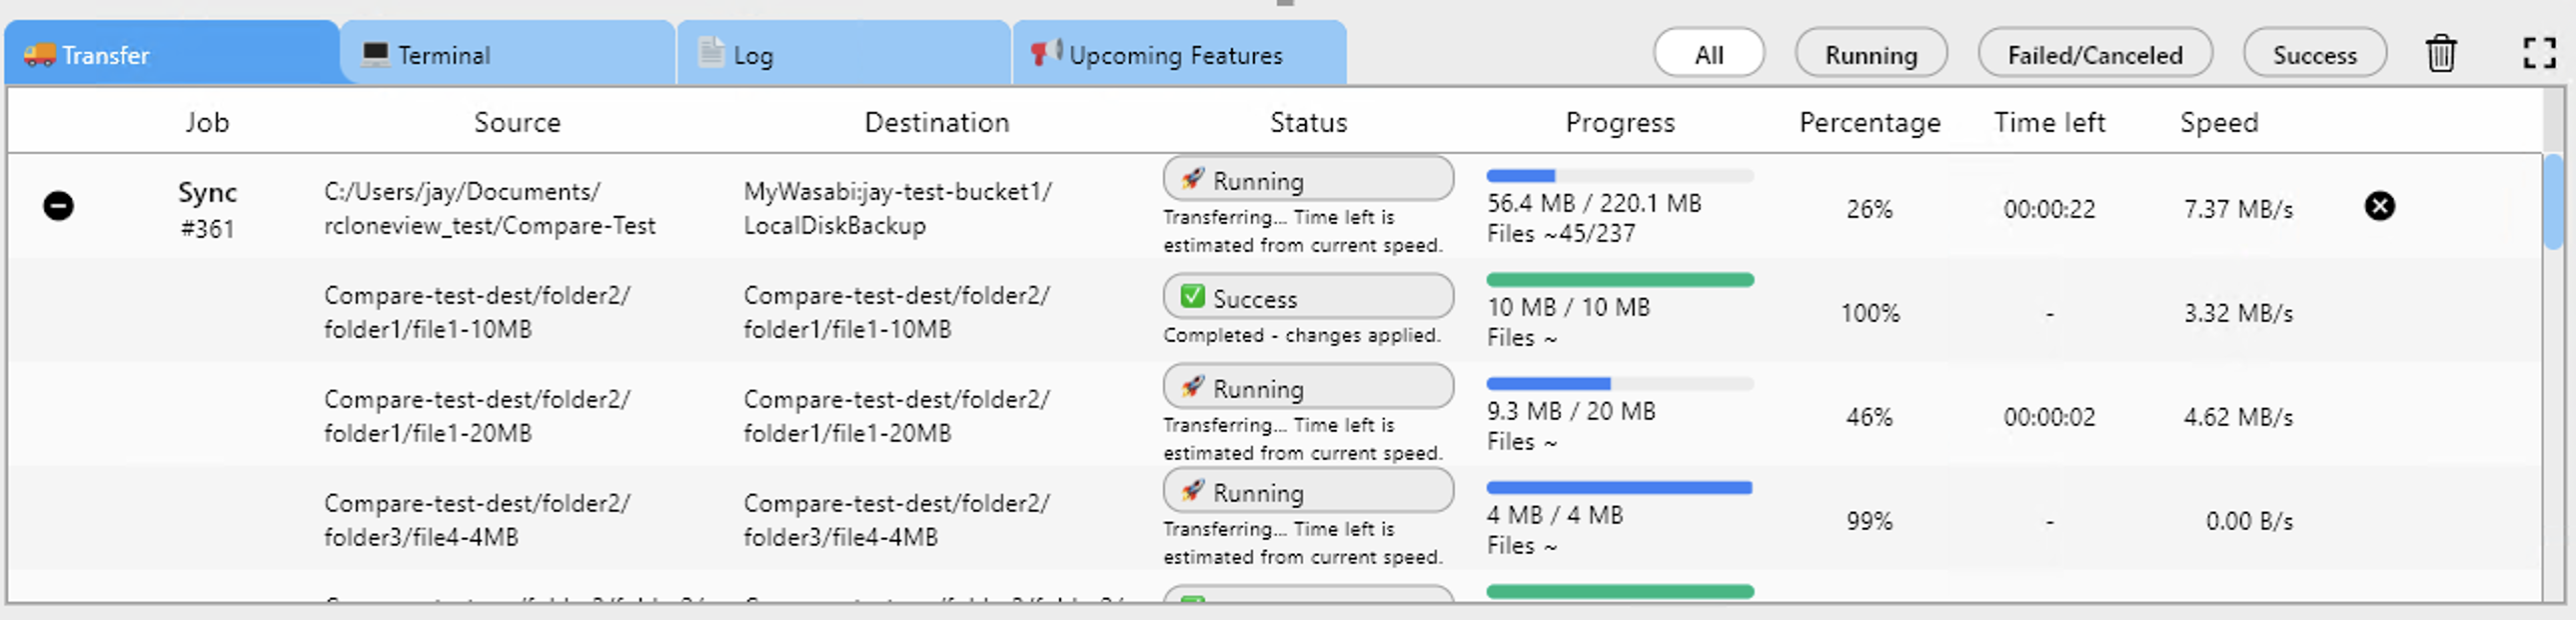
Monitor and Verify
Track your backups:
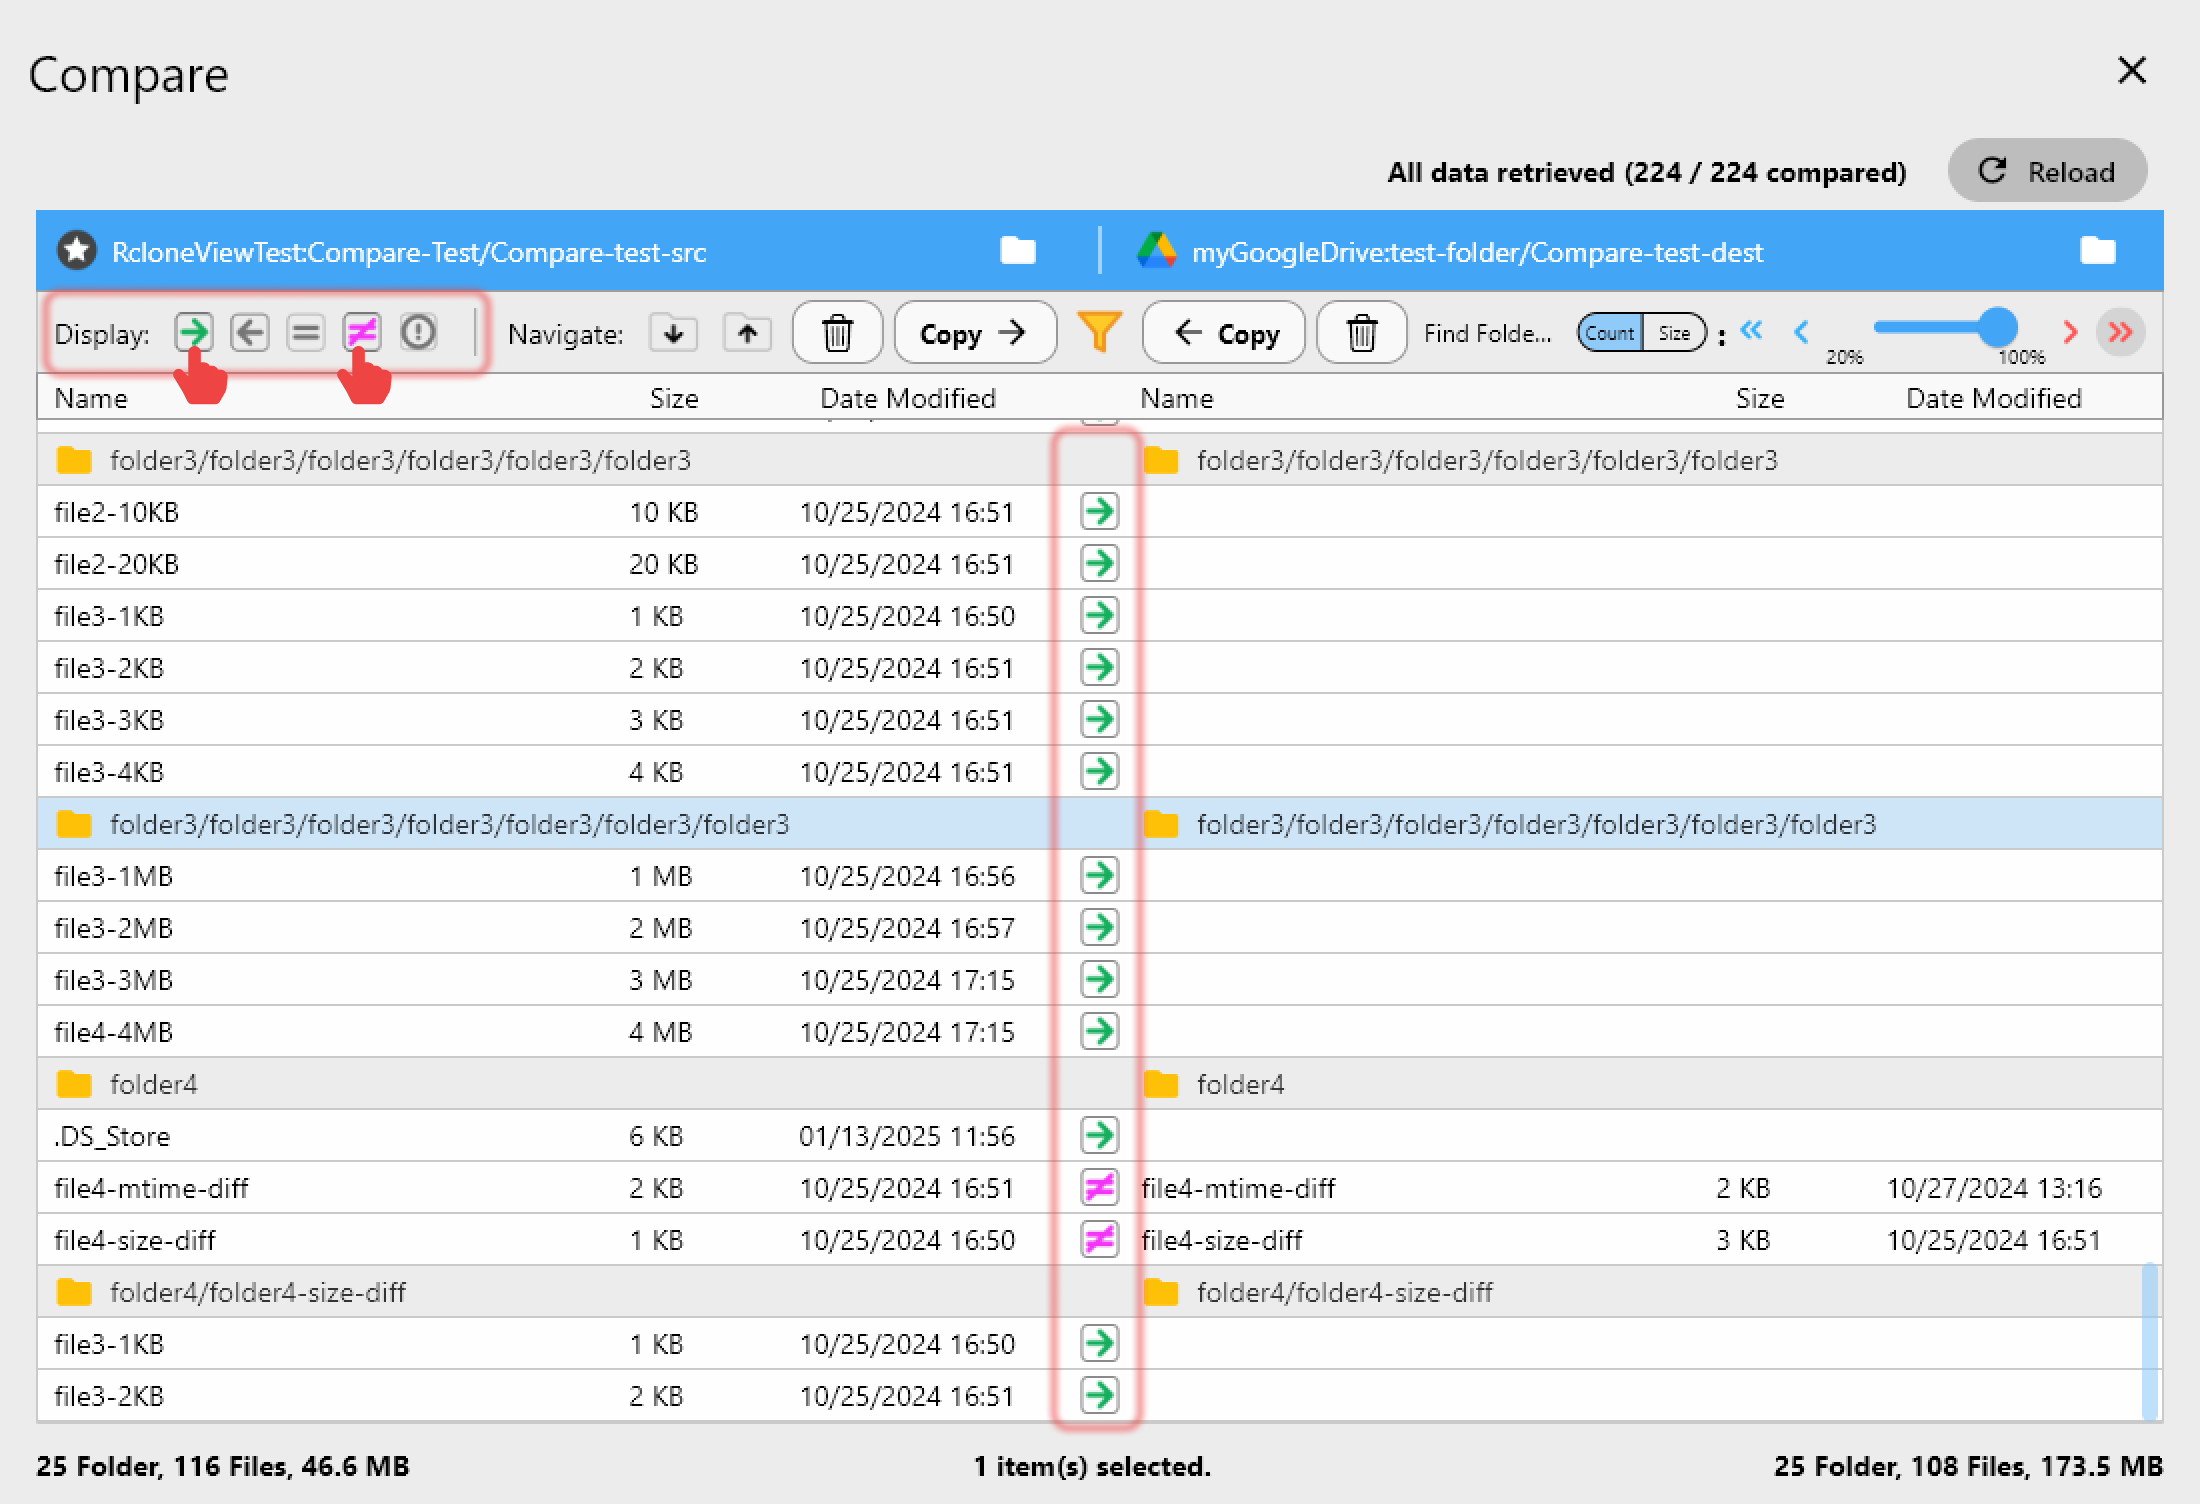
Verify with Folder Comparison:
Headless Operation
For a truly set-and-forget setup:
- Configure all jobs and schedules via VNC or directly.
- Enable RcloneView autostart (see the Ubuntu/Debian guide).
- Disconnect monitor and keyboard.
- The Pi runs silently, executing scheduled jobs.
Getting Started
- Get a Raspberry Pi 4 or 5 with an external USB drive.
- Install Raspberry Pi OS (64-bit Desktop).
- Download RcloneView from rcloneview.com.
- Add cloud remotes and create backup jobs.
- Schedule and forget — your Pi handles the rest.
The cheapest, quietest, most efficient cloud backup appliance you can build.
Related Guides: