Manage Azure Files with RcloneView: Sync, Backup, and Mount SMB Cloud Shares
Azure Files gives you fully managed SMB file shares in the cloud. RcloneView lets you browse, sync, back up, and mount them — all from a visual interface with zero command-line work.
Azure Files is Microsoft's managed file share service, offering SMB and NFS access directly from Azure. It is popular with enterprises running hybrid workloads, lift-and-shift applications, and shared storage for virtual machines. However, managing Azure Files outside the Azure Portal can be cumbersome — especially when you need to move data between Azure and other clouds or keep local copies in sync.
RcloneView solves this by wrapping rclone's Azure Files backend in a clean, two-pane GUI. You can add your Azure file shares as a remote, browse them visually, drag files between clouds, compare folder contents, schedule automated backups, and even mount shares as a local drive letter.

Manage & Sync All Clouds in One Place
RcloneView is a cross-platform GUI for rclone. Compare folders, transfer or sync files, and automate multi-cloud workflows with a clean, visual interface.
- One-click jobs: Copy · Sync · Compare
- Schedulers & history for reliable automation
- Works with Google Drive, OneDrive, Dropbox, S3, WebDAV, SFTP and more
Free core features. Plus automations available.
Why Use RcloneView for Azure Files
Azure Files works well inside the Azure ecosystem, but real-world workflows often span multiple providers. You may need to:
- Back up Azure file shares to a separate cloud like Amazon S3, Backblaze B2, or Wasabi for disaster recovery.
- Sync Azure Files with Google Drive or OneDrive so team members can access the same data from familiar tools.
- Mount Azure shares locally for applications that expect a local file path rather than an SMB connection string.
- Migrate data from Azure Files to another provider — or the other way around.
RcloneView handles all of these without scripting, PowerShell, or AzCopy.
Adding Azure Files as a Remote
Setting up Azure Files in RcloneView takes under a minute:
- Open RcloneView and click + New Remote.
- Select the Azure Files storage type from the list.
- Enter your Azure Storage account name and account key (or SAS token).
- Name your remote (e.g.,
AzureFileShares) and save.
Your Azure file shares will now appear in the Explorer pane, ready to browse.

Browsing and Managing File Shares
Once connected, RcloneView displays your Azure file shares in a familiar two-pane layout. You can:
- Navigate directories inside any share — drill into nested folders just like a local file manager.
- Preview file metadata such as size, modification date, and path.
- Rename, delete, or create folders directly from the GUI.
- Open a second cloud in the opposite pane for side-by-side management.

Syncing Azure Files with Other Clouds
The real power of RcloneView shows when you connect Azure Files to another cloud. Load Azure Files on one side and your destination — Google Drive, OneDrive, Amazon S3, or any supported remote — on the other.
Drag and Drop
Select files or folders in Azure Files and drag them to the destination pane. RcloneView handles the transfer in the background and shows real-time progress.
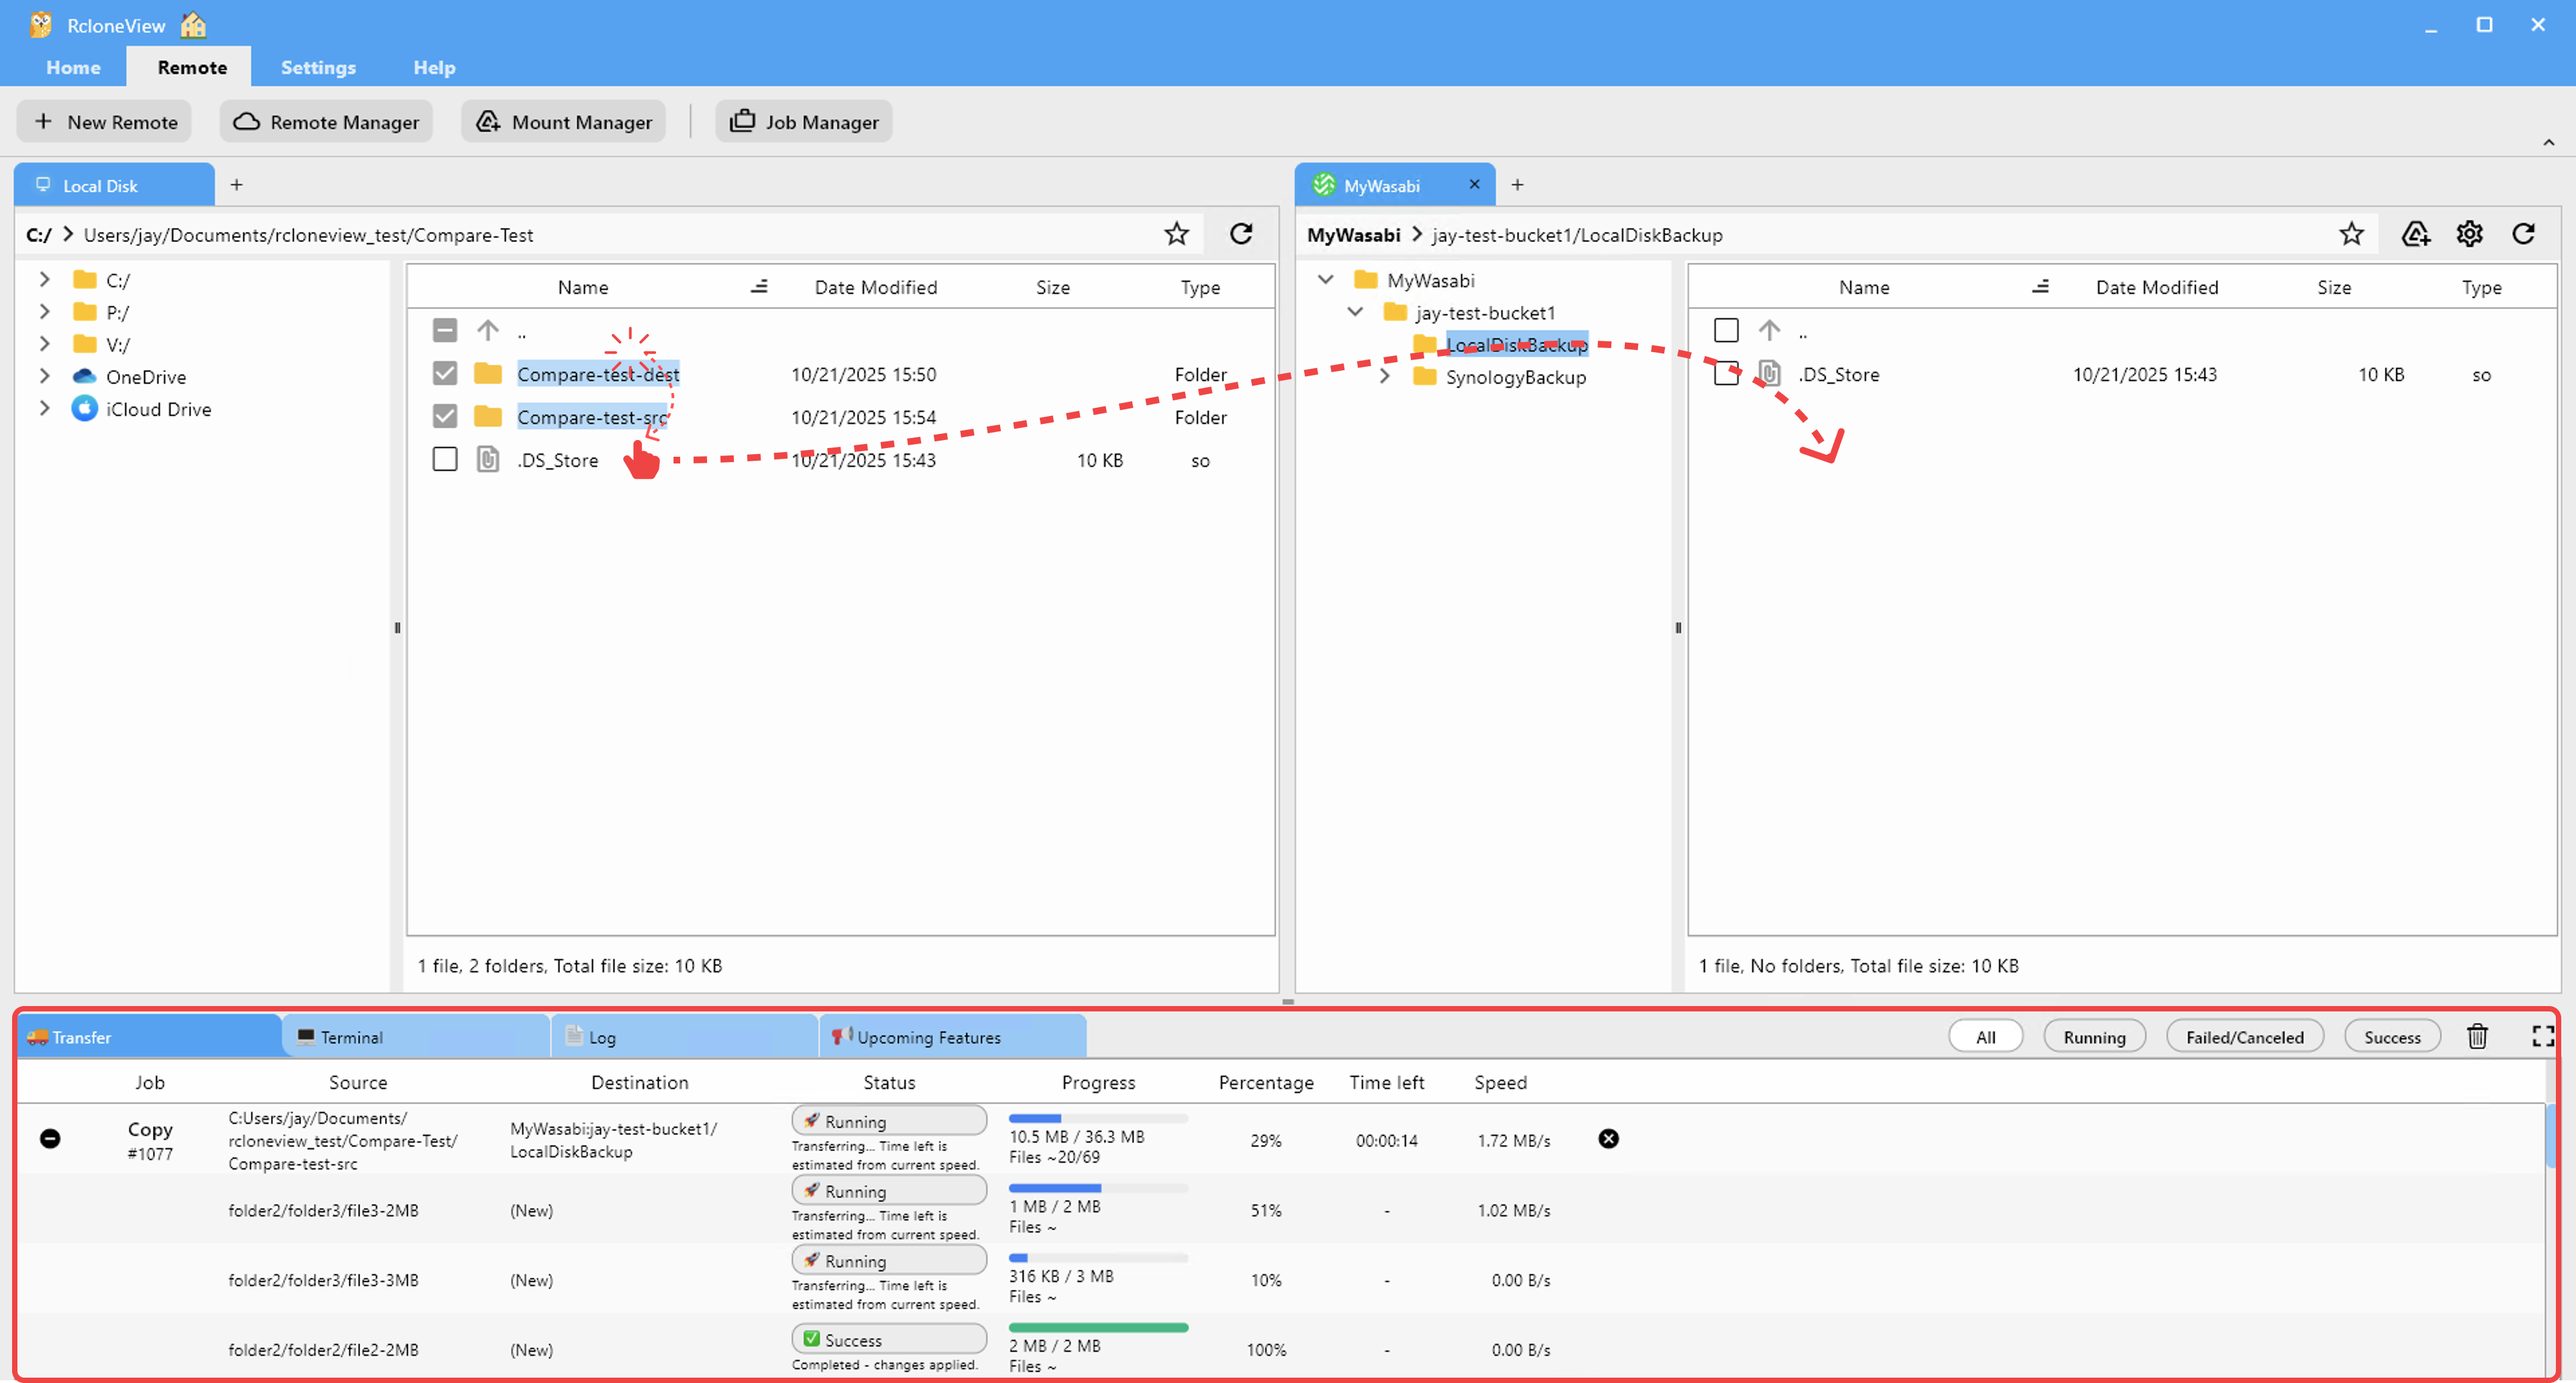
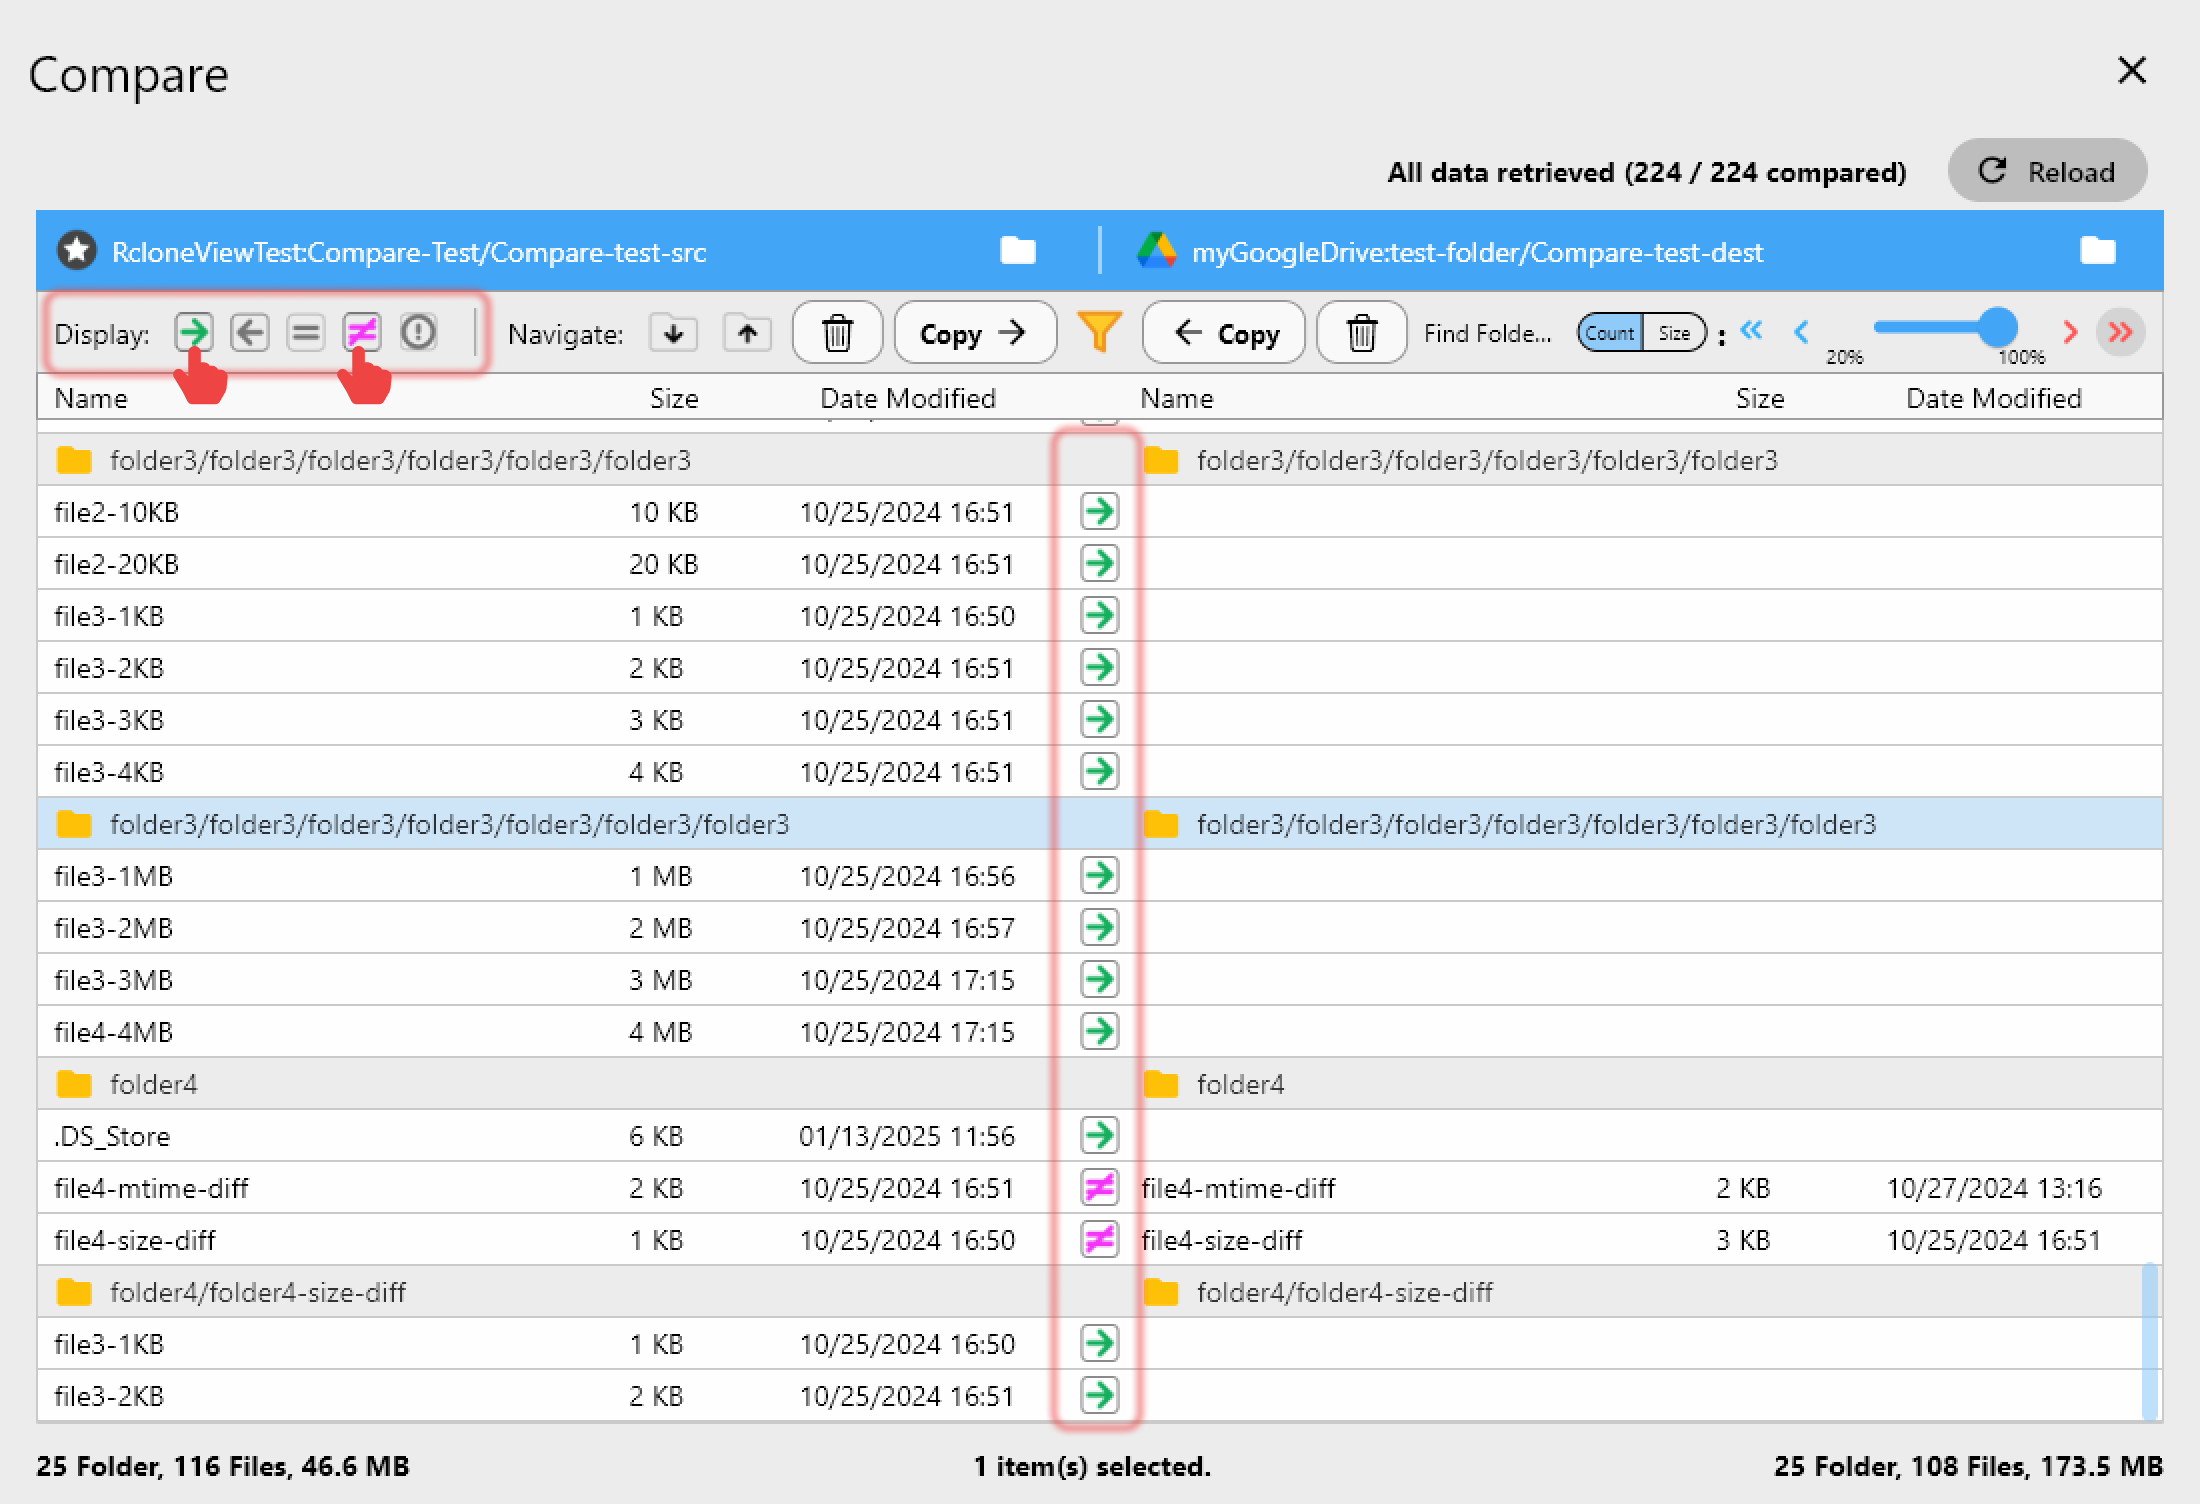
Compare and Selective Copy
Use the Compare feature to see which files are new, changed, or missing on either side. Then copy only the differences — perfect for incremental updates without transferring everything.
Full Sync
Run a Sync operation to make the destination an exact mirror of your Azure file share. Always use Dry Run first to preview what will change before committing.
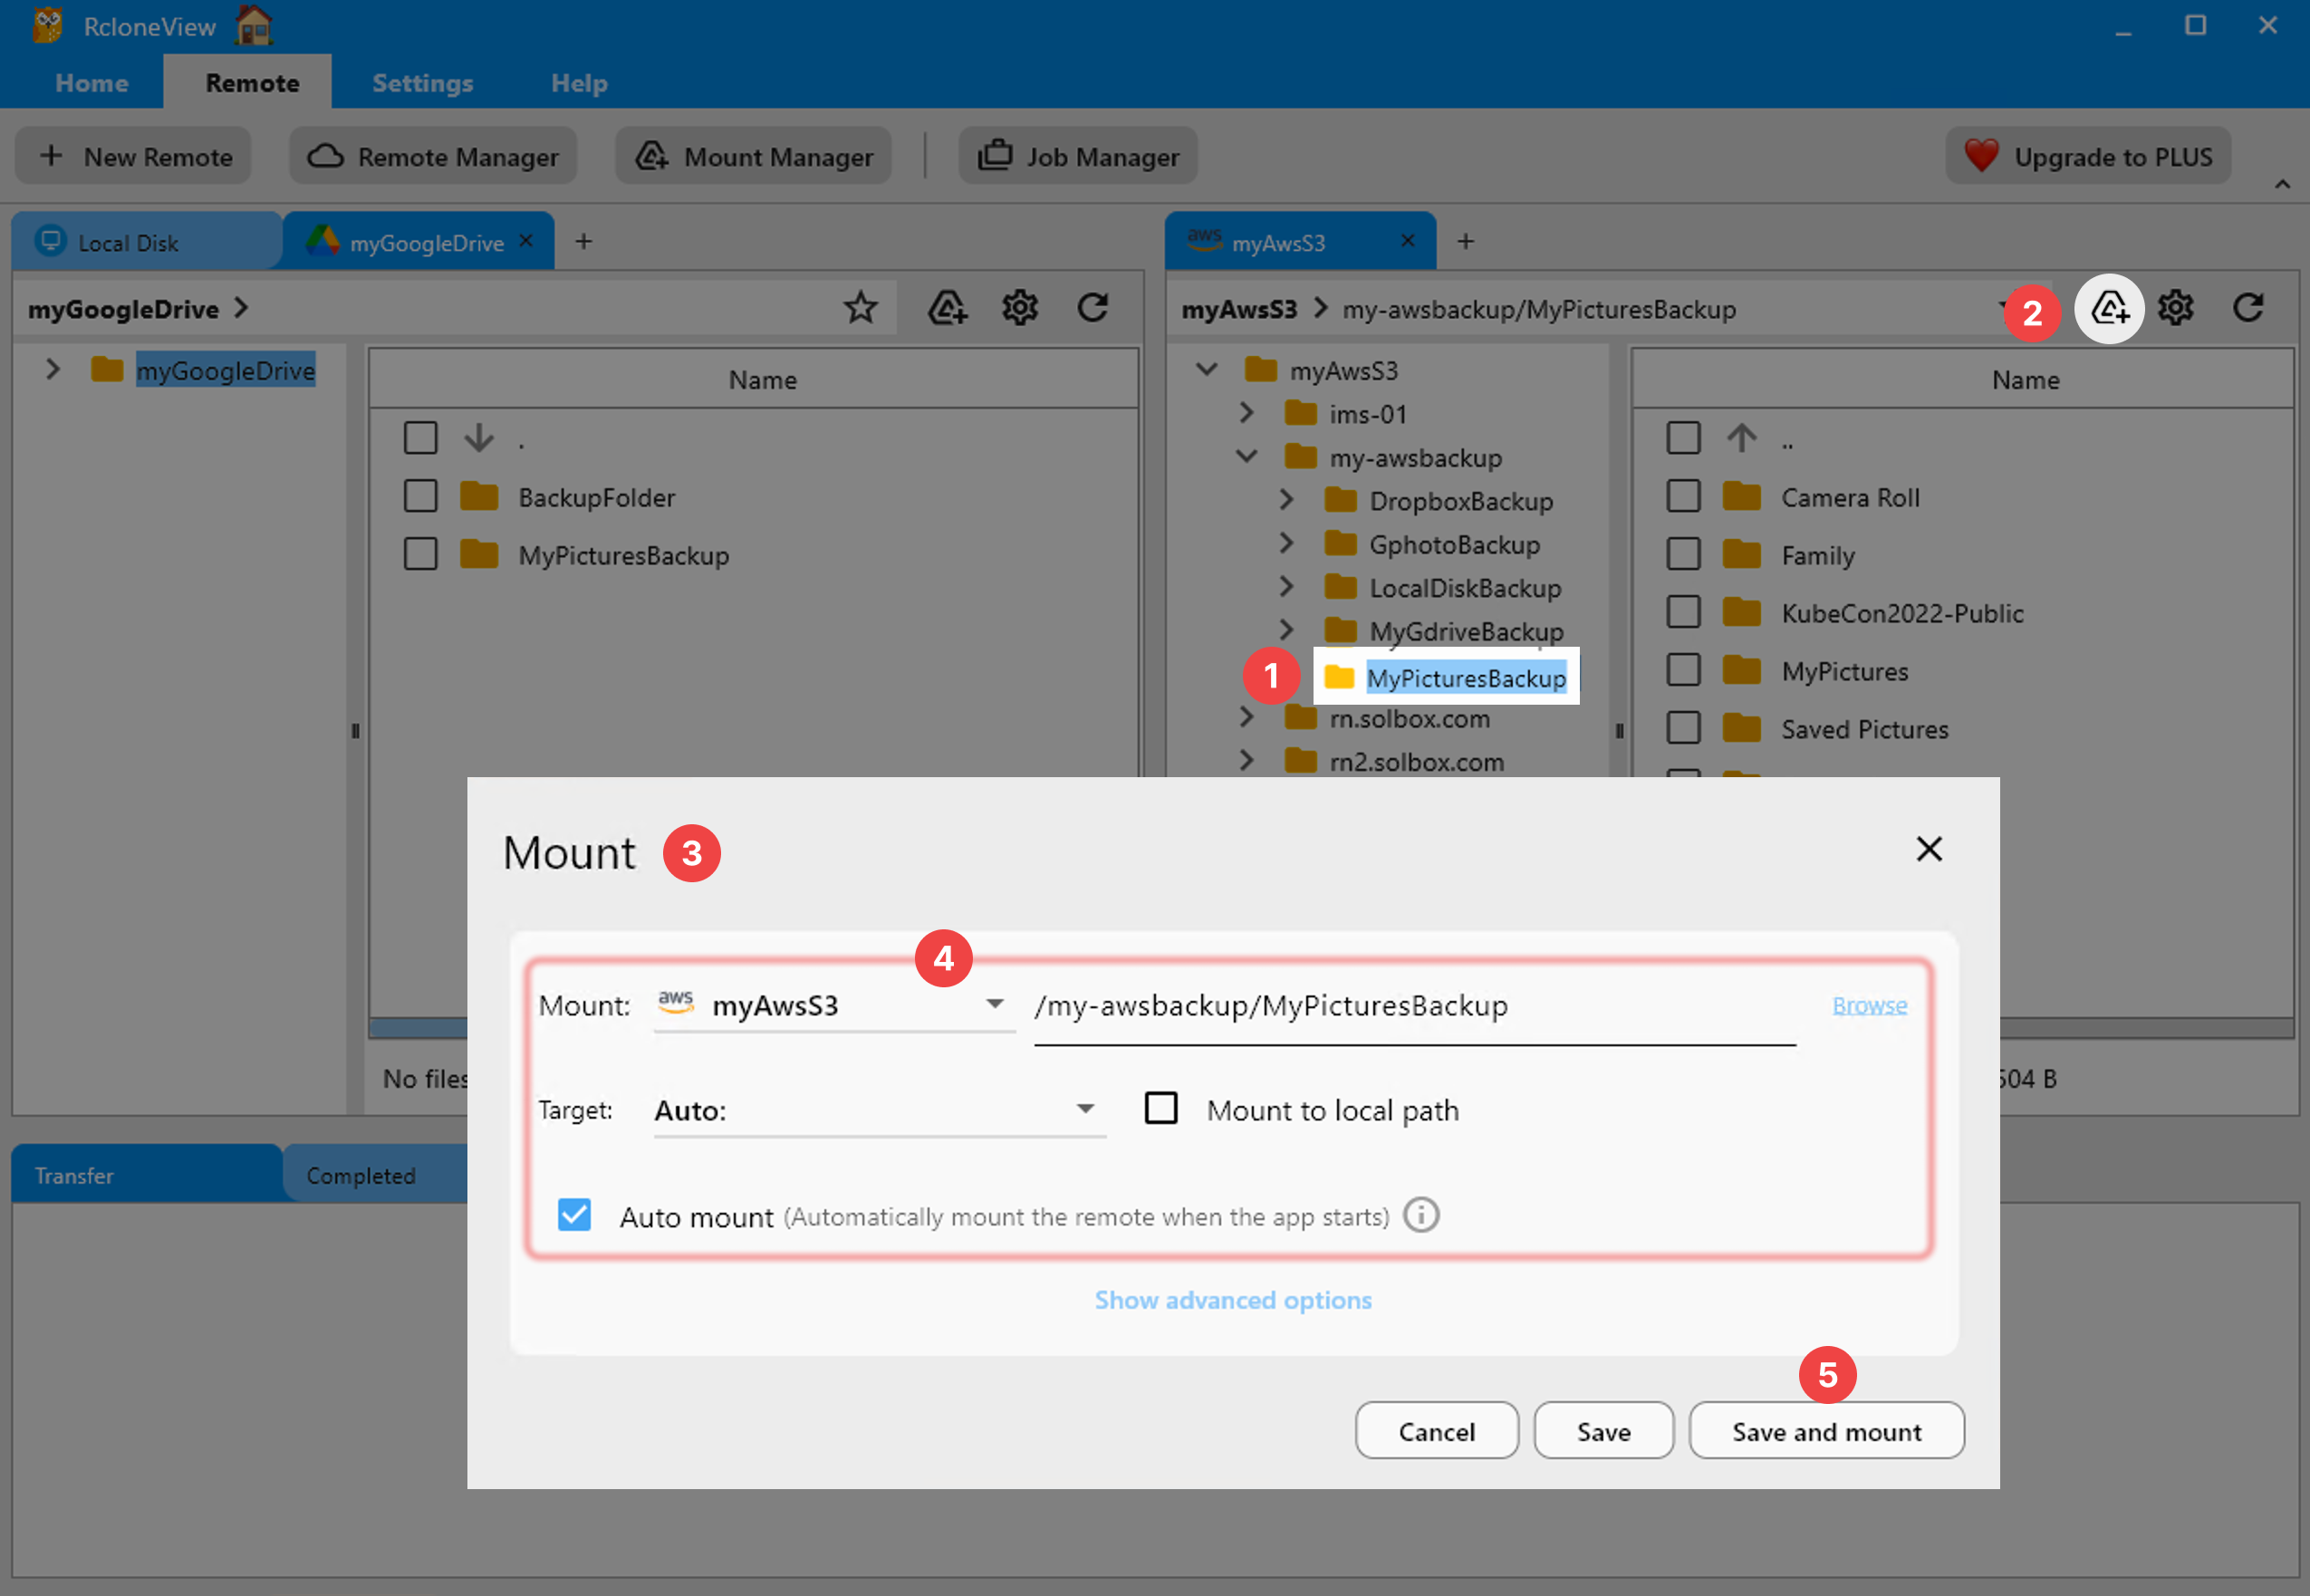
Mounting Azure Files as a Local Drive
RcloneView can mount any Azure file share as a local drive letter on Windows, macOS, or Linux. This is useful when:
- Desktop applications need a local path to read or write files.
- You want to access Azure Files from File Explorer or Finder without an SMB client.
- You need a quick, temporary mount for a one-off task.
Open the remote in the Explorer, right-click a share, and select Mount. Choose your drive letter or mount point, and the share appears as a local volume.
Scheduling Automated Backups
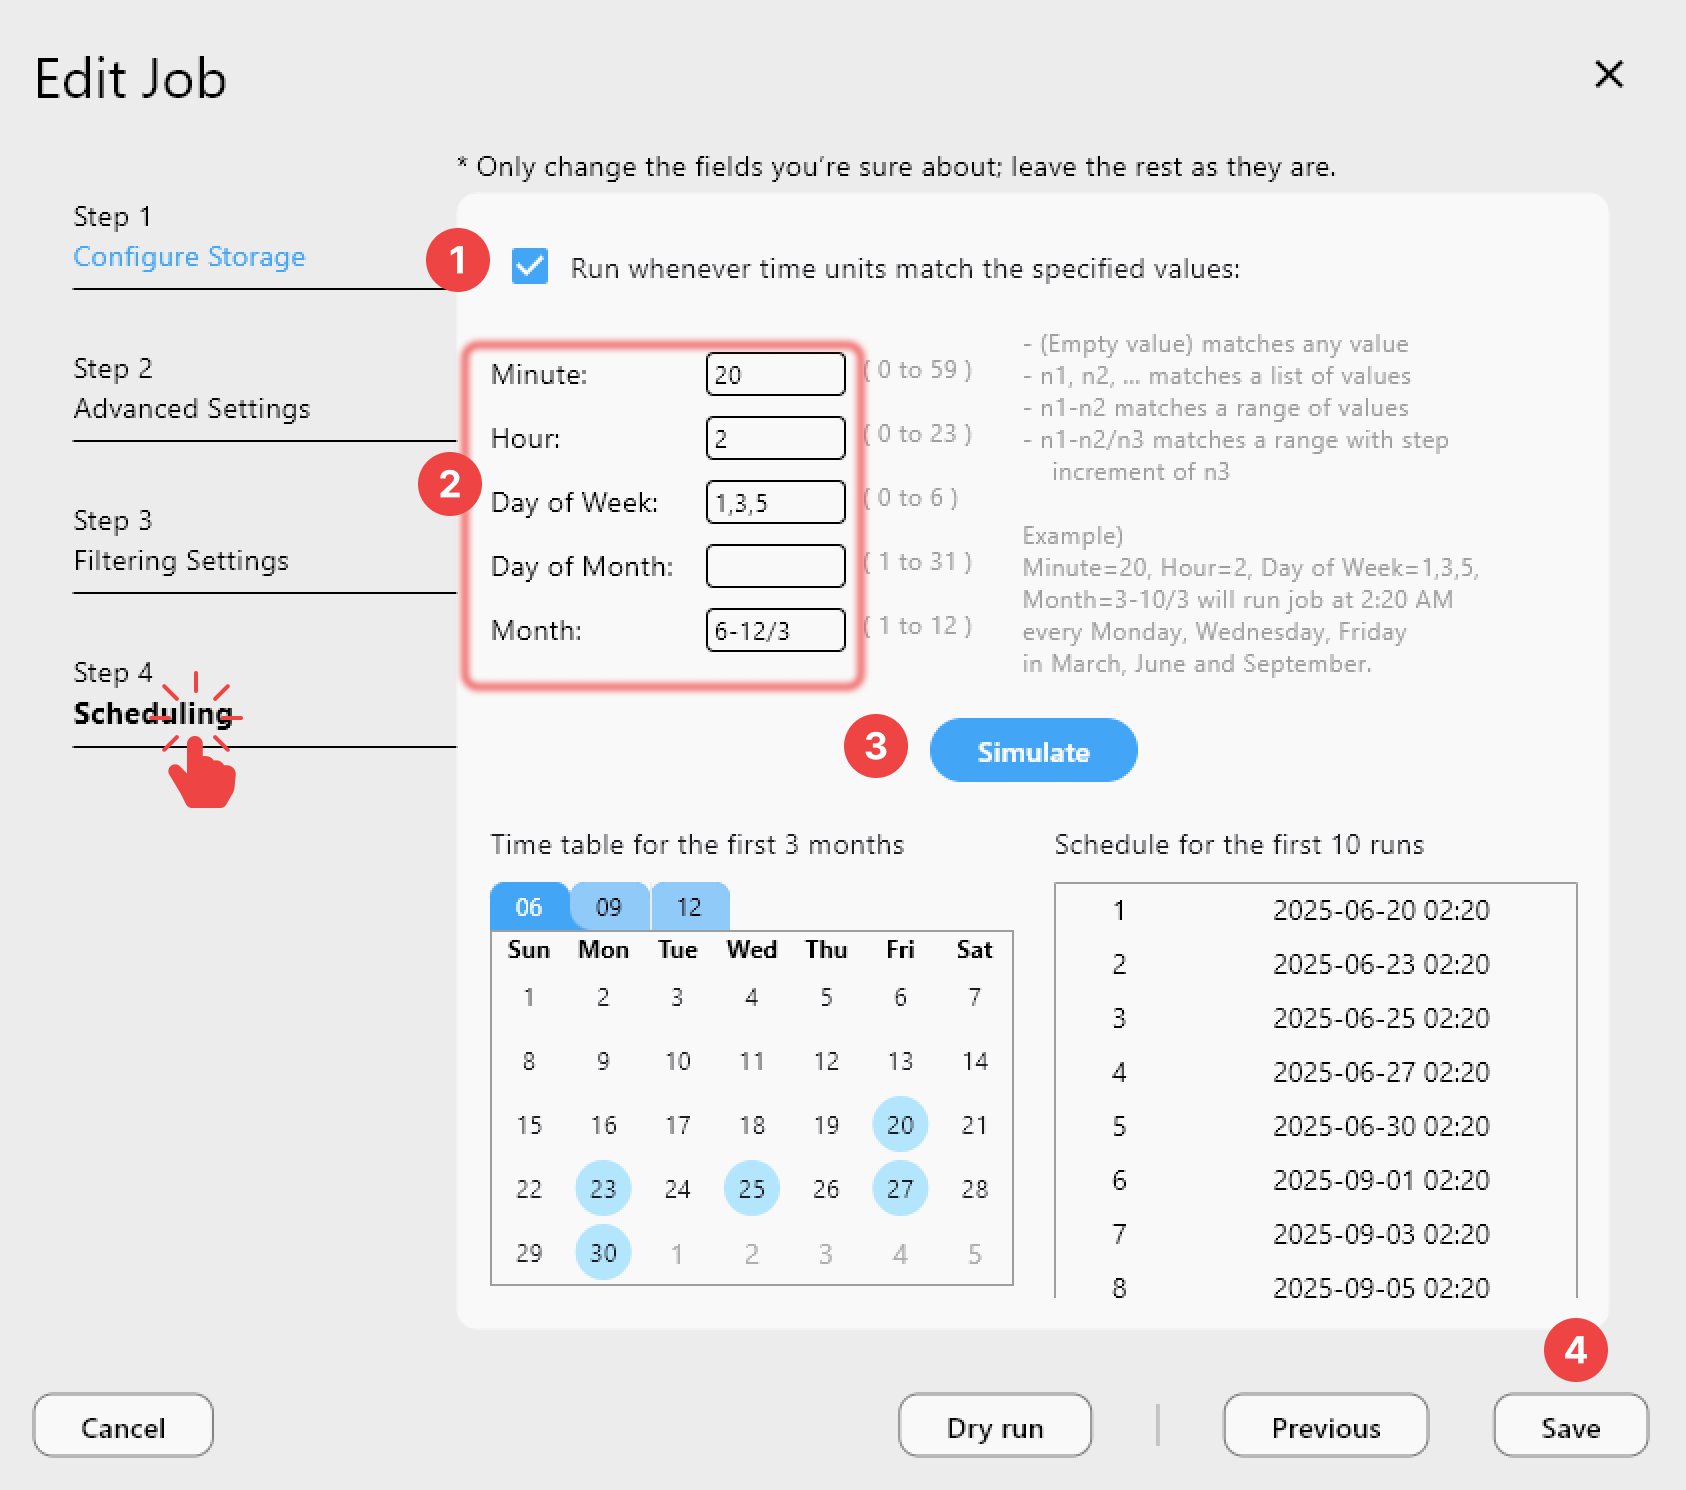
For ongoing protection, create a Scheduled Job in RcloneView:
- Set up a Sync or Copy job from Azure Files to your backup destination.
- Open the Job Scheduling panel and define a schedule — daily, weekly, or a custom cron expression.
- Enable the schedule and let RcloneView handle the rest.
Every run is logged in the Job History panel, so you can audit what was transferred and catch any errors.
Tips for Working with Azure Files
- Use SAS tokens with limited scope if you want to grant RcloneView access without exposing your full account key.
- Monitor transfer sizes — Azure Files charges for storage and transactions; syncing frequently with large deltas can add up.
- Exclude temporary files using RcloneView's filter rules to avoid syncing lock files, logs, or cache directories.
- Test restores periodically by copying a few files back from your backup destination to verify integrity.
Getting Started
- Download RcloneView from rcloneview.com.
- Add your Azure Files remote using your storage account credentials.
- Browse, sync, mount, or schedule — all from the GUI, no CLI required.
Azure Files management does not have to mean portal tabs and PowerShell scripts. RcloneView brings it all into one window.
Related Guides:
- Cloud-to-Cloud Transfers and Syncing with RcloneView
- Migrate Dropbox to Azure Blob Storage with RcloneView
- Manage Google Cloud Storage Buckets with RcloneView